Asus AP110 AP110 User Manual - Page 42
Re-install the CD-ROM, Drive
 |
View all Asus AP110 manuals
Add to My Manuals
Save this manual to your list of manuals |
Page 42 highlights
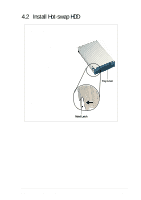
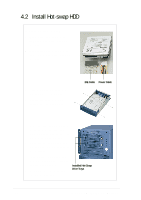
4.5 CD-ROM Drive Re-install the CD-ROM Drive 1. Align the CD-ROM drive to its bay and carefully push it inward until it is flushed to the front panel. 2. Secure the drive with the screws that you removed earlier (two on each side). NOTE: Align the front screw with the hole labeled 1. 3. Connect the IDE cable to the IDE connector at the back of the drive, matching the red pin stripe on the cable with Pin1 on the IDE connector. 4. Connect the power cable labeled P2 to the power connector at the back of the drive. IDE Cable Red Stripe to Pin 1 CD-ROM Screws Align with Hole 1 Power Cable (P2) 42 Chapter 4: Hardware Options
-
 1
1 -
2
-
3
-
4
-
5
-
6
-
7
-
8
-
9
-
10
-
11
-
12
-
13
-
14
-
15
-
16
-
17
-
18
-
19
-
20
-
21
-
22
-
23
-
24
-
25
-
26
-
27
-
28
-
29
-
30
-
31
-
32
-
33
-
34
-
35
-
36
-
 37
37 -
 38
38 -
 39
39 -
 40
40 -
 41
41 -
 42
42 -
 43
43 -
 44
44 -
 45
45 -
 46
46 -
 47
47 -
48
-
49
-
50
 |
 |

42
Chapter 4:
Hardware Options
4.5
CD-ROM Drive
Re-install the CD-ROM
Drive
1.
Align the CD-ROM drive to its
bay and carefully push it
inward until it is flushed to the
front panel.
2.
Secure the drive with the
screws that you removed
earlier (two on each side).
NOTE:
Align the front screw
with the hole labeled 1.
3.
Connect the IDE cable to the
IDE connector at the back of
the drive, matching the red pin
stripe on the cable with Pin1 on
the IDE connector.
4.
Connect the power cable
labeled P2 to the power
connector at the back of the
drive.
Align with Hole 1
CD-ROM
Screws
IDE Cable
Power Cable (P2)
Red Stripe to Pin 1