Asus AP110 AP110 User Manual - Page 41
CD-ROM Drive
 |
View all Asus AP110 manuals
Add to My Manuals
Save this manual to your list of manuals |
Page 41 highlights
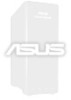
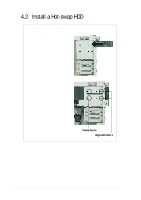
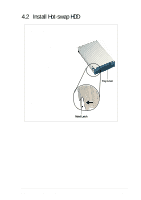
4.5 CD-ROM Drive The server comes with the CD-ROM drive already installed. This section tells how to remove and re-install the CD-ROM drive. You will need to remove the CD-ROM drive for either one of the following reasons: 1. You need to replace the drive 2. You need to remove the motherboard. The CD-ROM drive overlaps with the top right corner of the motherboard, so you can not get it out without moving the drive outward. Remove the CD-ROM Drive 1. Disconnect the power and IDE cables from the drive. 2. Remove the four screws (two on each side) that secure the drive to the chassis. 3. Carefully pull the drive out of the chassis. Power and IDE Cables CD-ROM Screws NOTE If you are doing the above procedure for the purpose of removing the motherboard, you do not have to completely remove the drive from the chassis. Simply pull out the drive for about an inch, or until you can access the motherboard. In this instance, you also have to pull out the hot-swap drive trays because they, too, overlap with the motherboard. Top Right Corner of the Motherboard Hot-swap HHD Trays and CD-ROM Drive Pulled Out AP110 Server User's Manual 41
-
 1
1 -
2
-
3
-
4
-
5
-
6
-
7
-
8
-
9
-
10
-
11
-
12
-
13
-
14
-
15
-
16
-
17
-
18
-
19
-
20
-
21
-
22
-
23
-
24
-
25
-
26
-
27
-
28
-
29
-
30
-
31
-
32
-
33
-
34
-
35
-
 36
36 -
 37
37 -
 38
38 -
 39
39 -
 40
40 -
 41
41 -
 42
42 -
 43
43 -
 44
44 -
 45
45 -
 46
46 -
47
-
48
-
49
-
50
 |
 |
