Asus MAXIMUS VIII EXTREME User Guide - Page 90
Setting up your OC Panel II in Extreme Mode
 |
View all Asus MAXIMUS VIII EXTREME manuals
Add to My Manuals
Save this manual to your list of manuals |
Page 90 highlights
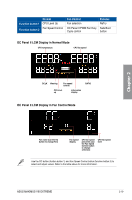
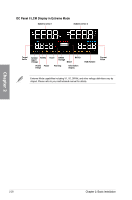
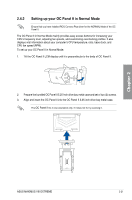
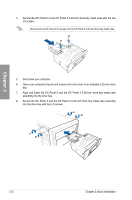
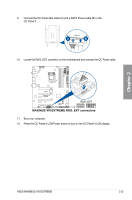
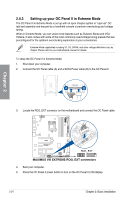
2.4.3 Setting up your OC Panel II in Extreme Mode The OC Panel II in Extreme Mode is set up with an open chassis system or "open-air" OC test bed assembly and enjoyed as a handheld console to perform overclocking and voltage tuning. When in Extreme Mode, you can utilize more features such as Subzero Sense and VGA Hotwire. It also comes with some of the most commonly used voltage tuning presets that are preconfigured for the optimum overclocking experience at your convenience. Extreme Mode capabilities including V1, V2, DRAM, and other voltage definitions vary by chipset. Please refer to your motherboard manual for details. To setup the OC Panel II in Extreme Mode: 1. Shut down your computer. 2. Connect the OC Panel cable (A) and a SATA Power cable (B) to the OC Panel II. 3. Locate the ROG_EXT connector on the motherboard and connect the OC Panel cable. Chapter 2 4. Boot your computer. 5. Press the OC Panel II power button to turn on the OC Panel II LCM display. 2-24 Chapter 2: Basic Installation
-
 1
1 -
2
-
3
-
4
-
5
-
6
-
7
-
8
-
9
-
10
-
11
-
12
-
13
-
14
-
15
-
16
-
17
-
18
-
19
-
20
-
21
-
22
-
23
-
24
-
25
-
26
-
27
-
28
-
29
-
30
-
31
-
32
-
33
-
34
-
35
-
36
-
37
-
38
-
39
-
40
-
41
-
42
-
43
-
44
-
45
-
46
-
47
-
48
-
49
-
50
-
51
-
52
-
53
-
54
-
55
-
56
-
57
-
58
-
59
-
60
-
61
-
62
-
63
-
64
-
65
-
66
-
67
-
68
-
69
-
70
-
71
-
72
-
73
-
74
-
75
-
76
-
77
-
78
-
79
-
80
-
81
-
82
-
83
-
84
-
 85
85 -
 86
86 -
 87
87 -
 88
88 -
 89
89 -
 90
90 -
 91
91 -
 92
92 -
 93
93 -
 94
94 -
 95
95 -
96
-
97
-
98
-
99
-
100
-
101
-
102
-
103
-
104
-
105
-
106
-
107
-
108
-
109
-
110
-
111
-
112
-
113
-
114
-
115
-
116
-
117
-
118
-
119
-
120
-
121
-
122
-
123
-
124
-
125
-
126
-
127
-
128
-
129
-
130
-
131
-
132
-
133
-
134
-
135
-
136
-
137
-
138
-
139
-
140
-
141
-
142
-
143
-
144
-
145
-
146
-
147
-
148
-
149
-
150
-
151
-
152
-
153
-
154
-
155
-
156
-
157
-
158
-
159
-
160
-
161
-
162
-
163
-
164
-
165
-
166
-
167
-
168
-
169
-
170
-
171
-
172
-
173
-
174
-
175
-
176
-
177
-
178
-
179
-
180
-
181
-
182
-
183
-
184
-
185
-
186
-
187
-
188
-
189
-
190
-
191
-
192
-
193
-
194
-
195
-
196
-
197
-
198
-
199
-
200
-
201
-
202
-
203
-
204
-
205
-
206
-
207
-
208
-
209
-
210
-
211
-
212
-
213
-
214
-
215
-
216
-
217
-
218
-
219
-
220
-
221
-
222
-
223
-
224
-
225
-
226
 |
 |
