Asus P8B75-M LX PLUS P8B75-M LX PLUS User's Manual - Page 48
ASUS BIOS Updater
 |
View all Asus P8B75-M LX PLUS manuals
Add to My Manuals
Save this manual to your list of manuals |
Page 48 highlights
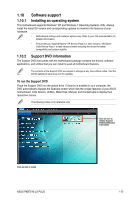
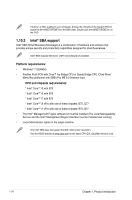
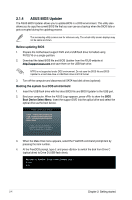
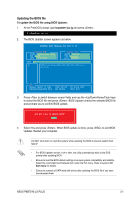
2.1.4 ASUS BIOS Updater The ASUS BIOS Updater allows you to update BIOS in a DOS environment. This utility also allows you to copy the current BIOS file that you can use as a backup when the BIOS fails or gets corrupted during the updating process. The succeeding utility screens are for reference only. The actual utility screen displays may not be same as shown. Before updating BIOS 1. Prepare the motherboard support DVD and a USB flash drive formatted using FAT32/16 on a single partition. 2. Download the latest BIOS file and BIOS Updater from the ASUS website at http://support.asus.com and save them on the USB flash drive. NTFS is not supported under DOS environment. Do not save the BIOS file and BIOS Updater to a hard disk drive or USB flash drive in NTFS format. 3. Turn off the computer and disconnect all SATA hard disk drives (optional). Booting the system to a DOS environment 1. Insert the USB flash drive with the latest BIOS file and BIOS Updater to the USB port. 2. Boot your computer. When the ASUS Logo appears, press to show the BIOS Boot Device Select Menu. Insert the support DVD into the optical drive and select the optical drive as the boot device. 3. When the Make Disk menu appears, select the FreeDOS command prompt item by pressing the item number. 4. At the FreeDOS prompt, type d: and press to switch the disk from Drive C (optical drive) to Drive D (USB flash drive). 2-4 Chapter 2: Getting started
-
 1
1 -
2
-
3
-
4
-
5
-
6
-
7
-
8
-
9
-
10
-
11
-
12
-
13
-
14
-
15
-
16
-
17
-
18
-
19
-
20
-
21
-
22
-
23
-
24
-
25
-
26
-
27
-
28
-
29
-
30
-
31
-
32
-
33
-
34
-
35
-
36
-
37
-
38
-
39
-
40
-
41
-
42
-
 43
43 -
 44
44 -
 45
45 -
 46
46 -
 47
47 -
 48
48 -
 49
49 -
 50
50 -
 51
51 -
 52
52 -
 53
53 -
54
-
55
-
56
-
57
-
58
-
59
-
60
-
61
-
62
-
63
-
64
-
65
-
66
-
67
-
68
-
69
-
70
-
71
-
72
-
73
-
74
-
75
-
76
-
77
-
78
-
79
-
80
 |
 |