Asus P8Z77-V PREMIUM P8Z77-V PREMIUM User's Manual - Page 196
Start, Programs, Accessories, Command Prompt tool, diskpart, list disk, select disk x
 |
View all Asus P8Z77-V PREMIUM manuals
Add to My Manuals
Save this manual to your list of manuals |
Page 196 highlights
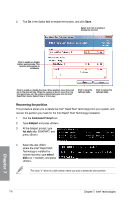
6. To launch the disk partitioning tool, click Start > Programs > Accessories > Command Prompt tool. 7. Type diskpart and press . 8. In the diskpart prompt, type list disk after DISKPART, and press . Select the disk with the unallocated volume by typing select disk x (x = disk number), and press . • The value "x" refers to a disk number where you created the unallocated partition. • Refer to step 5 for details about the unallocated disk space in the SSD. 9. Type create partition primary, and press . 10. After creating a primary partition, type detail disk, and press to view the details of the partitioned disk. 11. Select the RAW volume which has the same size as the shrinked volume, type select volume x (x = number), and press Enter to store the Intel® Rapid Start partition. The value "x" refers to a disk number where you want to create the store partition. Chapter 7 7-6 Chapter 7: Intel® technologies
-
 1
1 -
2
-
3
-
4
-
5
-
6
-
7
-
8
-
9
-
10
-
11
-
12
-
13
-
14
-
15
-
16
-
17
-
18
-
19
-
20
-
21
-
22
-
23
-
24
-
25
-
26
-
27
-
28
-
29
-
30
-
31
-
32
-
33
-
34
-
35
-
36
-
37
-
38
-
39
-
40
-
41
-
42
-
43
-
44
-
45
-
46
-
47
-
48
-
49
-
50
-
51
-
52
-
53
-
54
-
55
-
56
-
57
-
58
-
59
-
60
-
61
-
62
-
63
-
64
-
65
-
66
-
67
-
68
-
69
-
70
-
71
-
72
-
73
-
74
-
75
-
76
-
77
-
78
-
79
-
80
-
81
-
82
-
83
-
84
-
85
-
86
-
87
-
88
-
89
-
90
-
91
-
92
-
93
-
94
-
95
-
96
-
97
-
98
-
99
-
100
-
101
-
102
-
103
-
104
-
105
-
106
-
107
-
108
-
109
-
110
-
111
-
112
-
113
-
114
-
115
-
116
-
117
-
118
-
119
-
120
-
121
-
122
-
123
-
124
-
125
-
126
-
127
-
128
-
129
-
130
-
131
-
132
-
133
-
134
-
135
-
136
-
137
-
138
-
139
-
140
-
141
-
142
-
143
-
144
-
145
-
146
-
147
-
148
-
149
-
150
-
151
-
152
-
153
-
154
-
155
-
156
-
157
-
158
-
159
-
160
-
161
-
162
-
163
-
164
-
165
-
166
-
167
-
168
-
169
-
170
-
171
-
172
-
173
-
174
-
175
-
176
-
177
-
178
-
179
-
180
-
181
-
182
-
183
-
184
-
185
-
186
-
187
-
188
-
189
-
190
-
 191
191 -
 192
192 -
 193
193 -
 194
194 -
 195
195 -
 196
196 -
 197
197 -
 198
198 -
 199
199 -
 200
200 -
 201
201 -
202
-
203
-
204
-
205
-
206
-
207
-
208
 |
 |
