Asus P8Z77-V PREMIUM P8Z77-V PREMIUM User's Manual - Page 198
Recovering the partition, Command Prompt, diskpart, list disk, select, disk x
 |
View all Asus P8Z77-V PREMIUM manuals
Add to My Manuals
Save this manual to your list of manuals |
Page 198 highlights
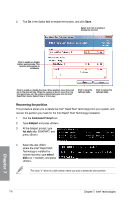
2. Tick On in the Status field to enable the function, and click Save. Select and click to enable or disable the function Click to enable or disable battery saving mode. This function only applies to notebooks. Click to enable or disable the timer. When enabled, move the scroll bar to the desired time. When the system is idle for more than the time period you set, the system automatically goes into the Intel® Rapid Start mode. Default time is 10 minutes. Click to save the settings made. Click to cancel the settings made. Recovering the partition This procedure allows you to delete the Intel® Rapid Start Technology from your system, and recover the partition you made for the Intel Rapid® Start Technology installation. 1. Run the Command Prompt tool. 2. Type diskpart and press . 3. At the diskpart prompt, type list disk after DISKPART, and press . 4. Select the disk (SSD) where the Intel® Rapid Start Technology is installed for volume recovery, type select disk x (x = number), and press . The value "x" refers to a disk number where you want to delete the store partition. 7-8 Chapter 7: Intel® technologies Chapter 7
-
 1
1 -
2
-
3
-
4
-
5
-
6
-
7
-
8
-
9
-
10
-
11
-
12
-
13
-
14
-
15
-
16
-
17
-
18
-
19
-
20
-
21
-
22
-
23
-
24
-
25
-
26
-
27
-
28
-
29
-
30
-
31
-
32
-
33
-
34
-
35
-
36
-
37
-
38
-
39
-
40
-
41
-
42
-
43
-
44
-
45
-
46
-
47
-
48
-
49
-
50
-
51
-
52
-
53
-
54
-
55
-
56
-
57
-
58
-
59
-
60
-
61
-
62
-
63
-
64
-
65
-
66
-
67
-
68
-
69
-
70
-
71
-
72
-
73
-
74
-
75
-
76
-
77
-
78
-
79
-
80
-
81
-
82
-
83
-
84
-
85
-
86
-
87
-
88
-
89
-
90
-
91
-
92
-
93
-
94
-
95
-
96
-
97
-
98
-
99
-
100
-
101
-
102
-
103
-
104
-
105
-
106
-
107
-
108
-
109
-
110
-
111
-
112
-
113
-
114
-
115
-
116
-
117
-
118
-
119
-
120
-
121
-
122
-
123
-
124
-
125
-
126
-
127
-
128
-
129
-
130
-
131
-
132
-
133
-
134
-
135
-
136
-
137
-
138
-
139
-
140
-
141
-
142
-
143
-
144
-
145
-
146
-
147
-
148
-
149
-
150
-
151
-
152
-
153
-
154
-
155
-
156
-
157
-
158
-
159
-
160
-
161
-
162
-
163
-
164
-
165
-
166
-
167
-
168
-
169
-
170
-
171
-
172
-
173
-
174
-
175
-
176
-
177
-
178
-
179
-
180
-
181
-
182
-
183
-
184
-
185
-
186
-
187
-
188
-
189
-
190
-
191
-
192
-
 193
193 -
 194
194 -
 195
195 -
 196
196 -
 197
197 -
 198
198 -
 199
199 -
 200
200 -
 201
201 -
 202
202 -
 203
203 -
204
-
205
-
206
-
207
-
208
 |
 |
