Asus TS300-E5 User Guide - Page 164
RAID 10 Stripe/Mirror
 |
UPC - 610839652525
View all Asus TS300-E5 manuals
Add to My Manuals
Save this manual to your list of manuals |
Page 164 highlights
3. Press 2 on the Main Menu screen to display the Define LD Menu (below). 4. Press the arrow keys to highlight an logical drive number you want to define and press Enter to select it. The Define Ld Menu for the logical drive number you selected will next appear (below). 5. 6-46 Choose the RAID Level you want. In the Define LD Menu section, press the Spacebar to toggle through logical drive types: • RAID 0 (Stripe) • RAID 1 (Mirror) • RAID 5 (Distributed Parity) • RAID 10 (Stripe/Mirror) • JBOD (Single Drive) Chapter 6: RAID configuration
-
 1
1 -
2
-
3
-
4
-
5
-
6
-
7
-
8
-
9
-
10
-
11
-
12
-
13
-
14
-
15
-
16
-
17
-
18
-
19
-
20
-
21
-
22
-
23
-
24
-
25
-
26
-
27
-
28
-
29
-
30
-
31
-
32
-
33
-
34
-
35
-
36
-
37
-
38
-
39
-
40
-
41
-
42
-
43
-
44
-
45
-
46
-
47
-
48
-
49
-
50
-
51
-
52
-
53
-
54
-
55
-
56
-
57
-
58
-
59
-
60
-
61
-
62
-
63
-
64
-
65
-
66
-
67
-
68
-
69
-
70
-
71
-
72
-
73
-
74
-
75
-
76
-
77
-
78
-
79
-
80
-
81
-
82
-
83
-
84
-
85
-
86
-
87
-
88
-
89
-
90
-
91
-
92
-
93
-
94
-
95
-
96
-
97
-
98
-
99
-
100
-
101
-
102
-
103
-
104
-
105
-
106
-
107
-
108
-
109
-
110
-
111
-
112
-
113
-
114
-
115
-
116
-
117
-
118
-
119
-
120
-
121
-
122
-
123
-
124
-
125
-
126
-
127
-
128
-
129
-
130
-
131
-
132
-
133
-
134
-
135
-
136
-
137
-
138
-
139
-
140
-
141
-
142
-
143
-
144
-
145
-
146
-
147
-
148
-
149
-
150
-
151
-
152
-
153
-
154
-
155
-
156
-
157
-
158
-
 159
159 -
 160
160 -
 161
161 -
 162
162 -
 163
163 -
 164
164 -
 165
165 -
 166
166 -
 167
167 -
 168
168 -
 169
169 -
170
-
171
-
172
-
173
-
174
-
175
-
176
-
177
-
178
-
179
-
180
-
181
-
182
-
183
-
184
-
185
-
186
-
187
-
188
-
189
-
190
-
191
-
192
-
193
-
194
-
195
-
196
-
197
-
198
-
199
-
200
-
201
-
202
-
203
-
204
-
205
-
206
-
207
-
208
 |
 |

6-46
Chapter 6: RAID configuration
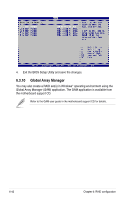
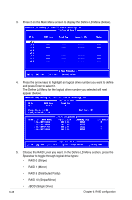
4.
Press the arrow keys to highlight an logical drive number you want to define
and press Enter to select it.
The Define Ld Menu for the logical drive number you selected will next
appear (below).
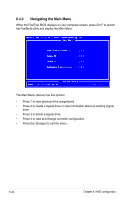
5.
Choose the RAID Level you want. In the Define LD Menu section, press the
Spacebar to toggle through logical drive types:
•
RAID 0 (Stripe)
•
RAID 1 (Mirror)
•
RAID 5 (Distributed Parity)
•
RAID 10 (Stripe/Mirror)
•
JBOD (Single Drive)
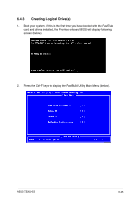
3.
Press 2 on the Main Menu screen to display the Define LD Menu (below).