Audiovox ECCO Owners Guide - Page 4
Power On to Ready Mode - personal gps
 |
View all Audiovox ECCO manuals
Add to My Manuals
Save this manual to your list of manuals |
Page 4 highlights
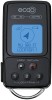
Before You Begin Note: The distance and times provided in this instruction guide are approximate measurements. Charge the Battery It takes 1.5 hours to fully charge the battery. The charge lasts 10 hours with typical use during active tracking or 16 days on standby. 1. Connect the charging cable into the USB port (e4) from one of the following power sources: AC outlet, personal computer USB port, (see "Power Source Specifications" on page 12). 2. The LCD backlight turns on, the battery strength indicator (d2) appears on the LCD and the green LED indicator (e1) blinks. After 5 seconds the backlight turns off. 3. When charged, the battery strength indicator (d2) is full, and the green LED indicator (e1) light is steady. 4. Disconnect the charging cable from the USB port (e4). The features cannot be accessed while connected to the charging cable. The unit displays the battery charge level in all modes, except when the latitude/longitude/satellite information is displayed. It is recommended to recharge when the bars across the battery strength indicator (d2) are at 25% or less. Power On to Ready Mode 1. Press and hold return (e3) for 2-3 seconds. The LCD backlight turns on and the start-up screen appears. 2. The unit immediately starts acquiring GPS data, indicated by the blinking green LED indicator (e1), and the LCD displaying a blinking satellite icon and the message Searching. 3. When your current position is determined, the green LED indicator (e1) is steady, the LCD satellite icon disappears and a sequence of messages appears: Initializing > Ready. Page 4 4/12 128-8854
-
 1
1 -
 2
2 -
 3
3 -
 4
4 -
 5
5 -
 6
6 -
 7
7 -
 8
8 -
 9
9 -
 10
10 -
11
-
12
 |
 |