Bissell Pet Hair Eraser® Cyclonic Canister Vacuum 66T6 User Guide - Engli - Page 5
Warning
 |
View all Bissell Pet Hair Eraser® Cyclonic Canister Vacuum 66T6 manuals
Add to My Manuals
Save this manual to your list of manuals |
Page 5 highlights
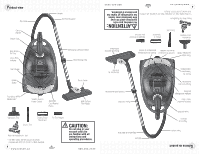
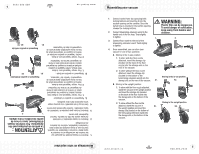
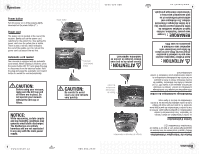
www.bissell.ca 5 800.263.2535 vacuum. the storage slot on the bottom of the the telescoping extension wand) into storage clip (located on the bottom of the upright position and insert the attached, stand the vacuum in B1. 2. To store without the floor nozzle B. Storing in the upright position: 1. To store with the floor nozzle attached, stand the vacuum in the upright position and insert the storage clip (located on the back of the floor nozzle) into the storage slot on the bottom of the vacuum. 4. Once assembled, you can store your vacuum in one of two positions: A. Storing in the in-use position: 1. To store with the floor nozzle attached, insert the storage clip (located on the back of the floor nozzle) into the storage slot on the rear of the vacuum. 2. To store without the floor nozzle attached, insert the storage clip (located on the bottom of the telescoping extension wand) into the storage slot on the rear of the vacuum. A1. WARNING: Plastic film can be dangerous. To avoid danger of suffocation, keep away from babies and children. 2. 3. Storing in the in-use position A2. Storing in the upright position B2. Assemblage de votre aspirateur 1. Branchez le tuyau pivotant en appuyant sur les boutons de verrouillage et en insérant le tuyau dans l'ouverture d'aspiration de l'appareil. Une fois que le tuyau pivotant est inséré dans l'ouverture d'aspiration, relâchez les boutons de verrouillage. 2. Branchez le tuyau extensible à l'extrémité du tuyau souple du côté du manche. Tournez légèrement pour serrer. 3. Branchez la buse pour plancher à l'extrémité du tuyau extensible. Tournez légèrement pour serrer. ATTENTION : La pellicule de plastique peut être dangereuse. Pour éviter les risques d'étouffement, tenez-la hors de portée des bébés et des enfants. 1. 2. 4. Une fois qu'il est assemblé, vous pouvez ranger votre aspirateur dans deux positions. A. Rangement en position d'utilisation : 1. Pour ranger l'appareil avec la buse fixée dessus, insérez le support de rangement (situé à l'arrière de la buse) dans la fente de rangement à l'arrière de l'aspirateur. 2. Pour ranger l'appareil sans la buse, insérez le support de rangement (situé au bas du tuyau extensible) dans la fente de rangement à l'arrière de l'aspirateur. B. Rangement en position verticale : 1. Pour ranger l'appareil avec la buse fixée dessus, mettez l'appareil en position verticale et insérez le support de rangement (situé à l'arrière de la buse) dans la fente de rangement au bas de l'aspirateur. 3. Rangement en position d'utilisation A1. A2. 2. Pour ranger l'appareil sans la buse, mettez l'appareil en position verticale et insérez le support de rangement (situé au bas du tuyau extensible) dans la fente de rangement au bas de l'aspirateur. B1. Rangement en position verticale B2. to tighten. telescoping extension wand. Twist slightly 3. Connect floor nozzle to the end of the 1. to tighten. handle end of the flex hose. Twist slightly 2. Connect telescoping extension wand to the 1. Connect swivel hose by squeezing both locking buttons and inserting it into the suction opening on the canister. Once the swivel hose is inserted in the suction opening, release the locking buttons. Assembling your vacuum www.bissell.ca 5 800.263.2535
-
 1
1 -
 2
2 -
 3
3 -
 4
4 -
 5
5 -
 6
6 -
 7
7 -
 8
8 -
 9
9 -
 10
10 -
 11
11 -
12
-
13
-
14
-
15
-
16
 |
 |
