Bosch HES7132U Use & Care Manual - Page 35
Care and Cleaning - Oven
 |
UPC - 825225842439
View all Bosch HES7132U manuals
Add to My Manuals
Save this manual to your list of manuals |
Page 35 highlights
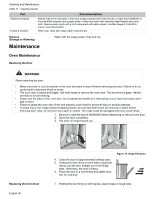
Table 10: Cooktop Care Chart Type of Soil Burned-on food soil, dark streaks, and specks Greasy spatters Metal marks: Iridescent stain Hard Water Spots - Hot cooking liquids dripped on surface Surface scratches - Small scratches are to be expected on the glass surface, but do not affect cooking. In time, small scratches will become smoother and much less noticeable with daily use of the glass ceramic cooktop cleaner. Cleaning and Maintenance Possible Solution Soften by laying a damp paper towel or sponge on top of soil for about 30 minutes. Use a plastic scrubber and glass ceramic cooktop cleaner or use the razor blade scraper. Rinse and dry. Use a soapy sponge or cloth to remove grease; rinse thoroughly and dry. Apply glass ceramic cooktop cleaner. Pans with aluminum, copper or stainless steel bases may leave marks. Treat immediately after surface has cooled with glass ceramic cooktop cleaner. If this does not remove the marks, try a mild abrasive (Bon Ami®, Soft Scrub® without bleach) with a dampened paper towel. Rinse and reapply creme. Failure to remove metal marks before the next heating makes removal very difficult. The minerals in some water can be transferred onto the surface and cause stains. Use undiluted white vinegar, rinse and dry. Recondition with glass ceramic cooktop cleaner. Apply Cleaning Creme before using to remove sand-like grains and grit such as salt and seasoning. Can be reduced by using pans with bases that are smooth, clean, and dry before use. Use recommended glass ceramic cooktop cleaner daily on the cooktop. Care and Cleaning - Oven Self Cleaning the Oven Our ovens feature a self-cleaning function that eliminates the manual labor involved with cleaning your oven. During self-cleaning, the oven uses a very high temperature to burn away food soil and grease. • Do not clean parts or accessories in the self-clean oven. • It is common to see smoke and/or an occasional flame-up during the Self- Clean cycle, depending on the content and amount of soil remaining in the oven. If a flame persists, turn off the oven and allow it to cool before opening the door to wipe up the excessive food soil. • The oven door locks at the beginning of the self-clean cycle. • The oven light does not operate during this mode. • During Self-Clean, the kitchen should be well ventilated to help eliminate odors associated with Self-Clean. Odors will lessen with use. • Four hours is the preset length of cleaning. The range can also be set to clean for 3 or 5 hours. • The mode automatically stops at the end of the clean hours. • When the oven cools after cleaning, the automatic door lock will release and the door can be opened. • To cancel or stop while the mode is operating, press OFF. • The door will not unlock until the oven reaches a safe temperature. Preparing the Oven for Self Clean WARNING A flexible door gasket is necessary for a good seal. Do not clean, rub, damage or move the gasket. 1. Remove all utensils and bakeware. 2. Remove oven racks. If oven racks are left in the oven during the self-clean cycle, they will permanently lose the shiny finish and change to a dull dark finish. See Oven Cleaning Chart for proper care. English 33
-
 1
1 -
2
-
3
-
4
-
5
-
6
-
7
-
8
-
9
-
10
-
11
-
12
-
13
-
14
-
15
-
16
-
17
-
18
-
19
-
20
-
21
-
22
-
23
-
24
-
25
-
26
-
27
-
28
-
29
-
 30
30 -
 31
31 -
 32
32 -
 33
33 -
 34
34 -
 35
35 -
 36
36 -
 37
37 -
 38
38 -
 39
39 -
 40
40 -
41
-
42
-
43
-
44
-
45
-
46
-
47
-
48
-
49
-
50
-
51
-
52
-
53
-
54
-
55
-
56
-
57
-
58
-
59
-
60
-
61
-
62
-
63
-
64
-
65
-
66
-
67
-
68
-
69
-
70
-
71
-
72
-
73
-
74
-
75
-
76
-
77
-
78
-
79
-
80
-
81
-
82
-
83
-
84
-
85
-
86
-
87
-
88
-
89
-
90
-
91
-
92
-
93
-
94
-
95
-
96
-
97
-
98
-
99
-
100
-
101
-
102
-
103
-
104
-
105
-
106
-
107
-
108
-
109
-
110
-
111
-
112
-
113
-
114
-
115
-
116
-
117
-
118
-
119
-
120
-
121
-
122
-
123
-
124
-
125
-
126
-
127
-
128
 |
 |
