Bose Wave SoundTouch IV Owners Guide - Page 8
Connecting the system to power, Adding the system to your Wi-Fi, network, Setting the clock - set time
 |
View all Bose Wave SoundTouch IV manuals
Add to My Manuals
Save this manual to your list of manuals |
Page 8 highlights
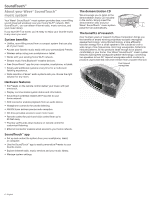
Setting up the System Connecting the system to power Before you set up the system on your network, connect the system to power. 1. Insert the small end of the AC power cord into the AC Power connector. 2. Plug the power cord into an AC (mains) power outlet. Connect the system to your Wi-Fi® network After you install the app, add the system to your network: 1. On your smartphone or tablet, select to launch the app. The app guides you through connecting the system to your Wi-Fi network. 2. Follow the instructions in the app to complete setup, including creating a SoundTouch™ account, adding a music library and music services. Note: To use Bluetooth® technology, you must complete setup. To connect your Bluetooth enabled devices, see page 13. Setting the clock 1. Press and hold either Time - or Time + for about one second. Adding the system to your Wi-Fi® network After you connect the system to power, you must download and install the SoundTouch™ app onto a smartphone or tablet that is connected to your network. The app guides you through connecting the system to your network. Note: If you do not have a smartphone or tablet, you can use a computer for setup. See page 25. To add a system to an existing SoundTouch™ account If you have already set up SoundTouch™ for another system, you do not need to download the SoundTouch™ app again. 1. On your smartphone or tablet, select the SoundTouch™ icon to launch the app. 2. Select EXPLORE > SETTINGS > Systems > ADD SYSTEM to add another system. The app guides you through setup. Download and install the SoundTouch™ app If this is your first time setting up a SoundTouch™ system, you must install the app. On your smartphone or tablet, download the SoundTouch™ controller app. Bose SoundTouchTM controller app • iOS users: download from the App Store • Android™ users: download on the Google Play™ store • Amazon Kindle Fire users: download from Amazon App store for Android Initially, HOLD TO SET appears on the display and then quickly changes to - CLOCK SET - as the button is depressed. 2. Release the selected Time button. 3. Press Time - to adjust the displayed time backward or press Time + to adjust the displayed time forward until it matches the current time. You can also press and hold for rapid adjustment. 4. Wait five seconds for the system to exit the clock setup mode. Notes: • To change the clock display from 12-hour (AM/PM) time to 24-hour time, see "The setup menu" on page 21. • If the system loses power due to a power outage or if you unplug the system, all system settings are permanently retained. However, the clock time is temporarily stored in backup memory for up to 48 hours. 8 - English
-
 1
1 -
2
-
 3
3 -
 4
4 -
 5
5 -
 6
6 -
 7
7 -
 8
8 -
 9
9 -
 10
10 -
 11
11 -
 12
12 -
 13
13 -
14
-
15
-
16
-
17
-
18
-
19
-
20
-
21
-
22
-
23
-
24
-
25
-
26
-
27
-
28
-
29
-
30
-
31
-
32
-
33
-
34
-
35
-
36
-
37
-
38
-
39
-
40
-
41
-
42
-
43
-
44
-
45
-
46
-
47
-
48
-
49
-
50
-
51
-
52
-
53
-
54
-
55
-
56
-
57
-
58
-
59
-
60
-
61
-
62
-
63
-
64
-
65
-
66
-
67
-
68
-
69
-
70
-
71
-
72
-
73
-
74
-
75
-
76
 |
 |
