Brother International BM2800 Users Manual - English and Spanish - Page 13
Stitch length dial, Stitch width dial
 |
View all Brother International BM2800 manuals
Add to My Manuals
Save this manual to your list of manuals |
Page 13 highlights
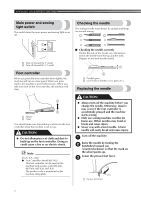
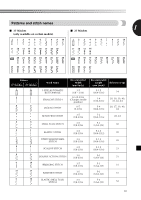
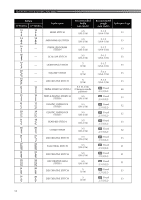
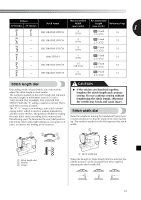
Pattern Recommended Recommended Stitch Name Width Length Reference Page 37 Stitches 27 Stitches (mm (inch)) (mm (inch)) 1 32 27 DECORATIVE STITCH 5 (3/16) Fixed 33 2.5 (3/32) 33 - DECORATIVE STITCH 5 (3/16) Fixed 33 2.5 (3/32) 34 - DECORATIVE STITCH 5 (3/16) Fixed 33 2.5 (3/32) 35 - LINK STITCH 5 (3/16) Fixed 33 2.5 (3/32) 36 - DECORATIVE STITCH 3-5 (1/8-3/16) Fixed 2.5 (3/32) 33 37 - DECORATIVE STITCH 5 (3/16) Fixed 33 2.5 (3/32) Stitch length dial Depending on the selected stitch, you may need to adjust the stitch length for best results. The numbers marked on the stitch length dial represent the stitch length in millimeters (mm) (1/25 inch). THE HIGHER THE NUMBER, THE LONGER THE STITCH. With the "0" setting, material is not fed. This is used when sewing a button. The "F"-"1" range is for making a satin stitch (closed zigzag stitch), which is used for making buttonholes and decorative stitches. The position needed for making the satin stitch varies according to the material and thread being used. To determine the exact dial position, first test the stitch and length settings on a scrap piece of fabric to observe the feeding of the material. 1 2 3 1 CAUTION ● If the stitches are bunched together, lengthen the stitch length and continue sewing. Do not continue sewing without lengthening the stitch length, otherwise the needle may break and cause injury. Stitch width dial Raise the needle by turning the handwheel toward you (counterclockwise) so that the mark on the wheel points up. The numbers marked on the dial represent the stitch width. 1 1 Stitch length dial 2 Shorter 3 Longer 1 Stitch width dial When the Straight or Triple Stretch Stitch is selected, the needle position can be changed from left to right by adjusting the stitch width dial. 12
-
 1
1 -
2
-
3
-
4
-
5
-
6
-
7
-
 8
8 -
 9
9 -
 10
10 -
 11
11 -
 12
12 -
 13
13 -
 14
14 -
 15
15 -
 16
16 -
 17
17 -
 18
18 -
19
-
20
-
21
-
22
-
23
-
24
-
25
-
26
-
27
-
28
-
29
-
30
-
31
-
32
-
33
-
34
-
35
-
36
-
37
-
38
-
39
-
40
-
41
-
42
-
43
-
44
-
45
-
46
-
47
-
48
-
49
-
50
-
51
-
52
-
53
-
54
-
55
-
56
-
57
-
58
-
59
-
60
-
61
-
62
-
63
-
64
-
65
-
66
-
67
-
68
-
69
-
70
-
71
-
72
-
73
-
74
-
75
-
76
-
77
-
78
-
79
-
80
-
81
-
82
-
83
-
84
-
85
-
86
-
87
-
88
-
89
-
90
-
91
-
92
-
93
-
94
-
95
-
96
-
97
-
98
-
99
-
100
-
101
-
102
-
103
-
104
 |
 |
