Brother International BM2800 Users Manual - English and Spanish - Page 35
Sewing Buttonholes And Buttons
 |
View all Brother International BM2800 manuals
Add to My Manuals
Save this manual to your list of manuals |
Page 35 highlights
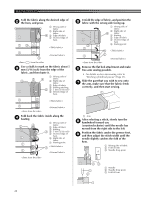
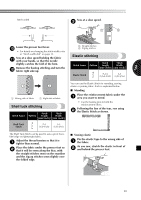
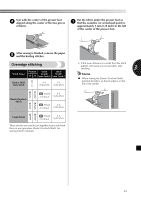
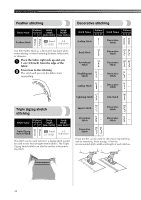
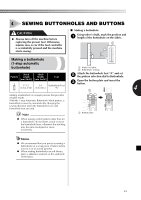
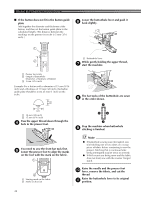
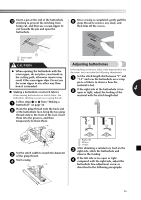
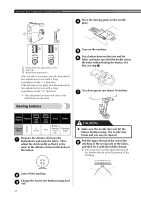
4 SEWING BUTTONHOLES AND BUTTONS CAUTION ● Always turn off the machine before replacing the presser foot. Otherwise, injuries may occur if the foot controller is accidentally pressed and the machine starts sewing. ■ Making a buttonhole Using tailor's chalk, mark the position and 1 length of the buttonhole on the fabric. 2 1 Making a buttonhole (1-step automatic buttonhole) 1 Marks on fabric 2 Buttonhole sewing Stitch Stitch Pattern Length Width Foot Attach the buttonhole foot "A" and set 2 the pattern selection dial to Buttonhole. [mm (inch)] [mm (inch)] Open the button plate and insert the 1 F-1.5 3 button. 3-5 Buttonhole Foot (1/64-1/16) (1/8-3/16) "A" 1 4 Making a buttonhole is a simple process that provides reliable results. With the 1-step Automatic Buttonhole Stitch pattern, a buttonhole is sewn by automatically changing the sewing direction when the buttonhole lever and buttonhole foot are used. Note ● When sewing a stitch pattern other than for a buttonhole, do not lower, touch or move the buttonhole lever, otherwise the stitching may become misaligned or sewn incorrectly. 1 Button plate Memo ● We recommend that you practice making a buttonhole on a scrap piece of fabric before you try it on an actual garment. ● When making buttonholes on soft fabrics, place a stabilizer material on the underside of the fabric. 34
-
 1
1 -
2
-
3
-
4
-
5
-
6
-
7
-
8
-
9
-
10
-
11
-
12
-
13
-
14
-
15
-
16
-
17
-
18
-
19
-
20
-
21
-
22
-
23
-
24
-
25
-
26
-
27
-
28
-
29
-
 30
30 -
 31
31 -
 32
32 -
 33
33 -
 34
34 -
 35
35 -
 36
36 -
 37
37 -
 38
38 -
 39
39 -
 40
40 -
41
-
42
-
43
-
44
-
45
-
46
-
47
-
48
-
49
-
50
-
51
-
52
-
53
-
54
-
55
-
56
-
57
-
58
-
59
-
60
-
61
-
62
-
63
-
64
-
65
-
66
-
67
-
68
-
69
-
70
-
71
-
72
-
73
-
74
-
75
-
76
-
77
-
78
-
79
-
80
-
81
-
82
-
83
-
84
-
85
-
86
-
87
-
88
-
89
-
90
-
91
-
92
-
93
-
94
-
95
-
96
-
97
-
98
-
99
-
100
-
101
-
102
-
103
-
104
 |
 |