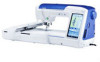
Brother International Innov-is 6000D Operation Manual for Premium Pack IV Opti - Page 2
Before you start, New Features, LED Pointer Shows You the Needle Drop Position
 |
View all Brother International Innov-is 6000D manuals
Add to My Manuals
Save this manual to your list of manuals |
Page 2 highlights
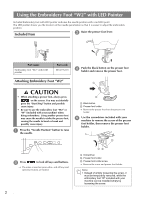
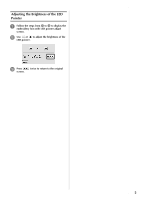
Before you start It is important to perform the upgrade according to the procedure outlined in the Installation Guide. The machine can then be used as outlined in this upgrade Operation Manual. The screen illustrations in this manual may differ from actual ones shown on the machine. New Features • LED Pointer Shows You the Needle Drop Position Included Embroidery foot with LED pointer indicates the needle position with a red LED point. The LED pointer shows you the location of the needle penetration so that it is easier to adjust the embroidery position. See "Using the Embroidery Foot "W2" with LED Pointer" on page 2. • Customize your Foot Controller Function With the multi-function foot controller, various sewing machine operations in addition to starting/stopping sewing, such as thread cutting and reverse stitching, can be specified to be performed. In addition, the small pedal can be installed on either the left or right side of the large pedal to suit your preference. See "Using the Multi-Function Foot Controller" on page 6. • New 4 categories of embroidery pattern are available From 2 large size fonts, buttonholes and decorative buttonhole frames, you will find the embroidery design that you wanted. To view a list of the patterns, refer to page 8. Contents Before you start ...1 New Features...1 Using the Embroidery Foot "W2" with LED Pointer 2 Included Item ...2 Attaching Embroidery Foot "W2 2 Checking the Needle Drop Point With the Embroidery Foot "W2" with LED Pointer 3 Adjusting the LED Pointer...4 Adjusting the Brightness of the LED Pointer 5 Using the Multi-Function Foot Controller 6 Included Items...6 Functions That Can Be Specified 6 Assembling the Controller ...6 Specifying the Functions...7 Adjusting the Pedal Positions 7 Selecting New Embroidery Patterns 8 Embroidery Pattern Color Change Table 9 Examples of Combinations 22 1
-
 1
1 -
 2
2 -
 3
3 -
 4
4 -
 5
5 -
 6
6 -
 7
7 -
 8
8 -
9
-
10
-
11
-
12
-
13
-
14
-
15
-
16
-
17
-
18
-
19
-
20
-
21
-
22
-
23
-
24
-
25
-
26
-
27
 |
 |
