Brother International Innov-is 6000D Operation Manual for Premium Pack IV Opti - Page 4
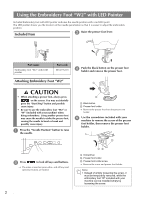
Checking the Needle Drop Point With the Embroidery Foot “W2” with LED Pointer, foot holder screw.
 |
View all Brother International Innov-is 6000D manuals
Add to My Manuals
Save this manual to your list of manuals |
Page 4 highlights
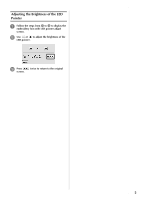
f Position the embroidery foot "W2" on the presser foot bar from behind. h Plug the connector of the embroidery foot "W2" with LED pointer into the jack on the left of your machine. a Presser foot bar g Hold the embroidery foot in place with your right hand, and then use the screwdriver to securely tighten the presser foot holder screw. a Presser foot holder screw CAUTION • Use the screwdriver included with your machine to firmly tighten the screw of the presser foot holder. If the screw is loose, the needle may strike the presser foot and possibly cause injury. i Press buttons. to unlock all keys and → All keys and operation buttons are unlocked, and the previous screen is displayed. Checking the Needle Drop Point With the Embroidery Foot "W2" with LED Pointer The presser foot code "W2" appears on the upper left side of the screen while the embroidery foot "W2" with LED pointer is attached to your machine. a After the embroidery frame is attached, press in the embroidery screen. → The LED pointer indicates the needle drop point. 3
-
 1
1 -
 2
2 -
 3
3 -
 4
4 -
 5
5 -
 6
6 -
 7
7 -
 8
8 -
 9
9 -
 10
10 -
11
-
12
-
13
-
14
-
15
-
16
-
17
-
18
-
19
-
20
-
21
-
22
-
23
-
24
-
25
-
26
-
27
 |
 |
