Brother International Innov-is 6000D Operation Manual for Premium Pack IV Opti - Page 8
Specifying the Functions, Adjusting the Pedal Positions, Press, and then press
 |
View all Brother International Innov-is 6000D manuals
Add to My Manuals
Save this manual to your list of manuals |
Page 8 highlights
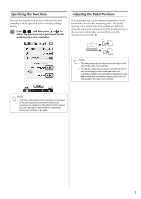
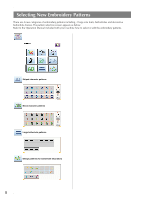
Specifying the Functions The functions performed by the multi-function foot controller can be specified in the machine settings screen. a Press , and then press or to select the functions to be performed by the multi-function foot controller. Adjusting the Pedal Positions The pedal spacing can be adjusted depending on the screw holes used in the mounting plate. The pedal spacing is the widest when the pedals are attached using the outermost screw holes a; the pedal spacing is the narrowest when they are attached using the innermost screw holes b. Note • The side pedal may be attached on the right or left side of the main foot controller. • For greater distance you always have the option of not connecting the side pedal and main foot controller using the mounting plate, making sure that both pedals are connected using the jack from the side pedal to the main foot controller. Note • After the multi-function foot controller is connected to the sewing machine and the functions are specified, the machine's "Start/Stop" button cannot be used. All buttons other than the "Start/Stop" button can continue to be used. 7
-
 1
1 -
2
-
 3
3 -
 4
4 -
 5
5 -
 6
6 -
 7
7 -
 8
8 -
 9
9 -
 10
10 -
 11
11 -
 12
12 -
 13
13 -
14
-
15
-
16
-
17
-
18
-
19
-
20
-
21
-
22
-
23
-
24
-
25
-
26
-
27
 |
 |
