Brother International Innov-is 6000D Operation Manual for Premium Pack IV Opti - Page 7
Using the Multi-Function Foot Controller, Included Items, Functions That Can Be Specified
 |
View all Brother International Innov-is 6000D manuals
Add to My Manuals
Save this manual to your list of manuals |
Page 7 highlights
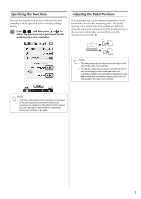
Using the Multi-Function Foot Controller With the multi-function foot controller, various sewing machine operations in addition to starting/stopping sewing, such as thread cutting and reverse stitching, can be specified to be performed. In addition, the small pedal can be installed on either the left or right side of the large pedal to suit your preference. Included Items Assembling the Controller No. Part name 1 Main foot controller 2 Side pedal 3 Mounting plate 4 Mounting screw × 2 Part code XF6470-001 XF3217-001 XF3222-001 XF3223-001 Functions That Can Be Specified a Align the wide side of the mounting plate with the notch in the bottom of the main foot controller, and then secure them together with a screw. b Align the other side of the mounting plate with the notch on the bottom of the side pedal, and then secure them together with a screw. c Insert the plug for the side pedal into the jack at the back of the main foot controller. Controller Functions that can be specified a Main foot controller Start/Stop b Heel switch c Side pedal Select any of the following: • Thread Cutting • Needle Position UP/DOWN • Single Stitch • Reverse Stitch* (Reinforcement Stitch) * If you set the "Reverse Stitch" function on the heel switch, machine operates the same as pressing the "Reverse/ Reinforcement Stitch" button on the machine. For the details, please refer to the Operation Manual included with your machine. Memo • If you set "Reverse Stitch" on the side pedal, you can easily sew darning, using zigzag stitches. With both feet, keep pressing the main foot controller, and repeat pressing and releasing the side pedal to sew forward and reverse in turn. Machine will reverse at the speed you press the main foot controller. d Insert the round-shaped plug for the main foot controller into the foot controller jack on the right side of the machine. e Open the cover of the external port (1) next to the foot controller jack, and then insert the square-shaped plug for the main foot controller into the external port (2). 6
-
 1
1 -
 2
2 -
 3
3 -
 4
4 -
 5
5 -
 6
6 -
 7
7 -
 8
8 -
 9
9 -
 10
10 -
 11
11 -
 12
12 -
13
-
14
-
15
-
16
-
17
-
18
-
19
-
20
-
21
-
22
-
23
-
24
-
25
-
26
-
27
 |
 |
