Brother International LS-1217B Users Manual - Multi - Page 81
How to Apply the Decorative Panel
 |
View all Brother International LS-1217B manuals
Add to My Manuals
Save this manual to your list of manuals |
Page 81 highlights
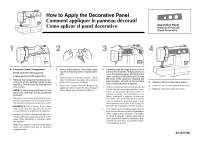
How to Apply the Decorative Panel Comment appliquer le panneau décoratif Como aplicar el panel decorativo Decorative Panel Panneau Décoratif Panel Decorativo 1 2 3 4 A A: Protective sheet (Transparent) Feuille protective (Transparent) Lamina protectora (Transparente) 1. Remove the transparent protective covering off of the existing panel on the machine. (Peels easily by starting from one corner.) NOTE: To ensure proper adhesion of new panel, this covering must be completely removed. 1. Enlever la couverture de protection transparente du panneau situé sur la machine. (Se détache facilement à partir des coins). REMARQUE: Pour s'assurer d'une adhésion exacte du nouveau panneau, la couverture doit être complètement détachée. 1. Remueva el protector transparente que se encuentra cubriendo el panel existente de la máquina. (Sale fácilmente si comienza desde una esquina) Nota: Para asegurar la aplicación del nuevo panel, este cobertor tiene que ser removido completamente. 2. Select desired panel. Peel paper backing off of desired panel to expose adhesive. 2. Sélectionnez le panneau désiré. Détachez l'endossure de papier du panneau désiré afin d'exposer l'adhésif. 2. Seleccíone el panel deseado. Remueva el papel que cubre la parte de atrás del panel seleccionado para exponer el adhesivo. 3. Carefully align left edge of back of new panel to the machine, making certain to cover the existing panel. Working to the right, continue to affix the panel, across the front of the machine, keeping the panel straight. Smooth out air bubbles and creases as panel is applied. 3. Aligner soigneusement le bord gauche de l'endos du nouveau panneau de la machine, en s'assurant de bien couvrir le panneau existant. En travaillant vers la droite, continuez à apposer le panneau de l'autre côté du devant de la machine tout en gardant le panneau droit. Lisser uniformément les bulles d'air et les plis pendant que le panneau est mis en place. 3. Con cuidado alinear la punta izquierda de la parte trasera del nuevo panel, asegurándose cubrir el panel entero existente. Colocándole desde la derecha continué aplicando el nuevo panel en el frente de la máquina, manteniendo el panel recto suavemente remueva las burbujas de aire. 4. Machine with new decorative panel. 4. Machine avec nouveau panneau décoratif. 4. Máquina con nuevo panel decorativo. XC1431-021
-
 1
1 -
2
-
3
-
4
-
5
-
6
-
7
-
8
-
9
-
10
-
11
-
12
-
13
-
14
-
15
-
16
-
17
-
18
-
19
-
20
-
21
-
22
-
23
-
24
-
25
-
26
-
27
-
28
-
29
-
30
-
31
-
32
-
33
-
34
-
35
-
36
-
37
-
38
-
39
-
40
-
41
-
42
-
43
-
44
-
45
-
46
-
47
-
48
-
49
-
50
-
51
-
52
-
53
-
54
-
55
-
56
-
57
-
58
-
59
-
60
-
61
-
62
-
63
-
64
-
65
-
66
-
67
-
68
-
69
-
70
-
71
-
72
-
73
-
74
-
75
-
 76
76 -
 77
77 -
 78
78 -
 79
79 -
 80
80 -
 81
81
 |
 |
