Brother International PE-DESIGN 10 Instruction Manual - Page 76
Dividing stitch pattern by, color, blocks
 |
View all Brother International PE-DESIGN 10 manuals
Add to My Manuals
Save this manual to your list of manuals |
Page 76 highlights
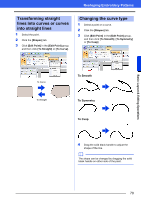
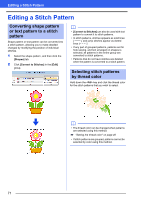
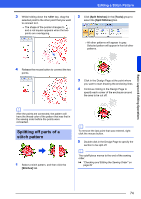
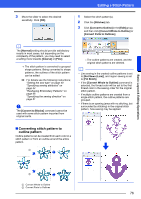
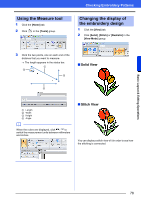
Editing a Stitch Pattern Dividing stitch pattern by color Before dividing After dividing 1 Select the stitch pattern(s), and then click the [Stitches] tab. 2 Click [Divide by Color] in the [Edit] group. Dotted lines appear around each part of the stitch pattern. Converting stitch patterns Stitch patterns can be converted into two types of shape patterns. Stitch Convert to Blocks The pattern is converted while maintaining the multiple sewing direction lines. Use this when you want to enlarge or reduce an embroidery pattern that uses satin or fill stitches. Convert to Outline The pattern is converted following the shape of the outline. b • After being converted, the outline patterns can be edited. cc "Setting the sew type" on page 49 "Specifying the sewing direction" on page 51 "Specifying sewing attributes" on page 54 "Reshaping Embroidery Patterns" on page 66 • For details on the shape pattern and stitch pattern refer to page 8. ■ Converting stitch pattern to blocks Stitch patterns can be converted into blocks (group of shape patterns with multiple sewing direction lines). In blocks (shapes) pattern, the sew types and sewing attributes can be changed, and the pattern can easily be edited. 1 Select the stitch pattern(s), and then click the [Stitches] tab. 2 Click [Convert to Blocks] in the [Edit] group. Blocks Shapes *Blocks: A group of shape patterns with multiple sewing direction lines After being converted, various editing operations can be performed. 75
-
 1
1 -
2
-
3
-
4
-
5
-
6
-
7
-
8
-
9
-
10
-
11
-
12
-
13
-
14
-
15
-
16
-
17
-
18
-
19
-
20
-
21
-
22
-
23
-
24
-
25
-
26
-
27
-
28
-
29
-
30
-
31
-
32
-
33
-
34
-
35
-
36
-
37
-
38
-
39
-
40
-
41
-
42
-
43
-
44
-
45
-
46
-
47
-
48
-
49
-
50
-
51
-
52
-
53
-
54
-
55
-
56
-
57
-
58
-
59
-
60
-
61
-
62
-
63
-
64
-
65
-
66
-
67
-
68
-
69
-
70
-
 71
71 -
 72
72 -
 73
73 -
 74
74 -
 75
75 -
 76
76 -
 77
77 -
 78
78 -
 79
79 -
 80
80 -
 81
81 -
82
-
83
-
84
-
85
-
86
-
87
-
88
-
89
-
90
-
91
-
92
-
93
-
94
-
95
-
96
-
97
-
98
-
99
-
100
-
101
-
102
-
103
-
104
-
105
-
106
-
107
-
108
-
109
-
110
-
111
-
112
-
113
-
114
-
115
-
116
-
117
-
118
-
119
-
120
-
121
-
122
-
123
-
124
-
125
-
126
-
127
-
128
-
129
-
130
-
131
-
132
-
133
-
134
-
135
-
136
-
137
-
138
-
139
-
140
-
141
-
142
-
143
-
144
-
145
-
146
-
147
-
148
-
149
-
150
-
151
-
152
-
153
-
154
-
155
-
156
-
157
-
158
-
159
-
160
-
161
-
162
-
163
-
164
-
165
-
166
-
167
-
168
-
169
-
170
-
171
-
172
-
173
-
174
-
175
-
176
-
177
-
178
-
179
-
180
-
181
-
182
-
183
-
184
-
185
-
186
-
187
-
188
-
189
-
190
-
191
-
192
-
193
-
194
-
195
-
196
-
197
-
198
-
199
-
200
-
201
-
202
-
203
-
204
-
205
-
206
-
207
-
208
-
209
-
210
-
211
-
212
-
213
-
214
-
215
-
216
-
217
-
218
-
219
-
220
-
221
-
222
-
223
-
224
-
225
-
226
-
227
-
228
-
229
-
230
-
231
-
232
-
233
-
234
-
235
-
236
-
237
-
238
-
239
-
240
-
241
-
242
-
243
-
244
-
245
-
246
-
247
-
248
-
249
-
250
-
251
-
252
-
253
-
254
-
255
-
256
-
257
-
258
-
259
-
260
-
261
-
262
-
263
-
264
-
265
-
266
-
267
-
268
-
269
-
270
-
271
-
272
-
273
-
274
-
275
-
276
-
277
-
278
-
279
-
280
-
281
-
282
-
283
-
284
-
285
-
286
-
287
-
288
-
289
-
290
-
291
-
292
-
293
-
294
-
295
-
296
-
297
-
298
-
299
-
300
-
301
-
302
-
303
-
304
-
305
-
306
-
307
-
308
-
309
-
310
-
311
-
312
-
313
-
314
-
315
-
316
-
317
-
318
-
319
-
320
-
321
-
322
-
323
-
324
-
325
-
326
-
327
-
328
-
329
-
330
-
331
-
332
-
333
-
334
-
335
-
336
-
337
-
338
-
339
-
340
-
341
-
342
-
343
-
344
-
345
-
346
-
347
-
348
-
349
-
350
-
351
-
352
-
353
 |
 |
