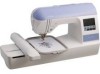
Brother International PE770 Users Manual - English - Page 18
Removing the embroidery unit - embroidery machines
 |
UPC - 012502623489
View all Brother International PE770 manuals
Add to My Manuals
Save this manual to your list of manuals |
Page 18 highlights
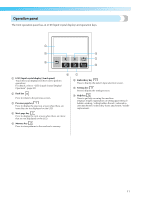
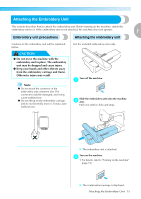
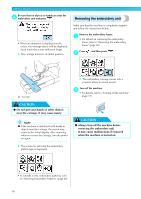
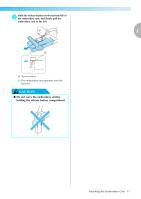
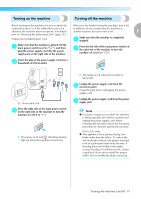
GETTING READY Be sure that no objects or hands are near the d embroidery unit and press . Removing the embroidery unit • When an animation is displayed on the screen, the message above will be displayed if you touch the screen with your finger. X The carriage moves to its initial position. Make sure that the machine is completely stopped and follow the instructions below. Remove the embroidery frame. a • For details on removing the embroidery frame, refer to "Removing the embroidery frame" (page 48). Press , and then press . b a a Carriage X The embroidery carriage moves into a position where it can be stored. Turn off the machine. c • For details, refer to "Turning off the machine" (page 19). CAUTION ● Do not put your hands or other objects near the carriage. It may cause injury. Note z If the machine is initialized with hands or objects near the carriage, the screen may return to the initial display. After removing whatever is near the carriage, turn the power on again. CAUTION ● Always turn off the machine before removing the embroidery unit. It may cause malfunctions if removed when the machine is turned on. X The screen for selecting the embroidery pattern type is displayed. • For details on the embroidery patterns, refer to "Selecting Embroidery Patterns" (page 49). 16
-
 1
1 -
2
-
3
-
4
-
5
-
6
-
7
-
8
-
9
-
10
-
11
-
12
-
 13
13 -
 14
14 -
 15
15 -
 16
16 -
 17
17 -
 18
18 -
 19
19 -
 20
20 -
 21
21 -
 22
22 -
 23
23 -
24
-
25
-
26
-
27
-
28
-
29
-
30
-
31
-
32
-
33
-
34
-
35
-
36
-
37
-
38
-
39
-
40
-
41
-
42
-
43
-
44
-
45
-
46
-
47
-
48
-
49
-
50
-
51
-
52
-
53
-
54
-
55
-
56
-
57
-
58
-
59
-
60
-
61
-
62
-
63
-
64
-
65
-
66
-
67
-
68
-
69
-
70
-
71
-
72
-
73
-
74
-
75
-
76
-
77
-
78
-
79
-
80
-
81
-
82
-
83
-
84
-
85
-
86
-
87
-
88
 |
 |
