Brother International PE770 Users Manual - English - Page 64
the display of available embroidery
 |
UPC - 012502623489
View all Brother International PE770 manuals
Add to My Manuals
Save this manual to your list of manuals |
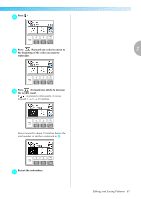
Page 64 highlights
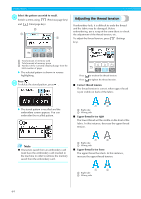
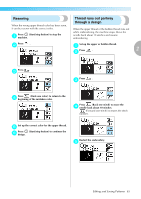
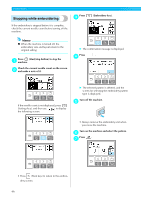
EMBROIDERY Memo z If you make a note of the values in the lower part of screen when you change the size and position, you can embroider with the same size and layout even if you have to turn the power back on in the middle of your work. Starting point key Moves the needle start position to align the needle with the pattern position. • Press (Back key) to return to the previous screen. Layout key Press this key to move to rotation screen. • Press screen. Rotation key Rotates the pattern one degree, 10 degrees or 90 degrees at a time. (Back key) to return to the previous Moves the needle to the position of the selected needle start position. Moves the frame to check the pattern position. Rotates the pattern 90 degrees to the left Rotates the pattern 90 degrees to the right Rotates the pattern 10 degrees to the left Rotates the pattern 10 degrees to the right Rotates the pattern 1 degree to the left Rotates the pattern 1 degree to the right Returns the pattern to its original position Horizontal mirror image key Mirrors the pattern left and right. CAUTION ● Never lower the needle when the embroidery frame is moving. The needle may break or bend. ● When you have revised the pattern, check the display of available embroidery frames and use an appropriate frame. If you use an embroidery frame not displayed as available for use, the presser foot may strike the frame and possibly cause injury. 62
-
 1
1 -
2
-
3
-
4
-
5
-
6
-
7
-
8
-
9
-
10
-
11
-
12
-
13
-
14
-
15
-
16
-
17
-
18
-
19
-
20
-
21
-
22
-
23
-
24
-
25
-
26
-
27
-
28
-
29
-
30
-
31
-
32
-
33
-
34
-
35
-
36
-
37
-
38
-
39
-
40
-
41
-
42
-
43
-
44
-
45
-
46
-
47
-
48
-
49
-
50
-
51
-
52
-
53
-
54
-
55
-
56
-
57
-
58
-
 59
59 -
 60
60 -
 61
61 -
 62
62 -
 63
63 -
 64
64 -
 65
65 -
 66
66 -
 67
67 -
 68
68 -
 69
69 -
70
-
71
-
72
-
73
-
74
-
75
-
76
-
77
-
78
-
79
-
80
-
81
-
82
-
83
-
84
-
85
-
86
-
87
-
88
 |
 |
