Brother International PE770 Users Manual - English - Page 74
Attaching the Embroidery Foot
 |
UPC - 012502623489
View all Brother International PE770 manuals
Add to My Manuals
Save this manual to your list of manuals |
Page 74 highlights
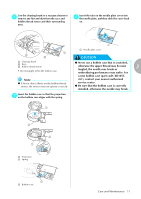
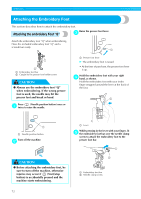
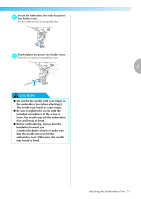
APPENDIX Attaching the Embroidery Foot This section describes how to attach the embroidery foot. Attaching the embroidery Foot "Q" Raise the presser foot lever. c Attach the embroidery foot "Q" when embroidering. Have the included embroidery foot "Q" and a screwdriver ready. a 1 2 a Embroidery foot bar b Caught by the presser foot holder screw CAUTION ● Always use the embroidery foot "Q" when embroidering. If the wrong presser foot is used, the needle may hit the presser foot and break or bend. Press (Needle position button) once or a twice to raise the needle. a Presser foot lever X The embroidery foot is raised. • At the time of purchase, the presser foot lever is up. Hold the embroidery foot with your right d hand, as shown. Hold the embroidery foot with your index finger wrapped around the lever at the back of the foot. a 1 a Needle position button Turn off the machine. b CAUTION ● Before attaching the embroidery foot, be sure to turn off the machine, otherwise injuries may occur if (Start/stop button) is accidentally pressed and the machine starts embroidering. a Lever While pressing in the lever with your finger, fit e the embroidery foot bar over the needle clamp screw to attach the embroidery foot to the presser foot bar. 1 2 a Embroidery foot bar b Needle clamp screw 72
-
 1
1 -
2
-
3
-
4
-
5
-
6
-
7
-
8
-
9
-
10
-
11
-
12
-
13
-
14
-
15
-
16
-
17
-
18
-
19
-
20
-
21
-
22
-
23
-
24
-
25
-
26
-
27
-
28
-
29
-
30
-
31
-
32
-
33
-
34
-
35
-
36
-
37
-
38
-
39
-
40
-
41
-
42
-
43
-
44
-
45
-
46
-
47
-
48
-
49
-
50
-
51
-
52
-
53
-
54
-
55
-
56
-
57
-
58
-
59
-
60
-
61
-
62
-
63
-
64
-
65
-
66
-
67
-
68
-
 69
69 -
 70
70 -
 71
71 -
 72
72 -
 73
73 -
 74
74 -
 75
75 -
 76
76 -
 77
77 -
 78
78 -
 79
79 -
80
-
81
-
82
-
83
-
84
-
85
-
86
-
87
-
88
 |
 |
