Brother International PR-650 PE-DESIGN NEXT CW Instruction Manual PRCW1 - Page 16
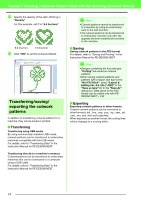
Transferring/saving/ exporting the cutwork patterns, Transferring, Saving, Exporting
 |
View all Brother International PR-650 manuals
Add to My Manuals
Save this manual to your list of manuals |
Page 16 highlights
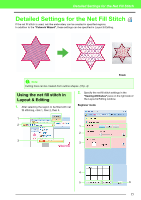
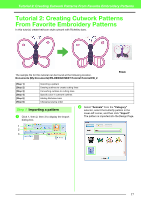
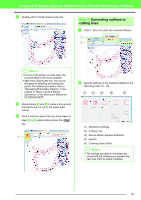
Tutorial 1: Creating a Cutwork Pattern Filled with Net Stitching (Cutwork Wizard) m Specify the density of the satin stitching in "Density". For this example, set it to "6.5 line/mm". 5.0 line/mm 7.0 line/mm n Click "OK" to exit the Cutwork Wizard. Transferring/saving/ exporting the cutwork patterns In addition to transferring cutwork patterns to a machine, they can be saved or printed. ■ Transferring Transferring using USB media By using commercially available USB media, cutwork patterns can be transferred to embroidery machines compatible with the USB media. For details, refer to "Transferring Data" in the Instruction Manual for PE-DESIGN NEXT. Transferring directly to a machine's memory Cutwork patterns can be transferred to embroidery machines that can be connected to a computer using a USB cable. For details, refer to "Transferring Data" in the Instruction Manual for PE-DESIGN NEXT. a Note: • Cutwork patterns cannot be transferred to a machine by using an embroidery card or the Link function. • The cutwork patterns can be transferred to embroidery machine only after the upgrade has been installed and certified to the machine. ■ Saving Saving cutwork patterns in the PES format For details, refer to "Saving and Printing" in the Instruction Manual for PE-DESIGN NEXT. a Note: • Designs containing the line sew type "Cutting" are saved as cutwork patterns. • When saving cutwork patterns and patterns with a region sew type set to "Net Fill Stitch", select "Layout & Editing Ver. 9.2. File (*.PES)" in the "Save as type" list in the "Save As" dialog box. Data saved in this PES format can be edited only with PEDESIGN NEXT + CW. ■ Exporting Exporting cutwork patterns in other formats Created cutwork patterns can be converted to other formats (.dst, .hus, .exp, .pcs, .vip, .sew, .jef, .csd, .xxx, and .shv) and outputted. When exported as another format, the cutting lines will be changed to a running stitch. 14
-
 1
1 -
2
-
3
-
4
-
5
-
6
-
7
-
8
-
9
-
10
-
 11
11 -
 12
12 -
 13
13 -
 14
14 -
 15
15 -
 16
16 -
 17
17 -
 18
18 -
 19
19 -
 20
20 -
 21
21 -
22
-
23
-
24
-
25
-
26
-
27
-
28
-
29
 |
 |
