Brother International PR-650 PE-DESIGN NEXT CW Instruction Manual PRCW1 - Page 23
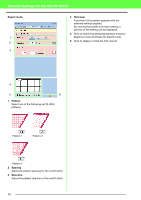
Step 4 Specify color in cutwork outlines, Step 5 Adding Richelieu bars, Specify color in cutwork
 |
View all Brother International PR-650 manuals
Add to My Manuals
Save this manual to your list of manuals |
Page 23 highlights
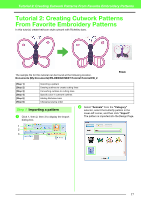
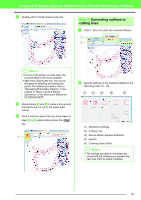
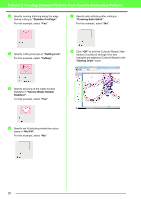
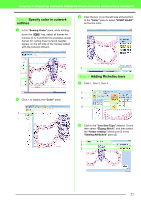
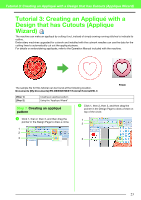
Tutorial 2: Creating Cutwork Patterns From Favorite Embroidery Patterns Step 4 Specify color in cutwork outlines a In the "Sewing Order" pane, while holding down the Ctrl key, select all frames for outlines (3, 4, 7 and 8 for this example) except frames for cutting lines (cutwork needles appear on the left side of the frames) added with the Cutwork Wizard. c Click the box (1) on the left side at the bottom of the "Color" pane to select "LIGHT LILAC" as the line color. b Click 1 to display the "Color" pane. 1 1 Step 5 Adding Richelieu bars a Click 1, then 2, then 3. 1 2 3 b Click in the "Line Sew Type" selector (1) and then select "Zigzag Stitch", and then select the "Under sewing" check box (3) in the "Sewing Attributes" pane (2). 1 2 3 21
-
 1
1 -
2
-
3
-
4
-
5
-
6
-
7
-
8
-
9
-
10
-
11
-
12
-
13
-
14
-
15
-
16
-
17
-
 18
18 -
 19
19 -
 20
20 -
 21
21 -
 22
22 -
 23
23 -
 24
24 -
 25
25 -
 26
26 -
 27
27 -
 28
28 -
29
 |
 |

21
Tutorial 2: Creating Cutwork Patterns From Favorite Embroidery Patterns
a
In the
“Sewing Order”
pane, while holding
down the
key, select all frames for
outlines (3, 4, 7 and 8 for this example) except
frames for cutting lines (cutwork needles
appear on the left side of the frames) added
with the Cutwork Wizard.
b
Click 1 to display the
“Color”
pane.
c
Click the box (1) on the left side at the bottom
of the
“Color”
pane to select
“LIGHT LILAC”
as the line color.
a
Click 1, then 2, then 3.
b
Click in the
“Line Sew Type”
selector (1) and
then select
“Zigzag Stitch”
, and then select
the
“Under sewing”
check box (3) in the
“Sewing Attributes”
pane (2).
Step 4
Specify color in cutwork
outlines
Ctrl
1
Step 5
Adding Richelieu bars
1
1
2
3
1
3
2