Brother International PR-650 PE-DESIGN NEXT CW Instruction Manual PRCW1 - Page 26
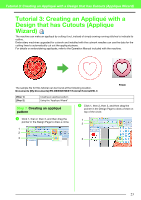
Tutorial 3: Creating an Appliqué with a Design that has Cutouts Applique Wizard, Using the Applique
 |
View all Brother International PR-650 manuals
Add to My Manuals
Save this manual to your list of manuals |
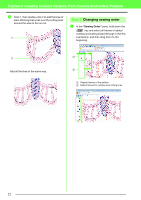
Page 26 highlights
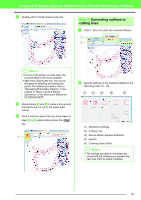
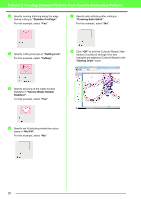
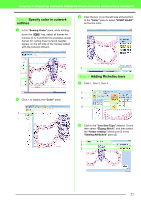
Tutorial 3: Creating an Appliqué with a Design that has Cutouts (Applique Wizard) c Select the two patterns, and then click 1, then 2, then 3 to apply hole sewing. 1 2 3 b Specify settings in the Applique Wizard in the following order (1) - (5). (5) (1) (2) (3) (4) b Memo: For details, refer to "Hole sewing" in the Instruction Manual for PE-DESIGN NEXT. Step 2 Using the "Applique Wizard" a Select the outer pattern, and then click 1, then 2 to start the Applique Wizard. 1 2 b Memo: Be sure to select the outer pattern before starting the Applique Wizard. (1) Applique Material (2) Applique Position (3) Tack down (4) Covering Stitch (5) Create an applique with hole sewing c Specify cutting lines for the appliqué in "Applique Material". → The outline of the appliqué can be sewn as running stitches or the appliqué can be cut out. For this example, select "Yes" then "Cutting". Running Stitch (default) Select this setting to sew the cutting line with a machine installed with an embroidery needle, then cut along the cutting line with scissors. Cutting Select this setting to cut the fabric with a machine installed with cutwork needles. 24
-
 1
1 -
2
-
3
-
4
-
5
-
6
-
7
-
8
-
9
-
10
-
11
-
12
-
13
-
14
-
15
-
16
-
17
-
18
-
19
-
20
-
 21
21 -
 22
22 -
 23
23 -
 24
24 -
 25
25 -
 26
26 -
 27
27 -
 28
28 -
 29
29
 |
 |
