Brother International PR-650 PE-DESIGN NEXT CW Instruction Manual PRCW1 - Page 27
Satin Stitch, E Stitch, default, Stroke, Interval, Pitch, Sewing, attributes
 |
View all Brother International PR-650 manuals
Add to My Manuals
Save this manual to your list of manuals |
Page 27 highlights
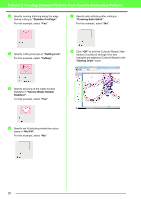
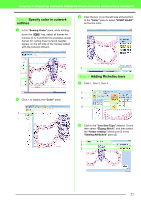
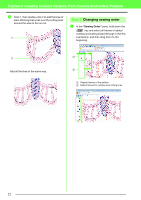
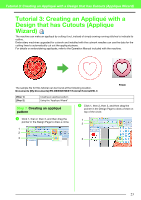
Tutorial 3: Creating an Appliqué with a Design that has Cutouts (Applique Wizard) d "Applique Position" is specified automatically. → The guideline for attaching the appliqué piece is set to be sewn automatically. e Specify basting of the appliqué in "Tack down". → The appliqué piece can be basted onto the base fabric. Select one of three stitches. For this example, select "Yes" then "V Stitch". b Memo: For details on setting "Stroke", "Interval" and "Pitch", refer to "E/V stitch" in "Sewing attributes" of Instruction Manual for PEDESIGN NEXT. g Specify hole sewing in "Create an applique with hole sewing". Satin Stitch E Stitch V Stitch (default) f Specify the stitching for securing the appliqué in "Covering Stitch". → Select the sew type and other attributes ("Width" and "Density") for finishing the appliqué. For this example, select "Satin Stitch", and then set "Width" to "3.0 mm" and "Density" to "5.0 line/mm". "Satin Stitch (default)" Settings can be specified for "Width" and "Density". → Select this check box when creating an appliqué with holes (empty regions). This check box appears only when an outer pattern with hole sewing applied was selected. For this example, select this check box. b Memo: To return all parameters to their default settings, click "Default". "E Stitch" Settings can be specified for "Stroke", "Interval" and "Pitch". "V Stitch" Settings can be specified for "Stroke", "Interval" and "Pitch". 25
-
 1
1 -
2
-
3
-
4
-
5
-
6
-
7
-
8
-
9
-
10
-
11
-
12
-
13
-
14
-
15
-
16
-
17
-
18
-
19
-
20
-
21
-
 22
22 -
 23
23 -
 24
24 -
 25
25 -
 26
26 -
 27
27 -
 28
28 -
 29
29
 |
 |
