Brother International S-7200B Service Manual - Page 14
FUNCTION SETTINGS OPERATION PANEL, Function No. 16, Stitch number C, D, C, D N stop double
 |
View all Brother International S-7200B manuals
Add to My Manuals
Save this manual to your list of manuals |
Page 14 highlights
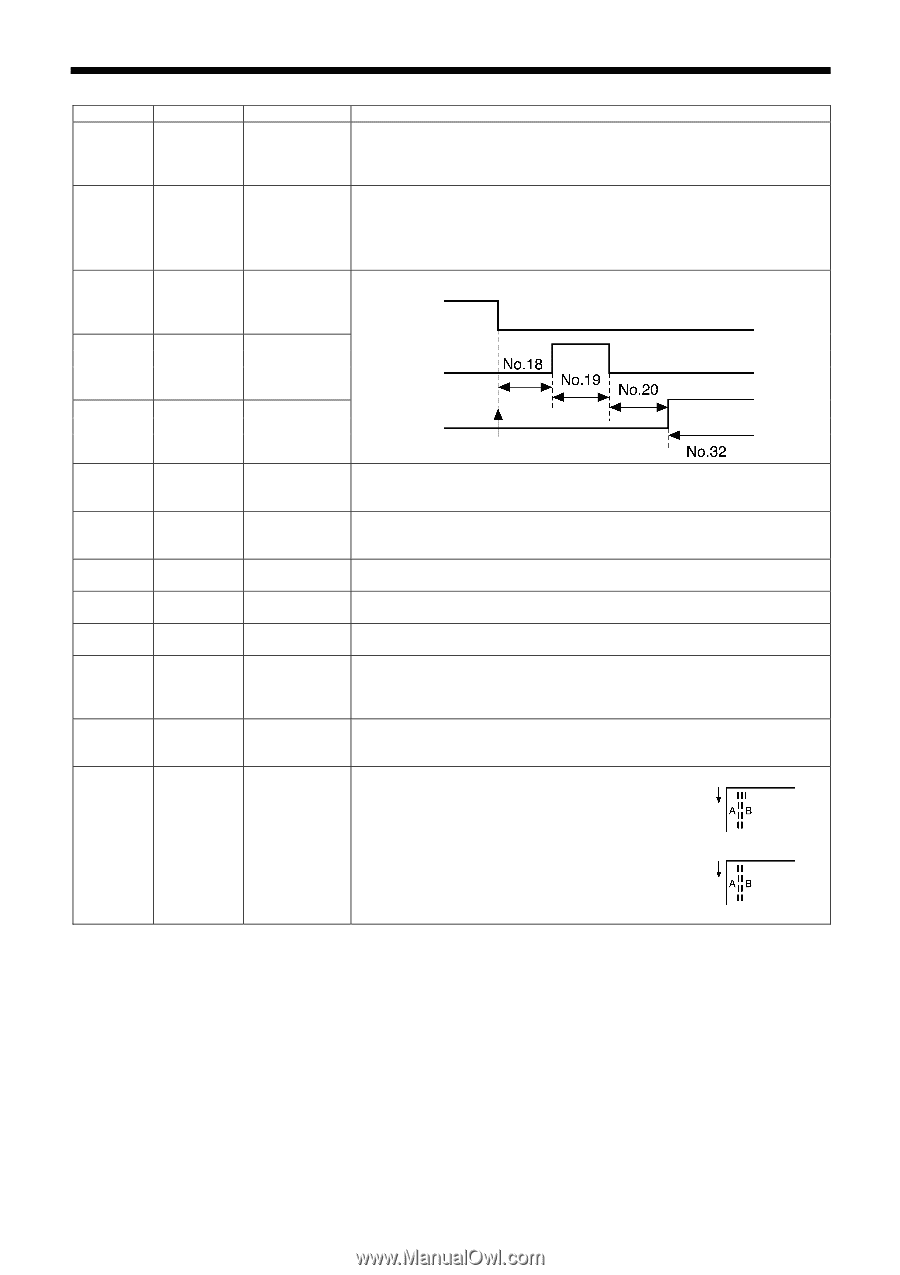
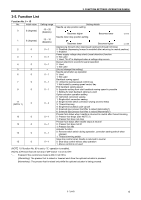
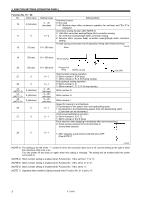
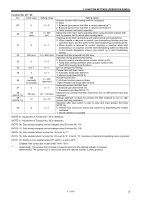
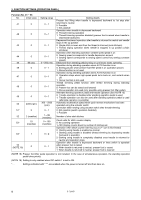
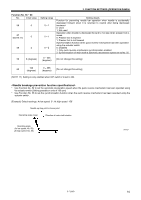
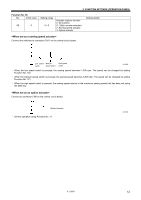
3. FUNCTION SETTINGS (OPERATION PANEL) Function No. 16 − 28 No. Initial value 16 3 (minutes) 17 0 18 20 (ms) Setting range 0 - 30 (minutes) 0 - 2 10 - 200 (ms) Setting details Overtime function 0: Not used 1-30: Machine stops after continuous operation for set time, and "Err 8" is displayed. Correction sewing function (See NOTE 3) 0: Half stitch correction sewing/Single stitch correction sewing 1: No correction sewing/Single stitch correction sewing 2: Reverse stitch (reverse feed) correction sewing/Single stitch correction sewing Thread wiping and presser foot lift operation timing after thread trimming Motor 2245M 19 50 (ms) 10 - 200 (ms) Thread wiping 20 21 22 23 (NOTE 4) 24 (NOTE 5) 25 (NOTE 6) 26 27 50 (ms) 0 0 0 (stitches) 0 (stitches) 0 (stitches) 0 0 10 - 200 (ms) 0 - 1 0 - 1 0 - 99 (stitches) 0 - 99 (stitches) 0 - 99 (stitches) 0 - 1 0 - 1 Presser foot lifting Needle up stop Start backtack sewing operation 0: Stitch number A, B (N stop) 1: Stitch number A, B, A, B (N stop double) End backtack sewing operation 0: Stitch number C, D 1: Stitch number C, D, C, D (N stop double) Stitch number G (fully ON) Stitch number H Stitch number I Speed for moving to end backtack 0: Decelerates to low speed, then end backtacking starts 1: Decelerates to end backtacking speed, then end backtacking starts (Cycle time can be shortened.) Continuous backtacking operation 0: Stitch number A, B, C, D 1: Stitch number A, B x D times Feed direction when stopping immediately after start backtacking 0: Quick reverse solenoid turns off and stops in normal feed direction 28 0 0 - 1 1: After stopping, quick reverse solenoid turns OFF (See NOTE 7) 2246M (NOTE 3) The setting to the left of the " / " symbol is when the correction stitch icon is off, and the setting to the right is when the correction stitch icon is on. Turn the power off and back on again when this setting is changed. The setting will be enabled after the power turns back on. (NOTE 4) Stitch number setting is enabled when Function No. 118 is set from "1" to "3". (NOTE 5) Stitch number setting is enabled when Function No. 118 is set to "2" or "3". (NOTE 6) Stitch number setting is enabled when Function No. 118 is set to "3". (NOTE 7) Operates when treadle is lightly pressed when Function No. 31 is set to "0". 7 S-7200B
-
 1
1 -
2
-
3
-
4
-
5
-
6
-
7
-
8
-
 9
9 -
 10
10 -
 11
11 -
 12
12 -
 13
13 -
 14
14 -
 15
15 -
 16
16 -
 17
17 -
 18
18 -
 19
19 -
20
-
21
-
22
-
23
-
24
-
25
-
26
-
27
-
28
-
29
-
30
-
31
-
32
-
33
-
34
-
35
-
36
-
37
-
38
-
39
-
40
-
41
-
42
-
43
-
44
-
45
-
46
-
47
-
48
-
49
-
50
-
51
-
52
-
53
-
54
-
55
-
56
-
57
-
58
-
59
-
60
-
61
-
62
-
63
-
64
-
65
-
66
-
67
-
68
-
69
-
70
-
71
-
72
-
73
-
74
-
75
-
76
-
77
-
78
-
79
-
80
-
81
-
82
-
83
-
84
 |
 |