Brother International S-7200B Service Manual - Page 29
Initializing The Control Box Panel
 |
View all Brother International S-7200B manuals
Add to My Manuals
Save this manual to your list of manuals |
Page 29 highlights
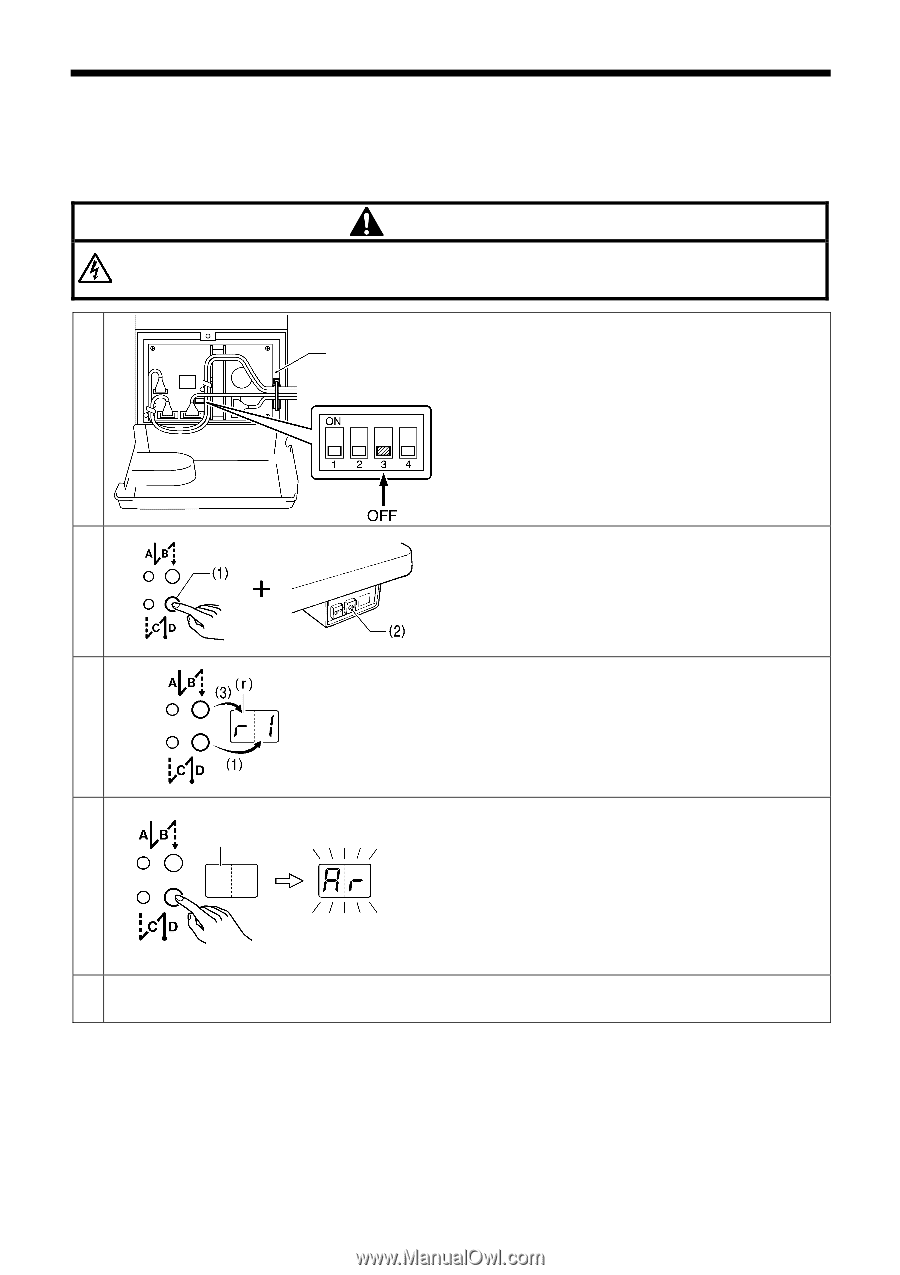
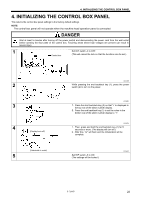
4. INITIALIZING THE CONTROL BOX PANEL 4. INITIALIZING THE CONTROL BOX PANEL This returns the control box panel settings to the factory default settings. NOTE: The control box panel will not operate when the machine head operation panel is connected. DANGER Wait at least 5 minutes after turning off the power switch and disconnecting the power cord from the wall outlet before opening the face plate of the control box. Touching areas where high voltages are present can result in severe injury. 1 Set DIP switch -3 to OFF. Control box (This will cancel the lock so that the functions can be set.) 2 3 4 (Display turns off) (5 seconds or more) 5 3143M While pressing the end backtack key (1), press the power switch (2) to turn on the power. 0706B 1. Press the start backtack key (3) so that "r" is displayed in the top row of the stitch number display. 2. Press the end backtack key (1) to set the value in the bottom row of the stitch number display to "1". 0707B 1. Then, press and hold the end backtack key (1) for 5 seconds or more. (The display will turn off.) 2. After this, "Ar" will flash and the initialization will be complete. Set DIP switch -3 to ON. (The settings will be locked.) 3150M S-7200B 22
-
 1
1 -
2
-
3
-
4
-
5
-
6
-
7
-
8
-
9
-
10
-
11
-
12
-
13
-
14
-
15
-
16
-
17
-
18
-
19
-
20
-
21
-
22
-
23
-
 24
24 -
 25
25 -
 26
26 -
 27
27 -
 28
28 -
 29
29 -
 30
30 -
 31
31 -
 32
32 -
 33
33 -
 34
34 -
35
-
36
-
37
-
38
-
39
-
40
-
41
-
42
-
43
-
44
-
45
-
46
-
47
-
48
-
49
-
50
-
51
-
52
-
53
-
54
-
55
-
56
-
57
-
58
-
59
-
60
-
61
-
62
-
63
-
64
-
65
-
66
-
67
-
68
-
69
-
70
-
71
-
72
-
73
-
74
-
75
-
76
-
77
-
78
-
79
-
80
-
81
-
82
-
83
-
84
 |
 |