Brother International S-7220B Instruction Manual - English - Page 60
Adjusting the needle bar height, height of surface B on the <1> side of the accessory
 |
View all Brother International S-7220B manuals
Add to My Manuals
Save this manual to your list of manuals |
Page 60 highlights
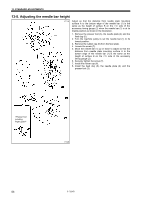
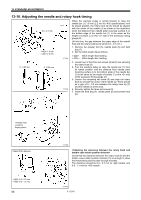
13. STANDARD ADJUSTMENTS 13-8. Adjusting the needle bar height 3771M Adjust so that the distance from needle plate mounting surface A to the bottom edge of the needle bar (1) is the same as the height of surface B on the side of the accessory timing gauge (2) when the needle bar (1) is at its lowest position as shown in the illustration. 1. Remove the presser foot (3), the needle plate (4) and the feed dog (5). 2. Turn the machine pulley to set the needle bar (1) to its lowest position. 3. Remove the rubber cap (6) from the face plate. 4. Loosen the screw (7). 5. Move the needle bar (1) up or down to adjust so that the distance from needle plate mounting surface A to the bottom edge of the needle bar (1) is the same as the height of surface B on the side of the accessory timing gauge (2). 6. Securely tighten the screw (7). 7. Install the rubber cap (6). 8. Install the feed dog (5), the needle plate (4) and the presser foot (3). 3772M 53 S-7220B
-
 1
1 -
2
-
3
-
4
-
5
-
6
-
7
-
8
-
9
-
10
-
11
-
12
-
13
-
14
-
15
-
16
-
17
-
18
-
19
-
20
-
21
-
22
-
23
-
24
-
25
-
26
-
27
-
28
-
29
-
30
-
31
-
32
-
33
-
34
-
35
-
36
-
37
-
38
-
39
-
40
-
41
-
42
-
43
-
44
-
45
-
46
-
47
-
48
-
49
-
50
-
51
-
52
-
53
-
54
-
 55
55 -
 56
56 -
 57
57 -
 58
58 -
 59
59 -
 60
60 -
 61
61 -
 62
62 -
 63
63 -
 64
64 -
 65
65 -
66
-
67
-
68
-
69
-
70
-
71
-
72
-
73
-
74
 |
 |
