Canon 1234B002 Digital Photo Professional Instruction Manual Windows (EOS 30D) - Page 37
Displaying the Edit Window
 |
UPC - 013803065107
View all Canon 1234B002 manuals
Add to My Manuals
Save this manual to your list of manuals |
Page 37 highlights
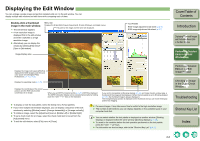
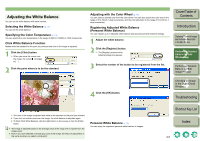
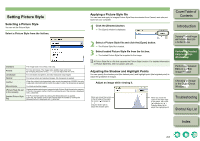
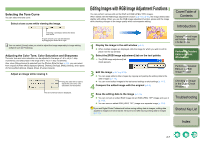
Displaying the Edit Window You can enlarge a single image and perform detailed edits on it in the edit window. You can display multiple edit windows and edit them while comparing each of them. Double-click a thumbnail image in the main window. ¿ The edit window appears. ¿ A low resolution image is displayed first in the edit window, and then it switches to a high resolution image. O Alternatively, you can display this window by selecting [File] menu ` [Open in Edit window]. Menu bar Displays the [File], [Edit], [View], [Adjustment], [Tools], [Window], and [Help] menus. The path for the image and file name are displayed. Image display area Tool Palette RAW image adjustment tab sheet (p.2-4) RGB image adjustment tab sheet (p.2-7) Displays the image color space ([RAW] is displayed for RAW images) and the work color space set with Digital Photo Professional (p.1-10, p.1-26). Displays the operating mode (p.1-25). Displays the coordinates of the cursor position and the RGB values (8-bit conversion) of an image. When you set CMYK simulation profile (p.1-26), [CMYK] is displayed. The CMYK simulation display can be canceled temporarily by holding down the + keys on the keyboard. If you set the tool palette to [Docking display] (p.1-26) and make the edit window large, a thumbnail of the image will be displayed. (When the tool palette is set to [Floating display] (p.1-26), the thumbnail image is always displayed.) The enlarged display position is displayed on the thumbnail and you can move the display position by dragging. O To display or hide the tool palette, select the [View] menu ` [Tool palette]. O If you have multiple edit windows displayed, you can display a sequence of the edit windows by selecting [Window] menu ` [Arrange horizontally] or [Arrange vertically]. O To rotate an image, select the [Adjustment] menu ` [Rotate Left] or [Rotate Right]. O To set a check mark for an image, select the check mark item to be set from the [Adjustment] menu. O To exit the edit window, select [File] menu ` [Close]. O For some images, it may take some time to switch to the high resolution image. O The number of edit windows you can display depends on the available space in your computer hard disk. O You can select whether the tool palette is displayed as another window ([Floating display]) or displayed within the same window ([Docking display]) (p.1-26). O To revert to the condition before the last operation performed on the tool palette, press the + keys. O For information on shortcut keys, refer to the "Shortcut Key List" (p.5-2). Cover/Table of Contents Introduction 1 Displaying Thumbnail Images and Performing Basic Edits in the Main Window 2 Performing Detailed Edits in the Edit Window 3 Performing Detailed Edits in the Edit Image Window 4 Checking an Image in the Quick Check Window Troubleshooting Shortcut Key List Index 2-2
-
 1
1 -
2
-
3
-
4
-
5
-
6
-
7
-
8
-
9
-
10
-
11
-
12
-
13
-
14
-
15
-
16
-
17
-
18
-
19
-
20
-
21
-
22
-
23
-
24
-
25
-
26
-
27
-
28
-
29
-
30
-
31
-
 32
32 -
 33
33 -
 34
34 -
 35
35 -
 36
36 -
 37
37 -
 38
38 -
 39
39 -
 40
40 -
 41
41 -
 42
42 -
43
-
44
-
45
-
46
-
47
-
48
-
49
-
50
-
51
-
52
 |
 |
