Canon 3060 Startup Guide
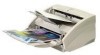
Canon 3060 - DR - Document Scanner Manual
 |
View all Canon 3060 manuals
Add to My Manuals
Save this manual to your list of manuals |
Canon 3060 manual content summary:
- Canon 3060 | Startup Guide - Page 1
Startup Manual Read this manual thoroughly before using this scanner. Keep this manual in a safe place for future reference. - Canon 3060 | Startup Guide - Page 2
CANON ELECTRONICS INC. 1248, SHIMOKAGEMORI, CHICHIBU-SHI, SAITAMA 369-1892, JAPAN CANON U.S.A. INC. ONE CANON PLAZA, LAKE SUCCESS, N.Y.11042, U.S.A. CANON CANADA INC. 6390 DIXIE ROAD, MISSISSAUGA, ONTARIO L5T 1P7, CANADA CANON EUROPA N.V. BOVENKERKERWEG 59-61, P.O.BOX 2262, 1180 EG AMSTELVEEN, THE - Canon 3060 | Startup Guide - Page 3
and, if not installed and used in accordance with the instruction manual, may cause harmful interference to radio communications. Operation of any changes or modifications to the equipment unless otherwise specified in the manual. If such changes or modifications should be made, you could be - Canon 3060 | Startup Guide - Page 4
- Canon 3060 | Startup Guide - Page 5
before using the scanner in order to ensure that you fully understand how to use the scanner correctly. After you have read this manual, retain it for future reference. Caution: Be aware of the following points when using this scanner for reproduction: ● Making duplicates of paper currency - Canon 3060 | Startup Guide - Page 6
are explained below. Familiarize yourself with these symbols and their meanings before reading this manual. "(→ page 12)" means "Refer to page 12 for more details on the information." WARNING This indicates a matter in which failure to follow proper procedure could - Canon 3060 | Startup Guide - Page 7
Table of Contents Preface ...1 Notational Conventions 2 Table of Contents 3 Before Using the Unit 5 To Ensure Safe Operation 5 Installation Location 5 Power ...6 Moving the Scanner 6 Notes on Normal Handling 7 Features of the DR-3060/3080C 9 Checking the Packing List 11 Removing Protective - Canon 3060 | Startup Guide - Page 8
Document Eject Tray 31 Installing the Document Eject Guide 33 Loading a Document for Scanning 35 When Using Automatic Feed 35 When Using Manual Feed 38 Patch Code Sheets 40 About the Scanning Glass and the Rollers 47 Troubleshooting 48 Specifications 53 Index ...55 4 Before Using the Unit - Canon 3060 | Startup Guide - Page 9
be placed in such a spot, hang a heavy curtain, etc., to shade the unit. ● Avoid dusty locations. Dust can get inside of the unit and cause problems. ● Avoid warm or humid locations, such as in the vicinity of a water faucet, water heater, humidifier, etc., and avoid locations where there fumes from - Canon 3060 | Startup Guide - Page 10
● Avoid locations that are subject to rapid temperature changes. Condensation inside of the unit can result in inferior image quality. Use this unit under the following environmental conditions: Temperature: 10 degree C to 32.5 degree C Humidity: 20% to 80% RH ● Avoid locating the unit near - Canon 3060 | Startup Guide - Page 11
operate at all even though the power is on, immediately turn the unit off and unplug the power cord. Contact your dealer or service representative to have the unit serviced. ■ Do not drop, kick, or otherwise strike the unit. If the unit does somehow become damaged, immediately turn the unit off and - Canon 3060 | Startup Guide - Page 12
fire or electric shock. If such foreign matter does get inside of the unit, unplug the power cord immediately, and then contact your dealer or service representative for assistance. ■ Do not set up the unit in a dusty or humid location. Doing so creates a risk of fire or electric shock. ■ Do not - Canon 3060 | Startup Guide - Page 13
in 24-bit color or 256-level gray scale.* ■ Supports a variety of scanning modes** The scanner supports the following scanning modes, depending on the document type: ● Single-sided/double-sided mode ● Continuous/manual feed ■ Automatic document size detection** The scanner automatically detects - Canon 3060 | Startup Guide - Page 14
-sided scanning, the bottom side is scanned in 256-level gray scale even if 24-bit color scanning is selected. ** Available when using applications that support these functions. 10 Before Using the Unit - Canon 3060 | Startup Guide - Page 15
. If anything is missing or damaged, contact your dealer or service representative. ➀ Document eject guide ➁ Auxiliary paper support plate ➂ Warranty card (120V model only) ➃ Setup disc (CD-ROM) ➄ Startup manual (this manual) ➅ Software license agreement ➆ Scanner ➇ Power cord • You will need to - Canon 3060 | Startup Guide - Page 16
Removing Protective Tape and Protective Sheet Before using the scanner, remove the protective tape and protective sheet that protect the unit from damage during shipment. 1. Remove the protective tape that is attached to the exterior of the unit. 2. Open the paper feed tray and remove the - Canon 3060 | Startup Guide - Page 17
holds ejected documents. Document eject tray Scanned documents are ejected here. Document eject guide attachment holes Attach the document eject guide to these holes. Document positioning mark Align the document guides with the mark that corresponds to the size of the document to be scanned. Paper - Canon 3060 | Startup Guide - Page 18
■ Rear Ventilation holes Power cord connector Connect the power cord that is provided with the scanner here. SCSI connectors Connect a 50-pin half-pitch (pin type) SCSI cable connector here. DIP switches Use these switches to set the SCSI ID and to turn the terminator on/off. CAUTION Do not - Canon 3060 | Startup Guide - Page 19
Installing the Scanner Requirements In order to install this scanner, you will need the following: ● PC ● SCSI interface cable (→ page 16) ● SCSI interface board Note ● Some application software may require a device driver that is different from the one that is provided on the setup disc. ● Make - Canon 3060 | Startup Guide - Page 20
Connecting the Scanner to Your PC Connect the DR-3060/3080C either directly to your PC or to a SCSI device daisy chain. Notes on the Shape of the Connector and the SCSI Interface Cable • The DR-3060/3080C is equipped with a 50-pin half-pitch (pin type) SCSI connector. • After checking the shape of - Canon 3060 | Startup Guide - Page 21
SCSI ID and Terminator Settings Use the DIP switches on the rear of the scanner to make the SCSI ID and terminator settings. For the DIP switches, the upper position is the ON position, and the lower position is the OFF position. Factor settings (Terminator: OFF; SCSI ID = 2) ON1 2 3 4 SCSI ID - Canon 3060 | Startup Guide - Page 22
Terminator Setting The terminator should be set to "ON" only in the SCSI device that is at the end of the SCSI daisy chain. If the scanner is the only SCSI device that is being connected to the PC, or if the scanner is being connected at the end of a daisy chain of SCSI devices, set bit 1 of the - Canon 3060 | Startup Guide - Page 23
Connecting the Power Cord Connect the power cord that is provided with this scanner to the power cord connector located on the rear of the scanner, and then plug the cord into a power outlet. Notice ● Only use the power cord that was provided with this unit. ● Always be sure to turn the power switch - Canon 3060 | Startup Guide - Page 24
after connecting this scanner to your PC, Windows Plug and Play automatically displays a screen prompting you to install the scanner driver. Follow the instructions on the screen to proceed with the installation. ● If you are using Windows 95, the "Found New Hardware" dialog box appears. 1. Select - Canon 3060 | Startup Guide - Page 25
● If you are using Windows 98, the "Add New Hardware Wizard" dialog box appears. 1. Click the Next button. 2. Select "Search for the best driver for your device. (Recommended)." and then click the Next button. 3. Load the setup disc into the computer's CD-ROM drive. 4. Select "Specify a location", - Canon 3060 | Startup Guide - Page 26
operate at all even though the power is on, immediately turn the unit off and unplug the power cord. Contact your dealer or service representative to have the unit serviced. Turning the Power Off CAUTION If the unit will not be used for an extended period of time, unplug the power cord - Canon 3060 | Startup Guide - Page 27
that runs normally under your operating system Notice If your CPU, memory or SCSI host adapter does not meet the recommended specifications, you may experience problems such as slow scanning speed. Installing the Software 23 - Canon 3060 | Startup Guide - Page 28
ISIS-compatible or TWAIN-compatible application software. For details, contact your application software dealer. ● Some functions described in this manual may not be supported by all application software. Installing the ISIS/TWAIN Driver Follow the procedure described below to install the ISIS/TWAIN - Canon 3060 | Startup Guide - Page 29
\Setup.exe" (where "D" is the drive letter assigned to your CD-ROM drive) and then click the OK button. The Installer starts. 5. Follow the onscreen instructions and complete the installation process. Installing the Software 25 - Canon 3060 | Startup Guide - Page 30
"D:\CapturePerfect\Setup.exe" (where "D" is the drive letter assigned to your CD-ROM drive) and then click the OK button. The Installer starts. 5. Follow the instructions on the screen and complete the installation process. 26 Installing the Software - Canon 3060 | Startup Guide - Page 31
Using the Software Using the ISIS/TWAIN Driver The ISIS/TWAIN driver help file describes how to use the ISIS/TWAIN driver. To access the ISIS/TWAIN driver help file, click Start - Programs Canon DR-3060 & 3080C - Canon DR-3060 & 3080C Help, or click the Help button in the driver's dialog box. Note - Canon 3060 | Startup Guide - Page 32
Using CapturePerfect Follow the procedure described below to start and close CapturePerfect. Note The basic method for scanning using CapturePerfect is described in the CapturePerfect help. From the Help menu on the CapturePerfect menu bar, click Help, then refer to the explanation of how to use - Canon 3060 | Startup Guide - Page 33
Closing CapturePerfect 1. On the File menu, click Exit. CapturePerfect closes. Notes When the scanner is scanning or some operation is pending after scanning has been started (such as when scanning has been interrupted), the mouse pointer changes to an hourglass. If the mouse pointer appears as an - Canon 3060 | Startup Guide - Page 34
automatic feed 0.0019 in. to 0.0079 in. (0.05 mm to 0.2 mm) with manual feed There are certain criteria that a document must meet in order to be scannable. to jam. ● Scanning documents before the ink is dry can cause problems with the scanner. Always make sure that the ink on a document - Canon 3060 | Startup Guide - Page 35
Setting Up the Paper Feed Tray and the Document Eject Tray 1. Grasp the edge of the paper feed tray and lift it up. 2. Gently open the paper feed tray towards you. CAUTION Do not place anything other than documents, and especially not heavy objects, on the paper feed tray. The object could fall - Canon 3060 | Startup Guide - Page 36
lift it up. 5. Gently open the document eject tray extension towards you. Note ● Always be sure to open the document eject tray extension. If the guide is not open when a document is scanned, the scanned document could droop down and become jammed in the scanner. ● To close the trays and extensions - Canon 3060 | Startup Guide - Page 37
eject tray extension and become jammed in the scanner. Avoid this problem by attaching the document eject guide. 1. Grasp the edge of the document eject tray extension and lift it up. 2. Attach the Auxiliary paper support plate to the document eject tray extention. 3. Gently open the document - Canon 3060 | Startup Guide - Page 38
Although it is still possible to scan normal documents while the document eject guide is in place, the guide will cause stacking problems when scanning documents on paper that is thicker than normal. Therefore, the document eject guide should be removed when it is not needed. ● Be certain to remove - Canon 3060 | Startup Guide - Page 39
scanner supports both automatic and manual feed operation. The methods for loading the document to be scanned when using automatic feed and manual feed are on the edge of a sheet of paper. 3. Align the paper side guides with the width of the document that is to be scanned. If the document is printed - Canon 3060 | Startup Guide - Page 40
Note Make sure that the left edge of the document does not extend to the left of the mark. A paper jam may occur if you begin to scan a document that is positioned at this mark. B4 A4 LTR 4. Place the document on the paper feed tray so that the document is face up. Notice There are stacking - Canon 3060 | Startup Guide - Page 41
a system error or a paper jam while the scanner is scanning, resolve the problem, make sure that the scanned image of the last page that was fed has been scanned, protect the scanner from damage by removing the document eject guide (if it was attached to the document eject tray) and then closing - Canon 3060 | Startup Guide - Page 42
feed tray rises up, allowing you to feed pages in manually. The document feed opening remains in the upper position as long as "manual feed" is set; if "automatic feed" is set, the document feed opening descends. 2. Align the paper side guides with the width of the document that is to be scanned - Canon 3060 | Startup Guide - Page 43
Note It may be difficult to manually feed a sheet that is unusually thin or that is curled. It may be necessary operation in accordance with the normal operating procedure for your application software, and continue to manually feed sheets into the scanner, one at a time. Using the Scanner 39 - Canon 3060 | Startup Guide - Page 44
Patch Code Sheets Patch Code Sheets are sheets printed with a special pattern that is used for separating files without interrupting scanning. When a Patch Code Sheet is read on the scanner, and the pattern on the sheet is recognized, the sheet functions as a Patch Code Sheet, and a file separator - Canon 3060 | Startup Guide - Page 45
Functions of Patch Code Sheets ● Patch code patterns PATCH T When this sheet is detected, a file separator is inserted after the document following this sheet. PATCH II When this sheet is detected, a file separator is inserted after this sheet. Note, however, that the setting is ignored, and - Canon 3060 | Startup Guide - Page 46
Effective Area for Detecting Patch Code Patterns 5 Patch code pattern 5 (effective area for detecting patch code patterns) 5 94 Unit: mm Notice ● When you copy the originals, adjust the size and density settings to match the original. Extremely dark or light copies may not scan correctly. ● - Canon 3060 | Startup Guide - Page 47
document eject tray, remove them. 2. Close the document eject tray extension. However, if the document eject guide is currently attached to the tray, it is not necessary to remove the document eject guide. Simply continue with the procedure described below. 3. Grasping the upper unit as shown in the - Canon 3060 | Startup Guide - Page 48
4. Raise the upper unit as far as it will go. 5. Remove the jammed paper inside of the scanner. When the jam occurred in the feed section When the jam occurred in the eject section Notice Do not pull hard on the jammed sheet; remove it gently. If the sheet does rip, be sure to remove all of the - Canon 3060 | Startup Guide - Page 49
6. Gently lower the upper unit to its normal position. 7. Gently push down on the top of the upper unit until the upper unit clicks into place. Note Once you have cleared the paper jam, check whether the scanned image on the last page has been stored properly or not, and then resume scanning. Using - Canon 3060 | Startup Guide - Page 50
Regular Maintenance Clean the scanner on a regular basis as described below in order to maintain peak scanning quality. CAUTION For safety's sake, always turn the unit off and unplug the power cord before cleaning this unit. Cleaning the Scanner To clean the exterior of the scanner, dampen a cloth - Canon 3060 | Startup Guide - Page 51
Cleaning the Scanning Glass and the Rollers 1. Turn the power off and unplug the power cord from the power outlet. 2. If the document eject tray extension is open, close it. 3. Grasp the upper unit and gently lift it up as far as it will go. 4. Wipe the scanning glass (the shaded portion ■ in the - Canon 3060 | Startup Guide - Page 52
, and how to resolve them. Refer to the troubleshooting section related to the problem that you have encountered. The scanner does not turn after consulting the above section you still cannot resolve the problem, contact your dealer or your service representative. ✘ The scanner does not turn on Check - Canon 3060 | Startup Guide - Page 53
The SCSI host adapter is not installed in the PC correctly. Refer to the instruction manual for the SCSI host adapter and install the SCSI host adapter in the PC correctly these symbols appears, refer to the instruction manual for the SCSI board and reconfigure the SCSI board. Troubleshooting 49 - Canon 3060 | Startup Guide - Page 54
application software. In Windows NT 4.0 Workstation, Windows 2000 Professional or Windows XP, the ASPI manager has not been installed correctly. Following the instructions in the SCSI host adapter instruction manual, install the ASPI manager and then start up the ASPI manager. 50 Troubleshooting - Canon 3060 | Startup Guide - Page 55
correctly? Has the application software been set up correctly? ● Is there a problem in the PC system? Notice If the scanner will not respond at all due described on page 47. If the rollers are worn, contact your service representative and request to have the rollers replaced. For details on how to - Canon 3060 | Startup Guide - Page 56
lines or spots on the image, or if there is some other problem with a scanned image, likely causes are listed below. Check each item instruction manual. An attempt was made to use a function of the scanner that is not supported by the application software. Some application software may not support - Canon 3060 | Startup Guide - Page 57
0.0059 in. (0.06 mm to 0.15 mm) with automatic feed 0.0019 in. to 0.0079 in. (0.05 mm to 0.2 mm) with manual feed Document feeding method Automatic/manual Scanning method Contact sensor Light source LED Scanning side Simplex/Duplex Scanning modes DR-3060 Black and white, text enhanced - Canon 3060 | Startup Guide - Page 58
: 20% to 80% RH ● The functions described above can be used if they are supported by the application software. ● Some functions may not be available, depending on the performance of This is a transport roller replacement kit. Service personnel must actually perform the replacement. Contact your - Canon 3060 | Startup Guide - Page 59
43 stacking limit marks 36 DR-3080C cleaning 46 functions of 9 moving 6 I Installation location 5 Interface cable connetion 16 P Paper jam cleaning 43 Paper side guides adjustment 35 position 13 Patch Code Sheets 40 PDF 40 Power off 22 on 20 Power cord connection 19 Power cord connector position 14 - Canon 3060 | Startup Guide - Page 60
MEMO 56 MEMO
-
 1
1 -
 2
2 -
 3
3 -
 4
4 -
 5
5 -
 6
6 -
 7
7 -
8
-
9
-
10
-
11
-
12
-
13
-
14
-
15
-
16
-
17
-
18
-
19
-
20
-
21
-
22
-
23
-
24
-
25
-
26
-
27
-
28
-
29
-
30
-
31
-
32
-
33
-
34
-
35
-
36
-
37
-
38
-
39
-
40
-
41
-
42
-
43
-
44
-
45
-
46
-
47
-
48
-
49
-
50
-
51
-
52
-
53
-
54
-
55
-
56
-
57
-
58
-
59
-
60
 |
 |
Startup Manual
Read this manual thoroughly before using this scanner.
Keep this manual in a safe place for future reference.