Canon 3060 Startup Guide - Page 26
Turning the Power Off - driver windows 7
 |
View all Canon 3060 manuals
Add to My Manuals
Save this manual to your list of manuals |
Page 26 highlights
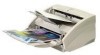
● If you are using Windows XP, the "Found New Hardware Wizard" dialog box appears. 1. Load the setup disc into the computer's CD-ROM drive. 2. In the "Welcome to the Found New Hardware Wizard" screen, select "Install from a list or specific location (Advanced)", and then click the Next button. 3. Select "Search for the best driver in these locations", and then clear the "Search removable media (floppy, CD-ROM...)" check box. Select "Include this location in the search", type "D:\INF" (where "D" is the drive letter assigned to your CD-ROM drive), and then click the Next button. 4. Click the Continue Anyway button in the "Hardware Installation" dialog box. Although a message appears indicating that the driver "has not passed Windows logo testing", simply continue operation. 5. Click the Finish button in the "Completing the Found New Hardware Wizard" screen. WARNING If the unit ever makes a strange noise, emits smoke or a strange odor, or becomes hot, or if the unit does not operate at all even though the power is on, immediately turn the unit off and unplug the power cord. Contact your dealer or service representative to have the unit serviced. Turning the Power Off CAUTION If the unit will not be used for an extended period of time, unplug the power cord for safety's sake. 1. Turn off the PC. 2. Turn off the scanner. The power switch is located on the lower right front corner of the scanner. To turn the scanner off, press the power switch. When the power indicator turns off, the scanner is off. Note Wait at least 10 seconds before turning the scanner back on. 22 Installing the Scanner
-
 1
1 -
2
-
3
-
4
-
5
-
6
-
7
-
8
-
9
-
10
-
11
-
12
-
13
-
14
-
15
-
16
-
17
-
18
-
19
-
20
-
 21
21 -
 22
22 -
 23
23 -
 24
24 -
 25
25 -
 26
26 -
 27
27 -
 28
28 -
 29
29 -
 30
30 -
 31
31 -
32
-
33
-
34
-
35
-
36
-
37
-
38
-
39
-
40
-
41
-
42
-
43
-
44
-
45
-
46
-
47
-
48
-
49
-
50
-
51
-
52
-
53
-
54
-
55
-
56
-
57
-
58
-
59
-
60
 |
 |
