Canon CanoScan FB 1200S User Manual
Canon CanoScan FB 1200S Manual
 |
View all Canon CanoScan FB 1200S manuals
Add to My Manuals
Save this manual to your list of manuals |
Canon CanoScan FB 1200S manual content summary:
- Canon CanoScan FB 1200S | User Manual - Page 1
f o r Macintosh Plug-in Module CS-S 3.6 for CanoScan FB1200S Color Image Scanners User's Guide - Canon CanoScan FB 1200S | User Manual - Page 2
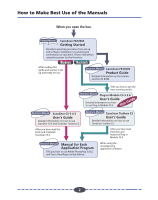
and confirmation of operation. Please read before using the scanner for the first time. Windows Macintosh After reading this guide and scanner is set up and ready for use. Electronic Manual CanoScan FB1200S Product Guide Detailed information on the scanner and the CD-ROM. Tells you how to get - Canon CanoScan FB 1200S | User Manual - Page 3
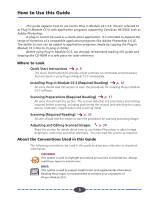
How to Use this Guide This guide explains how to use Canon Plug-in Module CS-S 3.6 (herein referred to as Plug-in Module CS-S) with application programs supporting CanoScan FB1200S, such as Adobe Photoshop. A plug-in cannot be used as a stand-alone application; it is intended to expand the range of - Canon CanoScan FB 1200S | User Manual - Page 4
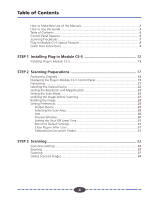
Manuals 2 How to Use this Guide 3 Table of Contents 4 Control Panel Features 6 Scanning Procedures 7 Plug-in Module CS-S Special Features 8 Quick Start Instructions Output Device 29 Selecting the Scan Area 29 Unit ...30 Preview Window 30 Setting the Shut Off Lamp Time 31 Return to Default - Canon CanoScan FB 1200S | User Manual - Page 5
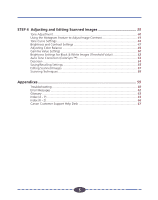
Value 52 Auto Tone Correction (ColorSync 53 Descreen ...54 Saving/Recalling Settings 55 Editing Scanned Images 57 Scanning Techniques 58 Appendices 59 Troubleshooting 60 Error Messages ...62 Glossary ...63 Index (A - P) ...65 Index (R - Z) ...66 Canon Customer Support Help Desk 67 5 5 - Canon CanoScan FB 1200S | User Manual - Page 6
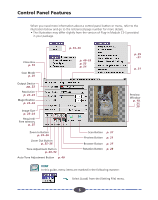
§ p. 40 § p. 40~52 § p. 53 § p. 54 Scan Button § p. 37 Preview Button § p. 21 Browser Button § p. 27 Rotation Button § p. 28 § p. 29 ~31 § p. 31 Preview Window § p. 19, 21, 30 HINT In this guide, menu items are marked in the following manner: Select [Load] from the [Setting File] menu. 6 6 - Canon CanoScan FB 1200S | User Manual - Page 7
CS-S Software § p. 12 Refer to the Getting Started Guide that accompanied your scanner for attachment instructions. STEP 2 Scanning Preparations § p. 17 • Positioning Originals 53 • Descreen p. 54 If the current brightness and color pose no problem, there is no need to adjust these settings. 7 7 - Canon CanoScan FB 1200S | User Manual - Page 8
can be performed easily because you can see the results of your changes as they are executed. w w w • Supports ColorSync™ Auto Tone Correction Supports ColorSync™ 2.0 or later versions. Achieves superior color quality by automatically compensating for and aligning the tones of various devices - Canon CanoScan FB 1200S | User Manual - Page 9
CD-ROM. 1 Install Plug-in Module CS-S p. 13 1. Place the CanoScan Setup Utility CD-ROM into the computer's 2 CD-ROM drive. The CanoScan Setup Utility will start automatically. (If it doesn't, double click the [CanoScan FB1200S] icon, followed by the [setup] icon.) 2. Click [Install Software - Canon CanoScan FB 1200S | User Manual - Page 10
Set the Scan Mode, Output Device, Resolution and Magnification pp. 22-26 • Scanning mode determines how the image is scanned. 5 • Output device setting optimizes the images for particular uses. • Resolution determines the amount of detail in the scanned image. • Magnification determines the - Canon CanoScan FB 1200S | User Manual - Page 11
-S will scan the image. • When the scan is complete, the Plug-in Module CS-S control panel will close. The image will appear in the Photoshop window. Save the Scanned Image p. 38 1. Save the image with the application program (Photoshop), 9 specifying a folder, file name and file format. 11 11 - Canon CanoScan FB 1200S | User Manual - Page 12
STEP 1 Installing Plug-in Module CS-S Step 1 describes how to install Plug-in Module CS-S. If it has already been installed according to the instructions in the Getting Started Guide, there is no need to perform the procedures described in Step 1. Installing Plug-in Module CS-S p. 13 12 12 - Canon CanoScan FB 1200S | User Manual - Page 13
Installing Plug-in Module CS-S STEP 1 If Plug-in Module CS-S has already been installed according to the instructions in the Getting Started Guide that came with the scanner, there is no need to perform the following procedures. Proceed to Step 2, Scanning Preparations. Caution In order to - Canon CanoScan FB 1200S | User Manual - Page 14
-in Module CS-S has already been installed according to the instructions in the Getting Started Guide, there is no need to perform the following procedures. Place the CanoScan Setup Utility CD-ROM into the computer's CD-ROM drive. Language select window will display to select your language, then the - Canon CanoScan FB 1200S | User Manual - Page 15
STEP 1 Delete the check marks beside all the programs other than Plug-in Module CS-S by clicking the check boxes beside their names. Click the [Start Installation] button at the bottom right of the window. ª Click the [Yes] button to start the installation. 15 15 - Canon CanoScan FB 1200S | User Manual - Page 16
as prompted by the on-screen instruction. ª Click the [Yes] button to restart the computer. Remove the CanoScan Setup Utility CD-ROM from the ). The following display profile files are available: CANON gamma 1.5 monitor, CANON gamma 1.8 monitor, CANON gamma 2.1 monitor. If you wish to adjust - Canon CanoScan FB 1200S | User Manual - Page 17
STEP 2 Scanning Preparations Step 2 presents the essential preparations for scanning. The following procedures are explained on the indicated pages. Positioning Originals Displaying the Plug-in Module CS-S Control Panel Previewing Selecting the Output Device Setting the Resolution and - Canon CanoScan FB 1200S | User Manual - Page 18
of position. Hint • For details about the types of originals you can set on the scanner document glass for scanning, refer to the Getting Started Guide. 18 18 - Canon CanoScan FB 1200S | User Manual - Page 19
image or correct colors, adjust the histogram or start the preview or scan. The image size and disk size that were specified in the preview window are automatically displayed here. Preview Window Displays the image in preview mode. 19 19 - Canon CanoScan FB 1200S | User Manual - Page 20
for instructions on how to connect the scanner (p. 9). Start Adobe Photoshop 5.0 LE. Select Plug-in Module CS-S with Photoshop 5.0 LE. Open the [File] menu and select [Import] and [Canon PI CS-S 3.6]. The Plug-in Module CS-S control panel opens, previewing starts automatically, and the preview - Canon CanoScan FB 1200S | User Manual - Page 21
will begin as soon as you start Plug-in Module CS-S. However, if [None] is selected for the [Preview Settings] in the Preview Window Settings dialog, previewing will not start automatically after the control panel opens so follow the procedure below to start previewing. Previewing scans the entire - Canon CanoScan FB 1200S | User Manual - Page 22
Selecting the Output Device STEP 2 When you select the output device, you set the resolution for the scanned image when it is output. Select a value for printing or for saving a file. If your image is destined to be shown on a computer display or web site, select the 72 dpi setting. Procedures - Canon CanoScan FB 1200S | User Manual - Page 23
STEP 2 Setting the Resolution and Magnification The magnification of an image can be changed before scanning to accommodate reproductions that are larger or smaller than the original. The settings can be changed in increments of 1%. 1.38"/3.5cm Scanning with horizontal/ vertical 2x magnification - Canon CanoScan FB 1200S | User Manual - Page 24
STEP 2 To Set the Magnification Factor Set the desired magnification factor on the control panel. Slider Drag the slider bar in either direction or use the arrow keys to change the resolution. Click here to return the magnification factor to 100%. Click the up or down arrow to increase or - Canon CanoScan FB 1200S | User Manual - Page 25
Setting the Scan Mode STEP 2 When an image is scanned, it is read as a collection of "dots." The scan mode that is selected determines how each of these dots is represented in the output. The following five scan modes are available. Black and White Expresses the image with dots of only two shades: - Canon CanoScan FB 1200S | User Manual - Page 26
. Select a scan mode from the pop-up menu. Caution • If you select 12-bit Grayscale or 36-bit Color for a software application that does not support these options, the system may hang up when you attempt to execute the scanning job with either selection. Before you use these settings, check the - Canon CanoScan FB 1200S | User Manual - Page 27
the magnification and scan mode to the appropriate settings (pp. 22-32). Click on the [Browser] button. • The selection frame will appear in the preview window to enable a portion of the image to be selected. • The size and shape of the selection frame cannot be changed because it is automatically - Canon CanoScan FB 1200S | User Manual - Page 28
Rotating the Image STEP 2 You can rotate the image in the preview window clockwise to the right or counterclockwise to the left in increments of 90 or 180 degrees. To rotate the image, click the appropriate button. Caution • - Canon CanoScan FB 1200S | User Manual - Page 29
device (printer, files), scan area setting method, size display units, preview window size, setting the shut off lamp time, and close plug-in after be scanned, drag the mouse to size the selection frame in the preview window. The area inside the borders of the selection frame will be scanned. When - Canon CanoScan FB 1200S | User Manual - Page 30
Unit Settings Dialog Box The units displayed in this section of the control panel will change. Preview Window You can size the preview window and set its resolution. Enter a large value for a large preview window size. You can also use this feature to set the auto preview and preview cache options - Canon CanoScan FB 1200S | User Manual - Page 31
the Shut Off Lamp Time This option turns off the FB1200S lamp to save power if it remains idle for a tables list the major default settings. Scan Mode Gamma Setting Magnification Unit Basic Resolution Preview Window Size Control Panel Position 24-bit Color Menu setting (CRT type for B) 100% Pixels - Canon CanoScan FB 1200S | User Manual - Page 32
menu in the control panel. Select the desired option from the pull-down menu. • Selecting any one of the Unit, Aspect Ratio or Preview Window options displays the respective dialog. Choose the desired value in the dialog and select [OK] to change the setting. • A confirmation dialog will display if - Canon CanoScan FB 1200S | User Manual - Page 33
STEP 3 Scanning Step 3 presents the procedures for conducting the final scan, saving the scanned image in a file and editing image files. Follow these procedures to perform scanning jobs. Scan Area Settings Zooming Scanning Saving Scanned Images p. 34 p. 35 p. 37 p. 38 33 33 - Canon CanoScan FB 1200S | User Manual - Page 34
one of four shapes Dragging the selection frame with the mouse cursor changes its shape. • Double-clicking the mouse button anywhere in the preview window selects the entire image. Hint • To specify small areas with precision, it is convenient to expand the preview display with the Zoom In button - Canon CanoScan FB 1200S | User Manual - Page 35
zoom function. See Operating Procedures (p. 34). Selection Frame ª Hint • The Zoom In button cannot be activated unless an area has been selected in the preview window. • You can zoom an area of the screen continuously up to six times. The Zoom In button [ ] cannot be clicked if the selected area - Canon CanoScan FB 1200S | User Manual - Page 36
STEP 3 Click on the Zoom In button [ ]. The selected area will be displayed in expanded form. If you want to enlarge the image again, reduce the size of the area selected with the frame and click the Zoom In button again. Click the Zoom Out button [ ] to restore the view prior to zooming. 36 36 - Canon CanoScan FB 1200S | User Manual - Page 37
Scanning STEP 3 Once you have set the magnification and scan mode, you may proceed with the scan. Once the scan is complete, Plug-in Module CS-S automatically closes and returns to the application software, such as Photoshop 5.0 LE, if the [Close plug-in after scan] setting is on. The following - Canon CanoScan FB 1200S | User Manual - Page 38
scanned image with the parent software application. The example below shows how to save a scanned image with Photoshop 5.0 LE. See the Photoshop 5.0 LE Users Guide. Procedure After an image is scanned, the image is displayed as "Untitled". When you save the image you can give the file a name, select - Canon CanoScan FB 1200S | User Manual - Page 39
STEP 4 Adjusting and Editing Scanned Images Scanned images may be corrected for brightness and color tone or edited in a variety of ways. The potential adjustments vary with the scan mode utilized in the preview. Adjustments to the scanned image may be made after the image is previewed. Color - Canon CanoScan FB 1200S | User Manual - Page 40
Tone Adjustment STEP 4 Use tone adjustment to enhance the brightness or color of the image in the preview area. Open the [Image] menu and select [Tone adjustment], or click the [Tone adjustment] button, to open the Tone adjustment dialog so you can enhance the preview image. You can also click the - Canon CanoScan FB 1200S | User Manual - Page 41
STEP 4 Using the Histogram Feature to Adjust Image Contrast The data comprising an image contains a variety of brightness settings ranging from shadows to highlights. These settings are represented in Plug-in Module CS-S by values ranging between 0 and 255. The difference in these values determines - Canon CanoScan FB 1200S | User Manual - Page 42
STEP 4 To Adjust a Histogram Specify the area of the image (the entire area to be scanned) for which a histogram will be generated. See Scan Area Settings (p. 34). The histogram will not display correctly if an extremely small area is selected. To select small areas, first expand the display with - Canon CanoScan FB 1200S | User Manual - Page 43
STEP 4 Click on the [OK] button. The preview image will change according to the values specified with the histogram. Hint The histogram dialog can also be displayed by selecting [Tone adjustment] from the [Image] menu. 43 43 - Canon CanoScan FB 1200S | User Manual - Page 44
to manipulate the graph to change the settings. When you test these settings yourself, you can see the changes immediately reflected in the preview window or the browser to achieve many interesting effects. OUTPUT Unadjusted Curve If you want to brighten the light areas ... Drag the mid-tones of - Canon CanoScan FB 1200S | User Manual - Page 45
a file under a file name and load the file again whenever you want to use the settings. Click the OK button. The image in the preview window changes to reflect the new settings. Hint You can also open this dialog by opening the [Image] menu in the control panel and selecting [Tone - Canon CanoScan FB 1200S | User Manual - Page 46
STEP 4 The Relationship Between the Tone Curve and Image Brightness Tone curve values fall with a range of 0.01 to 10.00. A value of 1 appears as a straight line in the graph, and if the value is any value other than one, the line on the graph will appear curved. The relationship between the shape - Canon CanoScan FB 1200S | User Manual - Page 47
Brightness and Contrast Settings STEP 4 You can adjust the image with two slide bars, one for contrast and one for brightness. Use this method to adjust an image before scanning if it is slightly out of focus or too dark. Hint You cannot use this feature with the black and white scan mode or the - Canon CanoScan FB 1200S | User Manual - Page 48
values to their default values, click this button. Click the [OK] button. The settings will be reflected in the image currently displayed in the preview window. 48 48 - Canon CanoScan FB 1200S | User Manual - Page 49
Adjusting Color Balance STEP 4 You can enhance color matching by adjusting the color balance of one or all of the three primary colors, red, green and blue (RGB). Use this feature to adjust color balance when you see an over abundance of a color in a scanned image. Hint • You cannot use this - Canon CanoScan FB 1200S | User Manual - Page 50
• Please read the documents shipped with your display or contact the manufacturer's customer service department to obtain the correct gamma value for your particular display model. • If Panels folder) and do not manually change the gamma value settings as described in the following pages. 50 50 - Canon CanoScan FB 1200S | User Manual - Page 51
setting to its default value, click this [Reset] button. Click the [OK] button. The changes are reflected in the image currently displayed in the preview window. 51 51 - Canon CanoScan FB 1200S | User Manual - Page 52
STEP 4 Brightness Settings for Black & White Images (Threshold Value) When the scan mode is set to black and white, the image brightness can be adjusted. The threshold value setting determines whether a halftone will be expressed as a black or a white data point. The possible threshold values range - Canon CanoScan FB 1200S | User Manual - Page 53
STEP 4 Auto Tone Correction (ColorSync™) If you scan an image in 24-bit color with ColorSyncTM selected, you can adjust the color automatically. The ColorSync™ function automatically matches the tones produced and displayed by scanners, displays and color printers. Optimal color correction is - Canon CanoScan FB 1200S | User Manual - Page 54
Descreen STEP 4 Moiré patterns occasionally appear when items printed at high resolutions are scanned. To reduce this phenomenon, scan photographs and other high-resolution prints with the descreen activated. Shut it off to scan lower resolution items, such as newspapers, books and magazine text. - Canon CanoScan FB 1200S | User Manual - Page 55
Saving/Recalling Settings STEP 4 The scan mode, resolution and preference settings can be saved with a preview image to a settings file and recalled for future processing. The user may freely assign a name to the settings file. It is convenient to save frequently used settings in a file. Hint In - Canon CanoScan FB 1200S | User Manual - Page 56
STEP 4 To Recall a Settings File Open the [Setting File] menu and select [Load]. Select the folder where the file is stored and click the name of the file you want to load. Click the [Open] button. The file you selected opens and the settings stored in the file are enabled for the Tone adjustment - Canon CanoScan FB 1200S | User Manual - Page 57
a simple demonstration of how to use the filter functions of Kai's Power Tools®, a plug-in module for Photoshop®. Refer to the manuals accompanying each application program for more detailed explanations. Many special effects may be achieved with filters. [Filter] menu KPT2.1, KPT Vortex Tiling - Canon CanoScan FB 1200S | User Manual - Page 58
. The maximum optical resolution of the CanoScan FB1200S is 1200 dpi for both the primary scan (horizontal dimension of the document) and secondary scan (vertical dimension). The 1200 dpi resolution of the primary scan is achieved with a proprietary Canon technology, the VAriable Refraction Optical - Canon CanoScan FB 1200S | User Manual - Page 59
Supported Computers: Memory Requirements: System Software: Supported Scanners: Macintosh or Power Macintosh equipped with CD-ROM drive and hard disk drive (use on iMac and Macintosh compatibles cannot be guaranteed) 32 MB or more (64 MB or more recommended) System 7.5 or later CanoScan FB1200S - Canon CanoScan FB 1200S | User Manual - Page 60
sections of the Product Guide electronic manual or the Troubleshooting item on the CD-ROM provided with your scanner. If your problem lies outside the solutions provided below, consult the retail outlet from which you purchased the software or the closest Canon Customer Support Help Desk. Hint - Canon CanoScan FB 1200S | User Manual - Page 61
resolution (p. 23) or scan area (p. 34) until the required space is lower. Problem: The "Insufficient Memory" error message appears when scanning. ®Solution 1: Select the smallest Adobe Photoshop (or other software application) manual. ®Solution 6: Increase the amount of RAM as required. 61 61 - Canon CanoScan FB 1200S | User Manual - Page 62
. • Increase the memory allocated to Photoshop. • Unlock the lock, attach the AC adapter to the scanner and restart Plug-in Module CS-S. • Contact your nearest Canon Customer Support Help Desk. • Note down the Sense Code, Additional Sense Code and error message and contact the nearest - Canon CanoScan FB 1200S | User Manual - Page 63
Glossary A P P E N D I C E S Brightness The amount of light in an image when it is scanned. Increasing the brightness setting makes the entire image lighter, and decreasing the brightness setting makes the entire image darker. (p. 47) Contrast The degree of difference between the dark and light - Canon CanoScan FB 1200S | User Manual - Page 64
A P P E N D I C E S Image File A computer file generated by scanning an image or by creating an image with an image editing software program, such as Photoshop®. An image file is generally comprised of bitmap data, a collection of color information corresponding to each dot of an image. There are - Canon CanoScan FB 1200S | User Manual - Page 65
Brightness 47, 63 Brightness/Contrast tab 48 Browser 8, 27 Browser button 6, 10, 27 Buttons 19 C CanoScan Setup Utility CD-ROM 9, 14 Close box 6, 19 Close Plug-in After Scan 31 Color 25 Color 29 Preview 9, 64 Preview button 6, 21 Preview setting 30 Preview window 6, 19, 30 Preview window size 30 65 - Canon CanoScan FB 1200S | User Manual - Page 66
and software. While every effort has been made to ensure that the information contained in this guide is accurate and complete, no liability can be accepted for any errors or omissions. Canon Inc. reserves the right to change the specifications of the hardware and software described within this - Canon CanoScan FB 1200S | User Manual - Page 67
ésident Paul-Doumer 92414 Courbevoie Cedex, France Tél.01 4199 7777 Fax.01 4199 7951 Hotline: Tél.01 4199 7070 CANON DEUTSCHLAND GmbH Postfach 528, 47705 Krefeld, Germany CANON- Hotline-Service Customer Support: (0 21 51)349-555 Info-Desk: (0 21 51)349-566 Mailbox: (0 21 51)349-577 Telefax: (0 21 51 - Canon CanoScan FB 1200S | User Manual - Page 68
DANMARK Vasekær 12, DK-2730 Herlev, Denmark Hotline: 44 88 26 66 http://www.canon.dk CANON NORGE AS Hallagerbakken 110, Boks 33, Holmlia 1210 Oslo 12, Norway Tlf: 2262 9321 FAX. 2262 0615 CANON BENELUX NEDERLAND N.V. Neptunusstraat 1, 2132 JA Hoofddorp The Netherlands Tel.: 023-5 670 123 Fax: 023 - Canon CanoScan FB 1200S | User Manual - Page 69
LTD. 1 Thomas Holt Drive, North Ryde, Sydney N.S.W. 2113, Australia Info-Line: (02)9805 2864 CANON NEW ZEALAND LTD. Fred Thomas Drive, Takapuna P.O. Box 33-336 Auckland, New Zealand Info-Line: 0900-522666 CANON HONG KONG CO., LTD. 10/F, Lippo Sun Plaza, 28 Canton Road Tsimshatsui, Kowloon, Hong Kong - Canon CanoScan FB 1200S | User Manual - Page 70
I-OE-023AA 0399 CDS ©Canon Inc. 1999 Adobe Acrobat PDF created in Japan
-
 1
1 -
 2
2 -
 3
3 -
 4
4 -
 5
5 -
 6
6 -
 7
7 -
8
-
9
-
10
-
11
-
12
-
13
-
14
-
15
-
16
-
17
-
18
-
19
-
20
-
21
-
22
-
23
-
24
-
25
-
26
-
27
-
28
-
29
-
30
-
31
-
32
-
33
-
34
-
35
-
36
-
37
-
38
-
39
-
40
-
41
-
42
-
43
-
44
-
45
-
46
-
47
-
48
-
49
-
50
-
51
-
52
-
53
-
54
-
55
-
56
-
57
-
58
-
59
-
60
-
61
-
62
-
63
-
64
-
65
-
66
-
67
-
68
-
69
-
70
 |
 |
Plug-in Module CS-S 3.6
for CanoScan FB1200S Color Image Scanners
User's Guide
f o r
M a c i n t o s h