Canon EOS 10D 10D_PictBridge.pdf - Page 6
Setting the Trimming, Trim the image., Select [Trimming].
 |
UPC - 750845811339
View all Canon EOS 10D manuals
Add to My Manuals
Save this manual to your list of manuals |
Page 6 highlights
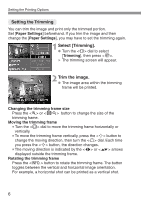
Setting the Printing Options Setting the Trimming You can trim the image and print only the trimmed portion. Set [Paper Settings] beforehand. If you trim the image and then change the [Paper Settings], you may have to set the trimming again. Select [Trimming]. 1 • Turn the < > dial to select [Trimming], then press < >. s The trimming screen will appear. Trim the image. 2 • The image area within the trimming frame will be printed. Changing the trimming frame size Press the < > or < > button to change the size of the trimming frame. Moving the trimming frame • Turn the < > dial to move the trimming frame horizontally or vertically. • To move the trimming frame vertically, press the < > button to change the moving direction, then turn the < > dial. Each time you press the < > button, the direction changes. • The moving direction is indicated by the < > or < > arrows displayed outside the trimming frame. Rotating the trimming frame Press the < > button to rotate the trimming frame. The button toggles between the vertical and horizontal image orientation. For example, a horizontal shot can be printed as a vertical shot. 6
-
 1
1 -
 2
2 -
 3
3 -
 4
4 -
 5
5 -
 6
6 -
 7
7 -
 8
8 -
 9
9 -
 10
10 -
 11
11 -
 12
12
 |
 |
