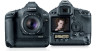
Canon EOS-1Ds Mark III Professional Products 2010 Brochure - Page 16
Info Display During Live View Function - battery charger
 |
UPC - 013803079265
View all Canon EOS-1Ds Mark III manuals
Add to My Manuals
Save this manual to your list of manuals |
Page 16 highlights
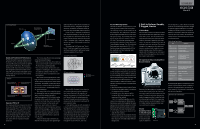
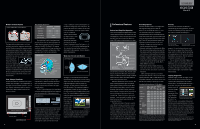
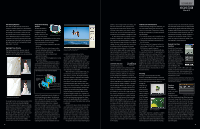
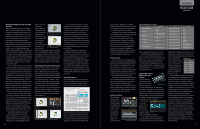
Metering and Exposure with Live View Function Evaluative metering directly off the imaging sensor is used. The Metering mode cannot be changed. The metering range is EV 0 to EV 20 (at 73°F/23°C, with EF 50mm f/1.4 lens). Any shooting mode and drive mode can be used. Also, AE lock, Exposure Compensation, AEB, and depth-of-field preview are possible. During magnified view, AE lock is automatically applied to the meter reading for the entire image. If C.Fn IV-16 [Live View exposure simulation] is set to [1: Enable (simulates exposure)] and the shooting mode is P, Tv, Av, or M, then the LCD monitor's brightness will change in response to the exposure setting so you can see how the exposure will look before you take the picture. When you press the shutter button completely, the opened shutter will close; the shutter will be cocked and released, and the picture will be taken. If flash is used, the mirror must come down briefly. Pressing the shutter button completely will cancel the mirror lockup and the metering sensor will execute E-TTL II flash metering control (preflash fired and the correct flash output is retained). Then the reflex mirror is locked up again and the picture is taken. For continuous shooting, the maximum shooting speed as with normal shooting can be achieved. During continuous shooting, the LCD monitor is off. After the shooting ends, the captured image is displayed on the LCD monitor. When the user is ready to shoot again, the camera returns to the Live View Function display automatically. As with viewfinder shooting, pressing the AE lock button during shooting with Live View Function will lock the current exposure and an asterisk will appear on the LCD monitor. During magnified view, AE lock will be applied automatically to the exposure level of the full view display. The Tv and Av settings will be displayed in orange. During the magnified view, the AE lock button will not work. With C.Fn IV 16-1, the picture brightness is also locked. Normally, the image with Live View Function displayed by the LCD monitor is always displayed at the correct brightness, regardless of the exposure setting, for easy viewing similar to compact digital cameras. However, if C.Fn IV- 16 [Live View Function exposure simulation] is set to 1, the picture will be displayed on the No compensation LCD monitor at virtu- ally the same bright- ness as the final exposure will be - based on the current aperture, shutter speed, ISO and 1 1/3 stop compensation exposure compensation settings. This enables you to see the exposure condition before tak- ing the picture. Exposure simulation will not work with flash or long time exposures in Bulb mode. If you press the depth-of-field preview button, exposure simulation will be active at all times regardless of the C.Fn IV-16 setting. Info Display During Live View Function Below the image, the shutter speed, aperture, exposure level (Exposure Compensation amount, AEB level), flash exposure level, shots remaining and ISO speed are displayed. In the magnified view, the magnified location, magnification and AE lock status are displayed on the right of the image. In addition, when you press the INFO button, the Picture Style, battery check, AE lock status and flash-ready are also displayed on the lower left of the image. If C.Fn IV -16-1 is set and you press the INFO button again, a brightness or RGB histogram appears on the right of the image. (For flash shots and bulb, the histogram display will be grayed out.) Grid Display C.Fn IV-14-1 (Aspect Ratio 6:6) Aspect Ratio Display (6:6) Information Display 4 Press the INFO button again and only the image seen with Live View Function (without information) will be displayed. If [Grid display: On] has been set, a four-line grid will be displayed on the image. This can be used to check the vertical or horizontal orientation of the image. The grid appears only in the full view mode (not in the magnified view). Also, with C.Fn IV-14 [Add aspect ratio information] set anywhere from 1 to 6, you can shoot in the same aspect ratio as 6 x 4.5, 6 x 6, 6 x 7 and 4 x 5, corresponding to medium- and large-format film sizes. When this feature is set, vertical lines matching the respective aspect ratio will appear on the screen. You can then compose the subject within this frame. Since the aspect ratio information will be appended to the image, when you open the image with Digital Photo Professional 3.0 or higher, the image will be displayed in the aspect ratio that was set. Note that the image areas outside the vertical lines are not actually deleted and that when the image is played back with the camera, the vertical lines matching the aspect ratio will also appear. Shooting Sequence During shooting with Live View Function, the picture is displayed and then the reflex mirror locks up automatically to maintain display with Live View Function (and returns later). Comparison of Shooting Sequence Viewfinder shooting Normal shooting Flash Live View Function Normal shooting Flash SET: Mirror lockup SET: Mirror lockup Shutter opens Shutter opens SW-1 ON Metering (AE sensor) AF (AF sensor) SW-2 ON Mirror lockup Shutter opens SW-1 ON Metering (AE sensor) AF (AF sensor) SW-2 ON Flash metering (AE sensor) Mirror lockup Shutter opens Exposure (CMOS) WB (CMOS) Exposure (CMOS) WB (CMOS) Metering/WB (CMOS) SW-1 ON SW-2 ON Shutter closes Shutter opens Exposure (CMOS) Metering/WB (CMOS) SW-1 ON SW-2 ON Shutter closes Mirror returns Flash metering (AE sensor) Mirror lockup Shutter opens Exposure (CMOS) Shutter closes Shutter closes Shutter closes Shutter closes Mirror returns Captured image displayed Mirror returns Captured image displayed Captured image displayed Captured image displayed ( Live-View display/ Continuous shooting) The Live View Function display's frame rate is approx. 30 fps. The picture remains smooth even if you change the camera's direction or if the subject moves. If the camera direction is changed to a scene with a very different light 31 TECHNOLOGY level, the picture brightness seen with Live View Function will be thrown off for a moment. If this happens, wait until the picture brightness stabilizes again before shooting. If the light source changes, the image seen with Live View Function may flicker. If this happens, stop shooting with the Live View Function and press the SET button to start shooting with the Live View Function again. During continuous shooting, the exposure for the first shot will also be applied to subsequent shots. If the sun or other bright light source enters the picture, the bright area might look dark. However, it will be correctly recorded as a bright area. Note that FE lock and modeling flash cannot be used. Thermal Issues Live View Function can normally be used without a practical time limit, allowing photographers to shoot extensively without interruption. However, if Live View Function is used and the camera is in a hot area (such as in direct sunlight), it's possible for image quality to degrade slightly. Another factor that can increase camera temperature during Live View is use of a MicroDrive-type memory card. To avoid this, an internal temperature sensor in the EOS-1Ds Mark III will alert the photographer by displaying an icon on the LCD monitor shaped like a thermometer. In extreme conditions, Live View Function will terminate automatically. It's possible to return to Live View Function after the camera's internal temperature drops to a normal level. Custom Functions The old Personal Functions of the previous EOS-1D series have been consolidated with Custom Functions (C.Fn), 57 in all, with a helpful numbering system. They are organized in groups I to IV. Custom Functions Custom Functions External Speedlite Control Speedlite 580EX II Flash C.Fn Settings No Item 0 Distance indicator display 1 Auto power off 2 Modeling flash 3 FEB auto cancel 4 FEB sequence 5 Flash metering mode No Description 0 Meters (m) 1 Feet (ft) 0 Enabled 1 Disabled 0 Enabled (DOF preview butt.) 1 Enabled (Test firing butt.) 2 Enabled (with both buttons) 3 Disabled 0 Enabled 1 Disabled 00 - + 1- 0 + 0 E-TTL II / E-TTL 1 TTL 2 External metering: Auto 3 External metering: Manual No Item 6 Quickflash w/continuous shot 7 Test firing with autoflash 8 AF-assist beam firing 9 Auto zoom for sensor size 10 Slave auto power off timer 11 Slave auto power off cancel 12 Flash recycle w/ exter. power 13 Flash exposure metering set. No Description 0 Disabled 1 Enabled 0 1/32 1 Full output 0 Enabled 1 Disabled 0 Enabled 1 Disabled 0 60 minutes 1 10 minutes 0 Within 8 hours 1 Within 1 hour 0 Flash and external power 1 External power source 0 Speedlite button and dial 1 Speedlite dial only are now pleasantly faster to select and set. With the Speedlite 580EX II attached, you can set or cancel the Speedlite's Custom Functions (C.Fn-0 to C.Fn-13) with the EOS-1Ds Mark III. You can also use the camera to set the 580EX II's flash mode, flash exposure compensation amount, FEB, flash sync and other Speedlite functions. The EOS-1Ds Mark III also allows Wireless E-TTL settings to be made on the camera's menu. Lightweight "Smart" Battery Pack and Charger The powerful LP-E4 rechargeable battery pack - a 2300 mAh, Lithium-ion battery is Battery Pack LP-E4 small and lightweight. It can display the following on the camera's LCD menu: Power source type, remaining capacity 6-level icon, display in 1% increments, shots taken since battery charged, whether battery calibration is needed and even when the battery has reached the end of its useful life. This informa- tion can be viewed with the [Battery info.] menu. The sys- tem also consists Battery Info. of Battery Charger LC-E4 and AC Adapter Kit ACK-E4. An IC chip in the battery tracks battery information. Battery level is displayed upon communication with the chip. The remaining battery level is indicated by a battery icon indi- cating one of six levels on the top LCD panel, in the viewfinder (during metering), and on the menu screen [Battery info.]. If communication Battery Check Icon Level (%) with the battery chip fails, 100 - 70 a communication error message will appear. By selecting [OK], you can continue shooting. (The battery icon will be displayed as empty.) 69 - 50 49 - 20 19 - 10 9 - 1 0 After the battery undergoes 20 discharging and charging cycles, a message recommend- ing battery calibration will appear on the bot- tom of the screen the next time the battery is installed. Calibration is performed with Battery Charger LC-E4 to find out the battery's capacity so that the remaining battery level can be indi- cated accurately. Each time the battery is recharged and used or discharged naturally, a slight discrepancy between the battery's remaining capacity information and the actual remaining capacity develops. With repeated recharge/discharge cycles, this discrepancy can become a large one. By performing calibration to discharge the entire battery and by then recharging the battery fully, accurate battery capacity information can be obtained. Two battery packs can be attached to the LC-E4 charger. It takes about 120 minutes to recharge one battery pack. The charger is compatible with the optional DC power adapters (12V/24V) so you can connect it to a car battery with the optional Car Battery Cable CB-570 to recharge the battery pack. 32
-
 1
1 -
2
-
3
-
4
-
5
-
6
-
7
-
8
-
9
-
10
-
 11
11 -
 12
12 -
 13
13 -
 14
14 -
 15
15 -
 16
16 -
 17
17 -
 18
18 -
 19
19 -
 20
20 -
 21
21 -
22
-
23
-
24
-
25
-
26
-
27
-
28
-
29
-
30
-
31
-
32
 |
 |
