Canon EOS Rebel T3 Black EF-S 18-55mm IS II Lens Kit Refurbished EOS REBEL T3 - Page 68
On the Quick Control screen, select the lighting or scene type., Take the picture., Default setting
 |
View all Canon EOS Rebel T3 Black EF-S 18-55mm IS II Lens Kit Refurbished manuals
Add to My Manuals
Save this manual to your list of manuals |
Page 68 highlights
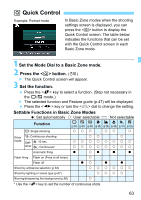
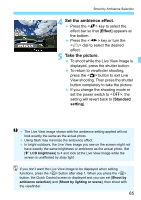
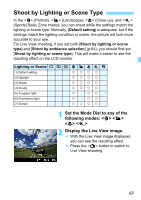
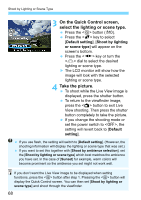
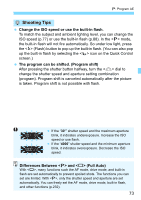
Shoot by Lighting or Scene Type 3 On the Quick Control screen, select the lighting or scene type. Press the button (7). Press the key to select [Default setting]. [Shoot by lighting or scene type] will appear on the screen's bottom. Press the key or turn the dial to select the desired lighting or scene type. X The LCD monitor will show how the image will look with the selected lighting or scene type. 4 Take the picture. To shoot while the Live View image is displayed, press the shutter button. To return to the viewfinder image, press the button to exit Live View shooting. Then press the shutter button completely to take the picture. If you change the shooting mode or set the power switch to , the setting will revert back to [Default setting]. If you use flash, the setting will switch to [Default setting]. (However, the shooting information will display the lighting or scene type that was set.) If you want to set this together with [Shoot by ambience selection], set the [Shoot by lighting or scene type] which best matches the ambience you have set. In the case of [Sunset] for example, warm colors will become prominent so the ambience you set might not work well. If you don't want the Live View image to be displayed when setting functions, press the button after step 1. Pressing the button will display the Quick Control screen. You can then set [Shoot by lighting or scene type] and shoot through the viewfinder. 68
-
 1
1 -
2
-
3
-
4
-
5
-
6
-
7
-
8
-
9
-
10
-
11
-
12
-
13
-
14
-
15
-
16
-
17
-
18
-
19
-
20
-
21
-
22
-
23
-
24
-
25
-
26
-
27
-
28
-
29
-
30
-
31
-
32
-
33
-
34
-
35
-
36
-
37
-
38
-
39
-
40
-
41
-
42
-
43
-
44
-
45
-
46
-
47
-
48
-
49
-
50
-
51
-
52
-
53
-
54
-
55
-
56
-
57
-
58
-
59
-
60
-
61
-
62
-
 63
63 -
 64
64 -
 65
65 -
 66
66 -
 67
67 -
 68
68 -
 69
69 -
 70
70 -
 71
71 -
 72
72 -
 73
73 -
74
-
75
-
76
-
77
-
78
-
79
-
80
-
81
-
82
-
83
-
84
-
85
-
86
-
87
-
88
-
89
-
90
-
91
-
92
-
93
-
94
-
95
-
96
-
97
-
98
-
99
-
100
-
101
-
102
-
103
-
104
-
105
-
106
-
107
-
108
-
109
-
110
-
111
-
112
-
113
-
114
-
115
-
116
-
117
-
118
-
119
-
120
-
121
-
122
-
123
-
124
-
125
-
126
-
127
-
128
-
129
-
130
-
131
-
132
-
133
-
134
-
135
-
136
-
137
-
138
-
139
-
140
-
141
-
142
-
143
-
144
-
145
-
146
-
147
-
148
-
149
-
150
-
151
-
152
-
153
-
154
-
155
-
156
-
157
-
158
-
159
-
160
-
161
-
162
-
163
-
164
-
165
-
166
-
167
-
168
-
169
-
170
-
171
-
172
-
173
-
174
-
175
-
176
-
177
-
178
-
179
-
180
-
181
-
182
-
183
-
184
-
185
-
186
-
187
-
188
-
189
-
190
-
191
-
192
-
193
-
194
-
195
-
196
-
197
-
198
-
199
-
200
-
201
-
202
-
203
-
204
-
205
-
206
-
207
-
208
-
209
-
210
-
211
-
212
-
213
-
214
-
215
-
216
-
217
-
218
-
219
-
220
-
221
-
222
-
223
-
224
-
225
-
226
-
227
-
228
-
229
-
230
-
231
-
232
-
233
-
234
-
235
-
236
-
237
-
238
-
239
-
240
-
241
-
242
-
243
-
244
-
245
-
246
-
247
-
248
-
249
-
250
-
251
-
252
-
253
-
254
-
255
-
256
-
257
-
258
-
259
-
260
-
261
-
262
-
263
-
264
-
265
-
266
-
267
-
268
-
269
-
270
-
271
-
272
-
273
-
274
-
275
-
276
-
277
-
278
-
279
-
280
-
281
-
282
-
283
-
284
-
285
-
286
-
287
-
288
-
289
-
290
-
291
-
292
 |
 |
