Canon FAXPHONE L120 FAXPHONE L120 Starter Guide
Canon FAXPHONE L120 Manual
 |
View all Canon FAXPHONE L120 manuals
Add to My Manuals
Save this manual to your list of manuals |
Canon FAXPHONE L120 manual content summary:
- Canon FAXPHONE L120 | FAXPHONE L120 Starter Guide - Page 1
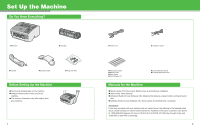
Starter Guide Please read this guide before operating this equipment. After you finish reading this guide, store it in a safe place for future reference. ENG - Canon FAXPHONE L120 | FAXPHONE L120 Starter Guide - Page 2
fax features, status monitor, and reports and lists ● Software Guide (in User Software CD): Driver set-up and printing from a computer Assistance: If you have a problem with your machine and you cannot solve it by referring to the manuals listed above, please contact our Canon Authorized Service - Canon FAXPHONE L120 | FAXPHONE L120 Starter Guide - Page 3
to get your fingers caught. 3 2 3 Gently rock the cartridge several times to distribute toner inside. 6 A Pull out the seal completely. NOTE Do not pull out the seal at an angle. 7 A Hold the cartridge by its handle (A). 10 Insert the cartridge in the machine as far as it will go. The arrow - Canon FAXPHONE L120 | FAXPHONE L120 Starter Guide - Page 4
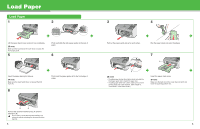
guide (A) to match the paper size. - If loading paper other than Letter, make sure to set the correct paper size in the machine. (See Chapter 3, "Print Media," in the Basic Guide.) Insert the paper stack cover. NOTE Make sure the back end of the cover does not catch and lower the scanning platform - Canon FAXPHONE L120 | FAXPHONE L120 Starter Guide - Page 5
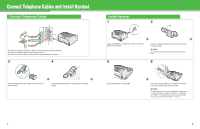
. A Hook the handset cable on the retainer (A) at the back of the machine to retain the slack. NOTE If using the handset or an external telephone, make sure to set the fax receive mode to , , or . For instructions on how to set the receive mode, see "Set the Receive Mode," on - Canon FAXPHONE L120 | FAXPHONE L120 Starter Guide - Page 6
is closed properly. (See "Install Cartridge," on p. 3.) ● is displayed: Make sure that the cartridge is installed properly. (See "Install Cartridge," on p. 3.) ● is displayed: Make sure that Letter-size paper is loaded in the machine. (See "Load Paper," on - Canon FAXPHONE L120 | FAXPHONE L120 Starter Guide - Page 7
Date Time User Fax Number User Name Session Page Number Number NOTE Before sending a fax, you MUST register your fax number, user name, and the current date and time in the machine. Entering Information Use the following buttons to enter information in the machine. FAXPHONE L120 Add.Mode - Canon FAXPHONE L120 | FAXPHONE L120 Starter Guide - Page 8
the character at the cursor position, or the entire entry if held for more than one second. Register 1 Press [Menu]. 5 Use [Up/Down] to select , then press [Set]. 9 Press [Stop/Reset] to return to standby mode. Sender Information 2 Use [Up/Down] to select - Canon FAXPHONE L120 | FAXPHONE L120 Starter Guide - Page 9
call. You have to manually receive faxes. Switches between fax and voice calls automatically. Distinguishes between fax and voice calls. NOTE - The answering machine must be connected directly to the machine for to work. - Voice mail is not supported with . - The - Canon FAXPHONE L120 | FAXPHONE L120 Starter Guide - Page 10
Pentium/133 MHz or faster Memory: 64 MB or more Available Hard Disk Space: 655 MB or more Microsoft Windows XP (32-bit version) CPU: Intel Pentium/Celeron series 300 MHz or faster Memory: 128 MB or more Available Hard Disk Space: 1.5 GB or more 4 5 6 7 2 3 If the L120 CD-ROM Setup screen is - Canon FAXPHONE L120 | FAXPHONE L120 Starter Guide - Page 11
3-chome, Ohta-ku, Tokyo 146-8501, Japan CANON U.S.A., INC. One Canon Plaza, Lake Success, NY 11042, U.S.A. CANON CANADA INC. 6390 Dixie Road Mississauga, Ontario L5T 1P7, Canada CANON EUROPA N.V. Bovenkerkerweg 59-61 1185 XB Amstelveen, The Netherlands CANON FRANCE S.A.S. 17, quai du Président Paul
-
 1
1 -
 2
2 -
 3
3 -
 4
4 -
 5
5 -
 6
6 -
 7
7 -
8
-
9
-
10
-
11
 |
 |

ENG
Starter Guide
Please read this guide before operating this equipment.
After you finish reading this guide, store it in a safe place for future reference.