Canon FAXPHONE L120 FAXPHONE L120 Starter Guide - Page 3
Install Cartridge, away from you and pointing down.
 |
View all Canon FAXPHONE L120 manuals
Add to My Manuals
Save this manual to your list of manuals |
Page 3 highlights
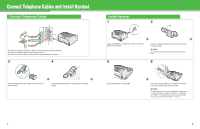
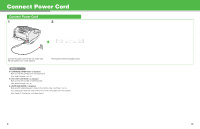
Install Cartridge 1 Remove the cartridge from the bag. Keep the bag for future use. 4 Open the document feeder tray. 8 A CAUTION Do not open the drum protective shutter (A). 5 A Open the cartridge cover by the notch (A). 9 Push down the cartridge to make sure it is properly set in the machine. Close the cartridge cover. NOTE Be careful not to get your fingers caught. 3 2 3 Gently rock the cartridge several times to distribute toner inside. 6 A Pull out the seal completely. NOTE Do not pull out the seal at an angle. 7 A Hold the cartridge by its handle (A). 10 Insert the cartridge in the machine as far as it will go. The arrow (A) on the cartridge should be facing away from you and pointing down. AB Open the paper delivery tray (A) and the extension (B). 4
-
 1
1 -
 2
2 -
 3
3 -
 4
4 -
 5
5 -
 6
6 -
 7
7 -
 8
8 -
 9
9 -
10
-
11
 |
 |
