Canon MultiPASS C5500 User Guide - Page 138
Creating a Drawing Graphic, Adding Variable Data Fields, Inserting a field
 |
View all Canon MultiPASS C5500 manuals
Add to My Manuals
Save this manual to your list of manuals |
Page 138 highlights
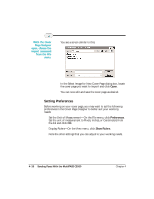
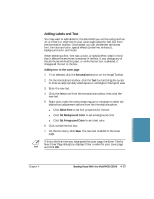
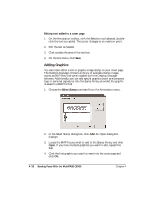
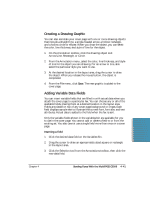
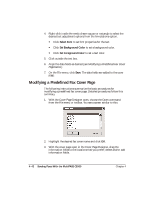
Creating a Drawing Graphic You can also annotate your cover page with one or more drawing objects that include a straight line, a single-headed arrow, a hollow rectangle, and a hollow circle or ellipse. When you draw the object, you can select the color, line thickness, and style of line for the object. 1. On the Annotation toolbox, click the drawing object tool: Arrow/Line, Rectangle, or Circle. 2. From the Annotation menu, select the color, line thickness, and style of line for the object you are drawing. For an arrow or line, also select the particular style you want to use. 3. At the desired location in the layout area, drag the cursor to draw the object. When you release the mouse button, the object is completed. 4. From the File menu, click Save. The new graphic is added to the cover page. Adding Variable Data Fields You can insert variable fields that are filled in with actual data when you attach the cover page to a particular fax. You can choose any or all of the available fields, placing them at a desired location in the layout area. Fields are placed on top of any cover page background or imges. Each field displays sample text to illustrate the current font, font size, and text attributes. Actual data is added to the field when the fax is sent. Only the variable fields shown in the variables bin are available for you to use in the cover page. You cannot add or delete a field to or from the existing set. You also cannot use a single field more than once on a cover page. Inserting a field 1. Click the desired data field on the Variables Bin. 2. Drag the cursor to draw an appropriately sized square or rectangle in the layout area. 3. Click the Selection tool from the Annotations toolbox, then click the new data field. Sending Faxes Chapter 4 Sending Faxes With the MultiPASS C5500 4-41
-
 1
1 -
2
-
3
-
4
-
5
-
6
-
7
-
8
-
9
-
10
-
11
-
12
-
13
-
14
-
15
-
16
-
17
-
18
-
19
-
20
-
21
-
22
-
23
-
24
-
25
-
26
-
27
-
28
-
29
-
30
-
31
-
32
-
33
-
34
-
35
-
36
-
37
-
38
-
39
-
40
-
41
-
42
-
43
-
44
-
45
-
46
-
47
-
48
-
49
-
50
-
51
-
52
-
53
-
54
-
55
-
56
-
57
-
58
-
59
-
60
-
61
-
62
-
63
-
64
-
65
-
66
-
67
-
68
-
69
-
70
-
71
-
72
-
73
-
74
-
75
-
76
-
77
-
78
-
79
-
80
-
81
-
82
-
83
-
84
-
85
-
86
-
87
-
88
-
89
-
90
-
91
-
92
-
93
-
94
-
95
-
96
-
97
-
98
-
99
-
100
-
101
-
102
-
103
-
104
-
105
-
106
-
107
-
108
-
109
-
110
-
111
-
112
-
113
-
114
-
115
-
116
-
117
-
118
-
119
-
120
-
121
-
122
-
123
-
124
-
125
-
126
-
127
-
128
-
129
-
130
-
131
-
132
-
 133
133 -
 134
134 -
 135
135 -
 136
136 -
 137
137 -
 138
138 -
 139
139 -
 140
140 -
 141
141 -
 142
142 -
 143
143 -
144
-
145
-
146
-
147
-
148
-
149
-
150
-
151
-
152
-
153
-
154
-
155
-
156
-
157
-
158
-
159
-
160
-
161
-
162
-
163
-
164
-
165
-
166
-
167
-
168
-
169
-
170
-
171
-
172
-
173
-
174
-
175
-
176
-
177
-
178
-
179
-
180
-
181
-
182
-
183
-
184
-
185
-
186
-
187
-
188
-
189
-
190
-
191
-
192
-
193
-
194
-
195
-
196
-
197
-
198
-
199
-
200
-
201
-
202
-
203
-
204
-
205
-
206
-
207
-
208
-
209
-
210
-
211
-
212
-
213
-
214
-
215
-
216
-
217
-
218
-
219
-
220
-
221
-
222
-
223
-
224
-
225
-
226
-
227
-
228
-
229
-
230
-
231
-
232
-
233
-
234
-
235
-
236
-
237
-
238
-
239
-
240
-
241
-
242
-
243
-
244
-
245
-
246
-
247
-
248
-
249
-
250
-
251
-
252
-
253
-
254
-
255
-
256
-
257
-
258
-
259
-
260
-
261
-
262
-
263
-
264
-
265
-
266
-
267
-
268
-
269
-
270
-
271
-
272
-
273
-
274
-
275
-
276
-
277
-
278
-
279
-
280
-
281
-
282
-
283
-
284
-
285
-
286
-
287
-
288
-
289
-
290
-
291
-
292
-
293
-
294
-
295
-
296
-
297
-
298
-
299
-
300
-
301
-
302
-
303
-
304
-
305
-
306
-
307
-
308
-
309
-
310
-
311
-
312
-
313
-
314
-
315
-
316
-
317
-
318
-
319
-
320
-
321
-
322
-
323
-
324
-
325
-
326
-
327
-
328
-
329
-
330
-
331
-
332
 |
 |