Canon PowerShot A400 Silver PowerShot A400 Camera User Guide - Page 54
Select [Off], [Date]
 |
View all Canon PowerShot A400 Silver manuals
Add to My Manuals
Save this manual to your list of manuals |
Page 54 highlights
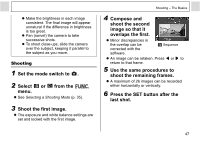
Shooting - The Basics Embedding the Date in the Image Data You can embed the date on image data when is selected. The date will be printed on your images even if it has not been set at the computer or printer. z Ensure that the camera's date/time is set beforehand (p. 21). z You cannot embed the date on image data when is not selected. 1 Check that appears on the LCD monitor. 2 Select (Date Stamp) in the [ (Rec.)] menu. z See Selecting Menus and Settings (p. 62). 3 Select [Off], [Date] or [Date & Time] using or . z See Setting the Date/ Time (p. 21). 4 Press the MENU button. 5 Shoot the image. z Shooting procedures are the same as for the Auto Mode (p. 31). z The Date Stamp cannot be deleted from the image data once it has been set. z When using a CP printer, part of the date may not get printed if the credit card size print (54 mm x 86 mm) is selected. 52
-
 1
1 -
2
-
3
-
4
-
5
-
6
-
7
-
8
-
9
-
10
-
11
-
12
-
13
-
14
-
15
-
16
-
17
-
18
-
19
-
20
-
21
-
22
-
23
-
24
-
25
-
26
-
27
-
28
-
29
-
30
-
31
-
32
-
33
-
34
-
35
-
36
-
37
-
38
-
39
-
40
-
41
-
42
-
43
-
44
-
45
-
46
-
47
-
48
-
 49
49 -
 50
50 -
 51
51 -
 52
52 -
 53
53 -
 54
54 -
 55
55 -
 56
56 -
 57
57 -
 58
58 -
 59
59 -
60
-
61
-
62
-
63
-
64
-
65
-
66
-
67
-
68
-
69
-
70
-
71
-
72
-
73
-
74
-
75
-
76
-
77
-
78
-
79
-
80
-
81
-
82
-
83
-
84
-
85
-
86
-
87
-
88
-
89
-
90
-
91
-
92
-
93
-
94
-
95
-
96
-
97
-
98
-
99
-
100
-
101
-
102
-
103
-
104
-
105
-
106
-
107
-
108
-
109
-
110
-
111
-
112
-
113
-
114
-
115
-
116
-
117
-
118
-
119
-
120
-
121
-
122
-
123
-
124
-
125
-
126
-
127
-
128
-
129
-
130
-
131
-
132
-
133
-
134
-
135
-
136
-
137
-
138
-
139
-
140
-
141
-
142
 |
 |
