Canon PowerShot A570IS PowerShot A570 IS Camera User Guide Advanced - Page 53
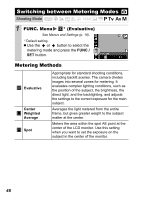
FUNC. Menu, Custom., Aim the camera at a piece of white, paper or cloth and press
 |
UPC - 013803078442
View all Canon PowerShot A570IS manuals
Add to My Manuals
Save this manual to your list of manuals |
Page 53 highlights
1 FUNC. Menu * (Auto) See Menus and Settings (p. 18). * Default setting. (Custom). Shooting 2 Aim the camera at a piece of white paper or cloth and press . z If you are viewing it with the LCD monitor, ensure that the center frame is completely filled with the white image. If you are using the optical viewfinder, ensure that the entire field is filled. However, the center frame will not appear when the digital zoom is being used, or when is displayed. z You are recommended to set the shooting mode to and the exposure compensation setting to [±0] before setting a custom white balance. The correct white balance may not be obtained when the exposure setting is incorrect (image appears completely black or white). z Shoot with the same settings as when reading the white balance data. If the settings differ, the optimal white balance may not be set. In particular, the following should not be changed. - ISO Speed - Flash Setting the flash to on or off is recommended. If the flash fires when reading the white balance data with the flash set to (Auto), make sure that you also use the flash when you shoot. z Since the white balance data cannot be read in Stitch Assist mode, preset the white balance in another shooting mode beforehand. 51
-
 1
1 -
2
-
3
-
4
-
5
-
6
-
7
-
8
-
9
-
10
-
11
-
12
-
13
-
14
-
15
-
16
-
17
-
18
-
19
-
20
-
21
-
22
-
23
-
24
-
25
-
26
-
27
-
28
-
29
-
30
-
31
-
32
-
33
-
34
-
35
-
36
-
37
-
38
-
39
-
40
-
41
-
42
-
43
-
44
-
45
-
46
-
47
-
 48
48 -
 49
49 -
 50
50 -
 51
51 -
 52
52 -
 53
53 -
 54
54 -
 55
55 -
 56
56 -
 57
57 -
 58
58 -
59
-
60
-
61
-
62
-
63
-
64
-
65
-
66
-
67
-
68
-
69
-
70
-
71
-
72
-
73
-
74
-
75
-
76
-
77
-
78
-
79
-
80
-
81
-
82
-
83
-
84
-
85
-
86
-
87
-
88
-
89
-
90
-
91
-
92
-
93
-
94
-
95
-
96
-
97
-
98
-
99
-
100
-
101
-
102
-
103
-
104
-
105
-
106
-
107
-
108
-
109
-
110
-
111
-
112
-
113
-
114
-
115
-
116
-
117
-
118
-
119
-
120
-
121
-
122
-
123
-
124
-
125
-
126
-
127
-
128
-
129
-
130
-
131
 |
 |
