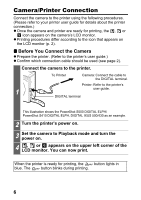
Canon PowerShot S410 Direct Print Guide - Page 12
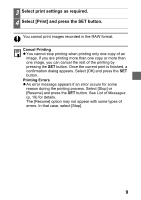
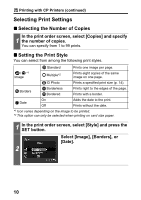
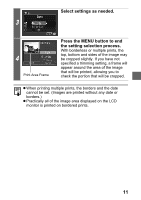
Select settings as needed., Press the MENU button to end, the setting selection process.
 |
View all Canon PowerShot S410 manuals
Add to My Manuals
Save this manual to your list of manuals |
Page 12 highlights
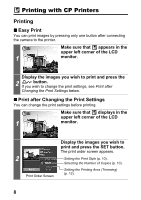
Select settings as needed. 3 4 Print Area Frame Press the MENU button to end the setting selection process. With borderless or multiple prints, the top, bottom and sides of the image may be cropped slightly. If you have not specified a trimming setting, a frame will appear around the area of the image that will be printed, allowing you to check the portion that will be cropped. z When printing multiple prints, the borders and the date cannot be set. (Images are printed without any date or borders.) z Practically all of the image area displayed on the LCD monitor is printed on bordered prints. 11
-
 1
1 -
2
-
3
-
4
-
5
-
6
-
 7
7 -
 8
8 -
 9
9 -
 10
10 -
 11
11 -
 12
12 -
 13
13 -
 14
14 -
 15
15 -
 16
16 -
 17
17 -
18
-
19
-
20
-
21
-
22
-
23
-
24
-
25
-
26
-
27
-
28
-
29
-
30
-
31
-
32
-
33
-
34
-
35
-
36
-
37
-
38
-
39
-
40
-
41
-
42
-
43
-
44
-
45
-
46
-
47
-
48
-
49
-
50
-
51
-
52
-
53
-
54
-
55
-
56
-
57
-
58
-
59
-
60
-
61
-
62
-
63
-
64
-
65
-
66
-
67
-
68
-
69
-
70
-
71
-
72
-
73
-
74
-
75
-
76
-
77
-
78
-
79
-
80
-
81
-
82
-
83
-
84
-
85
-
86
-
87
-
88
-
89
-
90
-
91
-
92
-
93
-
94
-
95
-
96
-
97
-
98
-
99
-
100
-
101
-
102
-
103
-
104
-
105
-
106
-
107
-
108
-
109
 |
 |

11
3
Select settings as needed.
4
Press the MENU button to end
the setting selection process.
With borderless or multiple prints, the
top, bottom and sides of the image may
be cropped slightly. If you have not
specified a trimming setting, a frame will
appear around the area of the image
that will be printed, allowing you to
check the portion that will be cropped.
When printing multiple prints, the borders and the date
cannot be set. (Images are printed without any date or
borders.)
Practically all of the image area displayed on the LCD
monitor is printed on bordered prints.
Print Area Frame