Canon PowerShot S410 Direct Print Guide - Page 25
Select [Trimming] and press the, SET button., Trim the image.
 |
View all Canon PowerShot S410 manuals
Add to My Manuals
Save this manual to your list of manuals |
Page 25 highlights
Printing with Bubble Jet Printers (continued) „ Setting the Printing Area (Trimming) Please set [Paper Settings] first (p. 25) before setting the trimming settings. If the print style is changed after having made trimming settings, you must select the settings again. Select [Trimming] and press the SET button. The trimming frame will appear at the center of the image. If a trimming setting has already been selected for the image, the frame will appear around the previously selected portion. 1 . The trimming setting screen differs depending on the camera model. Ensure that the screen appears before selecting settings. Trimming Frame Trim the image. Changing the Size of the Trimming Frame z Press the zoom lever or the zoom button to adjust the size of the trimming frame. z The trimming frame can be changed to a minimum selection of approximately half the displayed image or a maximum selection that is virtually the same size as the image. 2 z Expanding the trimming frame beyond its maximum size cancels the trimming setting. z When printing an image that has been magnified using the trimming option, the image quality may become coarser and grainier depending on the level of magnification. Moving the Trimming Frame z Move the trimming frame using the omni selector or the up, down, right and left buttons. 24
-
 1
1 -
2
-
3
-
4
-
5
-
6
-
7
-
8
-
9
-
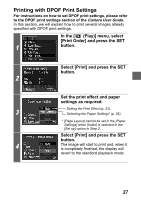
10
-
11
-
12
-
13
-
14
-
15
-
16
-
17
-
18
-
19
-
 20
20 -
 21
21 -
 22
22 -
 23
23 -
 24
24 -
 25
25 -
 26
26 -
 27
27 -
 28
28 -
 29
29 -
 30
30 -
31
-
32
-
33
-
34
-
35
-
36
-
37
-
38
-
39
-
40
-
41
-
42
-
43
-
44
-
45
-
46
-
47
-
48
-
49
-
50
-
51
-
52
-
53
-
54
-
55
-
56
-
57
-
58
-
59
-
60
-
61
-
62
-
63
-
64
-
65
-
66
-
67
-
68
-
69
-
70
-
71
-
72
-
73
-
74
-
75
-
76
-
77
-
78
-
79
-
80
-
81
-
82
-
83
-
84
-
85
-
86
-
87
-
88
-
89
-
90
-
91
-
92
-
93
-
94
-
95
-
96
-
97
-
98
-
99
-
100
-
101
-
102
-
103
-
104
-
105
-
106
-
107
-
108
-
109
 |
 |
