Canon PowerShot SD630 Software Starter Guide (For the Canon Digital Camera Sol - Page 39
Operating the Shutter Remotely
 |
View all Canon PowerShot SD630 manuals
Add to My Manuals
Save this manual to your list of manuals |
Page 39 highlights
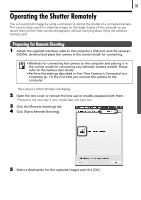
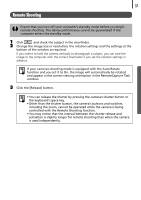
35 Operating the Shutter Remotely You can record still images by using a computer to control the shutter of a connected camera. This is particularly useful for checking images on the larger display of the computer as you record them and for high volume photography without worrying about filling the camera's memory card. Preparing for Remote Shooting 1 Attach the supplied interface cable to the computer's USB port and the camera's DIGITAL terminal and place the camera in the correct mode for connecting. • Methods for connecting the camera to the computer and placing it in the correct mode for connecting vary between camera models. Please refer to the Camera User Guide. • Perform the settings described in First Time Camera is Connected to a Computer (p. 17) the first time you connect the camera to the computer. The Camera Control Window will display. 2 Open the lens cover or remove the lens cap on models equipped with them. Proceed to the next step if your model does not have one. 3 Click the [Remote shooting] tab. 4 Click [Starts Remote Shooting]. 5 Select a destination for the captured images and click [OK].
-
 1
1 -
2
-
3
-
4
-
5
-
6
-
7
-
8
-
9
-
10
-
11
-
12
-
13
-
14
-
15
-
16
-
17
-
18
-
19
-
20
-
21
-
22
-
23
-
24
-
25
-
26
-
27
-
28
-
29
-
30
-
31
-
32
-
33
-
 34
34 -
 35
35 -
 36
36 -
 37
37 -
 38
38 -
 39
39 -
 40
40 -
 41
41 -
 42
42 -
 43
43 -
 44
44 -
45
-
46
-
47
-
48
-
49
-
50
-
51
-
52
-
53
-
54
-
55
-
56
-
57
-
58
-
59
-
60
-
61
-
62
-
63
-
64
-
65
-
66
-
67
-
68
-
69
-
70
-
71
-
72
-
73
-
74
-
75
-
76
-
77
-
78
-
79
-
80
-
81
-
82
-
83
-
84
-
85
-
86
-
87
-
88
-
89
-
90
-
91
-
92
-
93
-
94
-
95
-
96
-
97
-
98
 |
 |
