Canon RC-IP00 Remote Camera Controller User Manual Basic - Page 22
Basic Operations, Troubleshooting, Third-party Software, Connection Diagram
 |
View all Canon RC-IP00 manuals
Add to My Manuals
Save this manual to your list of manuals |
Page 22 highlights
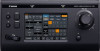
Basic Operations For more details please refer to the User Manual. 1 Turn on the power. 0 Set the power switch at the rear of this unit to "On". The LED lamp lights up in green. 2 Configure the settings of this unit. 0 Set the IP address of this unit as follows. A Select [SETTINGS] on the home screen of the operation panel. 0 If the home screen does not appear, select [HOME] to display the home screen. B Select [Network]. C Select [CONTROLLER]. 0 The IP address setting screen appears. D Enter the IP address and tap [ENTER]. 3 Configure the camera settings. 0 Configure the camera to be operated as follows. A Select [SETTINGS] on the home screen of the operation panel. 0 If the home screen does not appear, select [HOME] to display the home screen. B Select [Network]. C Select [CAMERA REGISTRATION]. D Perform registration according to the camera to be connected. 0 IP camera: Select [AUTO] or [Manual] 0 Serial camera: Select [Serial Activate 1] or [Serial Activate 100] Memo : 0 For details on the settings, please refer to the User Manual on the website. 0 To add or change the camera to be operated, perform the above procedures again. Troubleshooting Problem Symptom Power does No response even not turn on. after tapping the operation panel on the unit. Action Turn off the power switch at the back of the unit and power on again. If it still does not start up, stop using the unit, disconnect the power cord from the power outlet and consult a dealer or our service center. Third-party Software This product includes third-party software modules. For the licensing terms of the respective modules, please refer to [HOME]>[SETTINGS]>[Open Source License]. Connection Diagram Serial camera IP camera IP camera HUB LAN cable RS-422 cable RC-IP100 . * Up to 100 cameras can be connected concurrently. 22 Basic Operations
-
 1
1 -
2
-
3
-
4
-
5
-
6
-
7
-
8
-
9
-
10
-
11
-
12
-
13
-
14
-
15
-
16
-
 17
17 -
 18
18 -
 19
19 -
 20
20 -
 21
21 -
 22
22 -
 23
23 -
 24
24
 |
 |
