Casio CLASSPad300 User Guide - Page 85
Batch Transferring Virtual ClassPad Data to Connected ClassPad Units
 |
UPC - 079767161071
View all Casio CLASSPad300 manuals
Add to My Manuals
Save this manual to your list of manuals |
Page 85 highlights
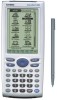
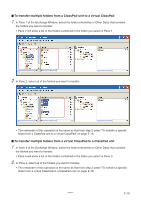
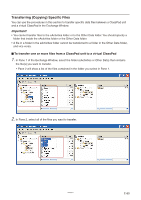
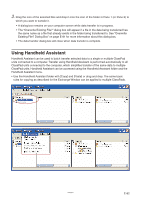
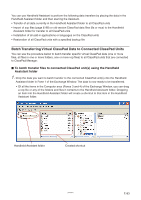
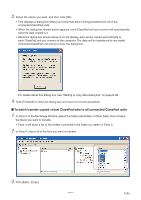
You can use Handheld Assistant to perform the following data transfers by placing the data in the Handheld Assistant folder and then starting the Assistant. • Transfer of all data currently in the Handheld Assistant folder to all ClassPad units • Import of xcp files (page E-98) or old version ClassPad data files (fls or mcs) to the Handheld Assistant folder for transfer to all ClassPad units • Installation of all add-in applications or languages on the ClassPad units • Restoration of all ClassPad units with a specified backup file Batch Transferring Virtual ClassPad Data to Connected ClassPad Units You can use the procedure below to batch transfer specific virtual ClassPad data (one or more files, all files in one or more folders, one or more vcp files) to all ClassPad units that are connected to ClassPad Manager. ■ To batch transfer files to connected ClassPad unit(s) using the Handheld Assistant folder 1. Drop the data you want to batch transfer to the connected ClassPad unit(s) into the Handheld Assistant folder in Pane 1 of the Exchange Window. The data is now ready to be transferred. • Of all the items in the Computer area (Panes 3 and 4) of the Exchange Window, you can drag a vcp file or any of the folders and files it contains to the Handheld Assistant folder. Dropping an item into the Handheld Assistant folder will create a shortcut to that item in the Handheld Assistant folder. Handheld Assistant folder Created shortcut 20060301 E-83
-
 1
1 -
2
-
3
-
4
-
5
-
6
-
7
-
8
-
9
-
10
-
11
-
12
-
13
-
14
-
15
-
16
-
17
-
18
-
19
-
20
-
21
-
22
-
23
-
24
-
25
-
26
-
27
-
28
-
29
-
30
-
31
-
32
-
33
-
34
-
35
-
36
-
37
-
38
-
39
-
40
-
41
-
42
-
43
-
44
-
45
-
46
-
47
-
48
-
49
-
50
-
51
-
52
-
53
-
54
-
55
-
56
-
57
-
58
-
59
-
60
-
61
-
62
-
63
-
64
-
65
-
66
-
67
-
68
-
69
-
70
-
71
-
72
-
73
-
74
-
75
-
76
-
77
-
78
-
79
-
 80
80 -
 81
81 -
 82
82 -
 83
83 -
 84
84 -
 85
85 -
 86
86 -
 87
87 -
 88
88 -
 89
89 -
 90
90 -
91
-
92
-
93
-
94
-
95
-
96
-
97
-
98
-
99
-
100
-
101
-
102
-
103
-
104
-
105
-
106
-
107
-
108
-
109
-
110
-
111
-
112
-
113
 |
 |