Celestron LCD Deluxe Digital Microscope Deluxe Digital LCD Microscope Manual ( - Page 6
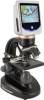
Digital Imaging - with built in digital camera
 |
View all Celestron LCD Deluxe Digital Microscope manuals
Add to My Manuals
Save this manual to your list of manuals |
Page 6 highlights
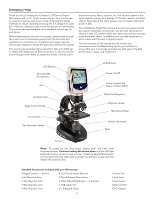
Digital Imaging You can take snapshots or a short video with your microscope with the built-in digital camera. With the internal storage memory, you do not need to use a PC or any other devices to do imaging. Transferring of images to your PC for saving and or printing them is easy and will be discussed later in this manual. Note: If you are going to take images, do not connect the USB cable to your PC or damage could occur to the equipment. The USB cable is not used at all for taking images. Settings and Information for the Digital Camera and the Touch Screen - The touch screen icons and their functions are quite easy to use and intuitive in nature. Below will be discussed the general use of the icons. Typically you use your fingers with the touch screen, but you can use the included touch pen as well. Figure 10 1 11 The touch screen has various functions and 12 choices among those functions. From the 2 image to the left you 3 will find the following twelve icons: 4 5 6 7 8 9 10 1. Digital Zoom Indicator 2. Increase EV Function 3. Decrease EV Function 4. Video Mode 5. Pixel Setting 6. Snapshot selection 7. Color effect 8. Image review 9. Video review 10. Settings 11. EV Value 12. Viewing/Snapshot Mode Snapshot selection (6) Normal is single shot but you can set for timed or a burst of three shots. Color effect (7) Lightly tap the icon to change from black & white, sepia, negative, transparent, and normal (x). Viewing / Snapshot mode (12) When viewing specimens, you will see this icon on the right of the screen. After you have made the various settings above and you want to take snapshot images, you just lightly press the icon to take an image (or use the touch pen). Image review (8) In this mode, you can review the snapshot images you have taken. Just touch the arrows and touch the screen to navigate and to see full screen images, etc. Video mode (4) You can take videos in this mode. To take videos, you need to make the settings first. In the image to the left, you will see the following icons on the screen after you press the Video icon. The icons on this image (Figure 11) do the following: 1. Touch to go back to the viewing mode 2. Set the pixel size to 160 or 320 (320 being a higher resolution for videos) by touching the screen. In 320 resolution it is 30 fps 3. Set the color desired - black & white, sepia, negative, or normal by touching the screen 4. Video quality setting - low, medium, or high quality by touching the screen 5. Record Video - touch to begin video and touch again to stop the video Figure 11 Note: After turning the LCD Monitor off, most settings will revert to the default settings. Settings icon (10) Language - choose from Chinese (simple or traditional), English, French, German, Italian, Japanese, Korean, Portuguese, Russian, and Spanish Time for Auto Play Review - 1 second to 6 seconds Memory - internal memory or SD Card Time & Date - year, month, and date Calibration - touch screen sensitivity (use touch pen) - point at the four corners and center crosses Brightness - of touch screen Auto Shutdown of Power - never to 5 minutes Beep - beeps with each touch of the screen or you can turn it off Default Factory Settings - change all back to factory settings Pixel setting icon (5) Lightly tap the icon to change the pixel setting from 320 (320x640), 640 (640x480), 1280 (1280x1024), 1600 (1600x1200), 2048 (2048x1536), and 2560 (2560x 2048). 1600 is the sensor resolution and 2048 and 2560 give you higher resolution through interpolation. 12 3 4 5 Video review (9) In this mode you can review the videos you have taken. Just touch the arrows and touch/scroll the screen to navigate and view your videos and delete them if you choose. EV Function (2, 3) Adjustment for exposure value, which increases/decreases the brightness level. Using an SD Card You can take images (snapshot or video) by using an SD (Secure Digital) Card (Up to 16GB with SDHC of most brands). Your SD card is inserted in the LCD Monitor (Figure 1). When you insert the SD card properly, the SD card icon will be visible in the Image Review mode or in the Set-Up mode for memory. When imaging this way the images are saved on the SD card and not in the internal storage memory. 6
-
 1
1 -
 2
2 -
 3
3 -
 4
4 -
 5
5 -
 6
6 -
 7
7 -
 8
8 -
 9
9 -
 10
10 -
 11
11 -
 12
12 -
13
-
14
-
15
-
16
-
17
-
18
-
19
-
20
-
21
-
22
-
23
-
24
-
25
-
26
-
27
-
28
-
29
-
30
-
31
-
32
-
33
-
34
-
35
-
36
-
37
-
38
-
39
-
40
 |
 |
