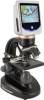
Celestron LCD Deluxe Digital Microscope Deluxe Digital LCD Microscope Manual ( - Page 7
Rouble, Hooting, Aintenance, Arranty
 |
View all Celestron LCD Deluxe Digital Microscope manuals
Add to My Manuals
Save this manual to your list of manuals |
Page 7 highlights
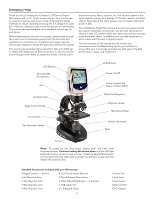
Note: Inserting or removing an SD card while the LCD is on may cause the LCD to shut down and/or could damage the SD card. Transferring Your Images - To transfer images to a PC or MAC, you need to have a free USB port and have an imaging program for snapshots and/or video. Note: Do not disconnect the USB cable while transferring images or damage may occur. 1. You can transfer images from the internal storage memory to your PC by using the supplied USB Cable. The small plug end of the cable plugs into the LCD Monitor (see Figure 1) and the large plug end of the cable plugs into your PC. If the connections are proper you will see on your microscope screen "MSDC" or similar data. Your PC will automatically recognize the new hardware. Then you will choose which program on your PC you want to transfer the images to. 2. If you used an SD card to store your images, you can transfer them to your PC using the method in # 1 above or you can take the SD card out and use the SD card slot on your PC (if available) to transfer the images. In either way your PC will ask you to choose which program you want to transfer the images to. Deleting all Snapshots/Video Images - To delete all images use the memory format function - Settings / Memory / Format and choose SD card or Flash memory. Trouble Shooting If you do not get an image to view on your LCD screen, here are a few things to double check: 1. Make sure the AC Adapter is plugged in to an AC power source and attached to the microscope securely and correctly. 2. Make sure you have the illuminators turned on with maximum brightness adjustment. 3. Make sure the objective lens you have chosen is set correctly and it has clicked in the right position. 4. Make sure that the diaphragm (filter wheel) is set correctly at a click position so that the illuminated light comes up properly - the normal position is the 6 position (6 mm hole) for most applications. 5. Make sure the specimen slide is correctly fit into the clamp on the mechanical stage and properly centered. 6. Make sure the SD Card (if using one) is inserted properly. If icon does not display, then remove and insert again. 7. Touch Screen Icons not working properly. The microscope will need to be recalibrated. Turn off the power and as soon as you see "Power Down" on the screen immediately touch the screen to enter the calibration mode. With the touch pen, touch the target in all four corners and the center of the screen. The icons should work after you turn the microscope back on. If they do not, try the calibration again, this may take more than one try. Care, Maintenance, and Warranty Your Celestron accessory is a precision optical instrument and should be treated with care at all times. Follow these care and maintenance suggestions and your microscope will need very little maintenance throughout its lifetime. • When you are done using your microscope, remove any specimens left on the stage. • Turn off the illuminator switches. • Turn off the LCD monitor - push and hold the on/off button until you see "Power Shutting Off". • Unplug the power cord. • Always place the plastic bag or dust cover over the microscope when not in use or when being stored to help keep it clean. • Store the microscope in a dry and clean place. • Be very careful if using your microscope in direct sun light to prevent damage to the microscope or your eyes. • When moving your microscope, carry it by the "arm" with one hand and not by the focuser knob, LCD monitor, etc. Then, put your other hand under the base for support. • Clean the outside surfaces (metal and plastics) with a moist cloth. • Always unplug any cords before cleaning. • Never clean optical surfaces with cloth or paper towels as they can scratch optical surfaces easily. • Blow off dust with a camel's hair brush or an air blower from optical surfaces. • To clean fingerprints off of optical surfaces, use a lens cleaning agent and lens tissue available at most photo outlets and when cleaning do not rub in circles as this may cause sleeks or scratches to occur. • Never disassemble or clean internal optical surfaces. This should be done by qualified technicians at the factory or other authorized repair facilities. • When handling glass specimen slides, use care as the edges can be sharp. Your microscope has a two year limited warranty. Please see the Celestron website for detailed information at www.celestron.com. 7
-
 1
1 -
 2
2 -
 3
3 -
 4
4 -
 5
5 -
 6
6 -
 7
7 -
 8
8 -
 9
9 -
 10
10 -
 11
11 -
 12
12 -
13
-
14
-
15
-
16
-
17
-
18
-
19
-
20
-
21
-
22
-
23
-
24
-
25
-
26
-
27
-
28
-
29
-
30
-
31
-
32
-
33
-
34
-
35
-
36
-
37
-
38
-
39
-
40
 |
 |
