Clifford Concept 400 Owners Guide - Page 8
Remotely Adjustable Digital Dual-Zone Proximity Sensor 4, User-Selectable AutoLock and AutoUnLock™
 |
View all Clifford Concept 400 manuals
Add to My Manuals
Save this manual to your list of manuals |
Page 8 highlights
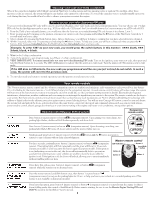
Remotely Adjustable Digital Dual-Zone Proximity Sensor 4 Your system's Digital Dual-Zone Proximity Sensor 4 detects movement inside the passenger compartment and very near your vehicle. If a thief lingers very close to your windows, a warning tone sounds; if he were to lean into the passenger compartment, the primary zone of this sensor would trigger the full alarm. This sensor uses radar waves to detect movement. These waves pass through nonmetallic materials like plastic, carpet, glass and wood. However, metal and metallic paint, plastic and even some metallic film window tinting materials will interfere with or completely block the radar waves. As such, it is not unusual that the Proximity Sensor zones may need a little readjustment when you first have the system installed. In some instances, your Clifford installer may need to try a different location for the sensor. If needed, you can adjust sensitivity of these sensor zones via your remote control as described in the following section. To prevent falsing, system sensors are bypassed when the engine is remotely started (if you have the IntelliStart 4 option). Metal above or near the Proximity Sensor will have a significant impact on operation. You should not place coins, CDs, cassettes (due to the iron oxide tape) or other metallic objects above or near where the sensor is mounted. Ask your Authorized Clifford Dealer about these optional sensors that will further enhance the security of your vehicle: n Glass Tampering Sensor: Today's thieves shatter vehicle windows with a small metal punch device that does not create any vibrations for an impact sensor to detect. The Glass Tampering Sensor detects the sound of glass breaking, and glass tampering attempts, and will trigger the alarm. n Dual-Zone OmniSensor: Uses our most advanced DSP (digital signal processing) to detect theft-related impacts and vibrations. Advanced discrimination algorithms differentiate better than any other sensor between common environmental conditions (such as a heavy truck rolling by) and genuine threats to your vehicle. n Digital Tilt/Motion Sensor: Detects less than one degree of lifting or any minute motion of the vehicle while completely ignoring all other conditions that falsely set off all other sensors. Even if you park on a hill, the Digital Tilt/Motion Sensor will accurately respond to the first hint of tampering to reliably protect your wheels and entire vehicle. Remote controlled sensor adjustments If the setting(s) of the sensor zones are either too sensitive or not sensitive enough, you may test and adjust them with the master remote control: 1. Disarm the system with the remote control. 2. Select which sensor to adjust: • Optional OmniSensor: Transmit channel 15 on the master remote (LevelShift three times, then button 3). You will hear one chirp and the LED will turn on. • Proximity Sensor: Transmit channel 16 on the master remote (LevelShift three times, then button 4). You will hear one chirp and the LED will turn on. 3. Adjustment of optional OmniSensor: To test the primary (alarm) zone, press button 4 (you will hear a 2-chirp confirmation), then firmly "thump" the top of the A-pillar (the area between the side windows near the roof) heel of your fist. If the impact is strong enough to trigger the primary zone, you will hear a siren chirp. To change sensitivity, press button 2 (you will hear a 2-chirp confirmation), then firmly thump the top of the A-pillar with the amount of force that you want set off the alarm (a single chirp will acknowledge the thump). Press button 4 to lock in the new setting. You may now press button 3 to adjust the warning zone (as noted in 3a. below), or press button 1 to fully exit the OmniSensor adjustment mode (you will hear 3 chirps). a. For the OmniSensor warning zone, press button 3 (you'll hear 1 chirp). Then use the same procedure as above, but thump less forcefully for the warning zone. When done, press button 1 to reselect the primary zone (you will hear 2 chirps), then button 1 again to fully exit OmniSensor adjustment mode (you will hear 3 chirps). 4. Adjustment of Proximity Sensor: You may test the Proximity Sensor primary zone by rapidly leaning through an open window into the passenger compartment. You will hear a siren chirp when the primary zone is triggered. This should not occur near the window, but instead when you would be in a position to touch the car stereo. To change sensitivity, press and release button 2 to increase sensitivity or button 4 to decrease sensitivity. To rapidly increase or decrease several steps, press and hold the button. For each sensitivity increase, you will hear a higher and higher pitched confirmation chirp. For each sensitivity decrease, you will hear a lower and lower pitched confirmation chirp. Two LoudChirps indicate minimum and maximum settings of the 32-step range of settings. You may now press button 3 to adjust the warning zone (as noted in 4a. below), or press button 1 to fully exit the Proximity Sensor adjustment mode (you will hear 3 chirps). a. For the Proximity Sensor warning zone, press button 3 (you'll hear 1 chirp). Then use the same procedure as above, but this time bring your hands and face to the window as a thief would to see what's inside. The sensitivity of the warning zone should be set so that it is triggered when your face and hands are within a few inches of the window, no further. When done, press button 1 to reselect the primary zone (you will hear 2 chirps), then button 1 again to fully exit Proximity Sensor adjustment mode (you will hear 3 chirps). Remote controlled zone override of the Proximity Sensor Pressing LevelShift button twice, then button 2 on the master remote control or buttons + on the companion remote or anytime while the system is armed will override the warning zone of the Proximity Sensor. This prevents the system from sounding warnings if you must park your vehicle in an area with heavy pedestrian traffic. A second press of this button combination anytime afterward while the system is still armed will override both zones of the Proximity Sensor. This comes in handy when you must temporarily leave a pet or a passenger in the vehicle. This remote zone override is visually confirmed with 4 flashes of the indicator lights. The sensor zones are automatically restored the next time you arm. User-Selectable AutoLock and AutoUnLock™ Some vehicles are incompatible with the AutoLock and AutoUnLock features. For your safety and that of your passengers, the doors automatically lock the instant you turn on the ignition. When you turn the ignition off, AutoUnLock automatically unlocks the doors. These are user-selectable features. &
-
 1
1 -
2
-
 3
3 -
 4
4 -
 5
5 -
 6
6 -
 7
7 -
 8
8 -
 9
9 -
 10
10 -
 11
11 -
 12
12
 |
 |
