Compaq 12XL300 Models XL300, XL300A, and XL300B - Maintenance & Service Gu - Page 104
Turn the Notebook upside down and remove one screw.
 |
UPC - 720591463632
View all Compaq 12XL300 manuals
Add to My Manuals
Save this manual to your list of manuals |
Page 104 highlights
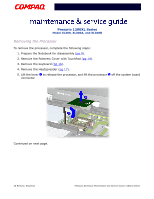
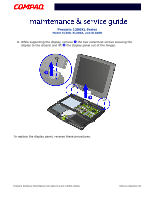
Presario 1200XL Series Model XL300, XL300A, and XL300B 10. Turn the Notebook upside down and remove one screw. 11. Turn the Notebook right side up and lift the cover off the chassis. Note: Now that the upper CPU cover is removed, you can remove the hard drive ribbon cable from the system board PRESARIO NOTEBOOK MAINTENANCE AND SERVICE GUIDE 1200XL SERIES REMOVAL SEQUENCE 31
-
 1
1 -
2
-
3
-
4
-
5
-
6
-
7
-
8
-
9
-
10
-
11
-
12
-
13
-
14
-
15
-
16
-
17
-
18
-
19
-
20
-
21
-
22
-
23
-
24
-
25
-
26
-
27
-
28
-
29
-
30
-
31
-
32
-
33
-
34
-
35
-
36
-
37
-
38
-
39
-
40
-
41
-
42
-
43
-
44
-
45
-
46
-
47
-
48
-
49
-
50
-
51
-
52
-
53
-
54
-
55
-
56
-
57
-
58
-
59
-
60
-
61
-
62
-
63
-
64
-
65
-
66
-
67
-
68
-
69
-
70
-
71
-
72
-
73
-
74
-
75
-
76
-
77
-
78
-
79
-
80
-
81
-
82
-
83
-
84
-
85
-
86
-
87
-
88
-
89
-
90
-
91
-
92
-
93
-
94
-
95
-
96
-
97
-
98
-
 99
99 -
 100
100 -
 101
101 -
 102
102 -
 103
103 -
 104
104 -
 105
105 -
 106
106 -
 107
107 -
 108
108 -
 109
109 -
110
-
111
-
112
-
113
-
114
-
115
-
116
-
117
-
118
-
119
-
120
-
121
-
122
-
123
-
124
-
125
-
126
-
127
-
128
-
129
-
130
-
131
-
132
-
133
 |
 |

P
RESARIO
N
OTEBOOK
M
AINTENANCE
AND
S
ERVICE
G
UIDE
1200XL S
ERIES
R
EMOVAL
S
EQUENCE
31
Presario 1200XL Series
Model XL300, XL300A, and XL300B
10. Turn the Notebook upside down and remove one screw.
11. Turn the Notebook right side up and lift the cover off the chassis.
Note:
Now that the upper CPU cover is removed, you can remove the hard drive ribbon
cable from the system board